





Paveway II Delivery Profiles - Buddy-Lasing - Low Altitude - Wedge (23/25)
Let's continue the Paveway II buddy-lasing series, focusing now on the low-altitude employment profiles. Up to this point, we’ve dealt with geometry and intervisibility theory, as well as medium-altitude profiles where clear line-of-sight simplified the task. At low level, the same principles still apply, but every mile of range becomes critical for intervisibility.
Among the available techniques, two main profiles can be described: the Wedge and the Pop-Up. This chapter will focus on the Wedge profile. You'll see that it's very similar to the medium altitude Wedge profile, with the added difficulty of intervisibility management for the LASER aircraft.
I. Geometry
I.1 - SHOOTER
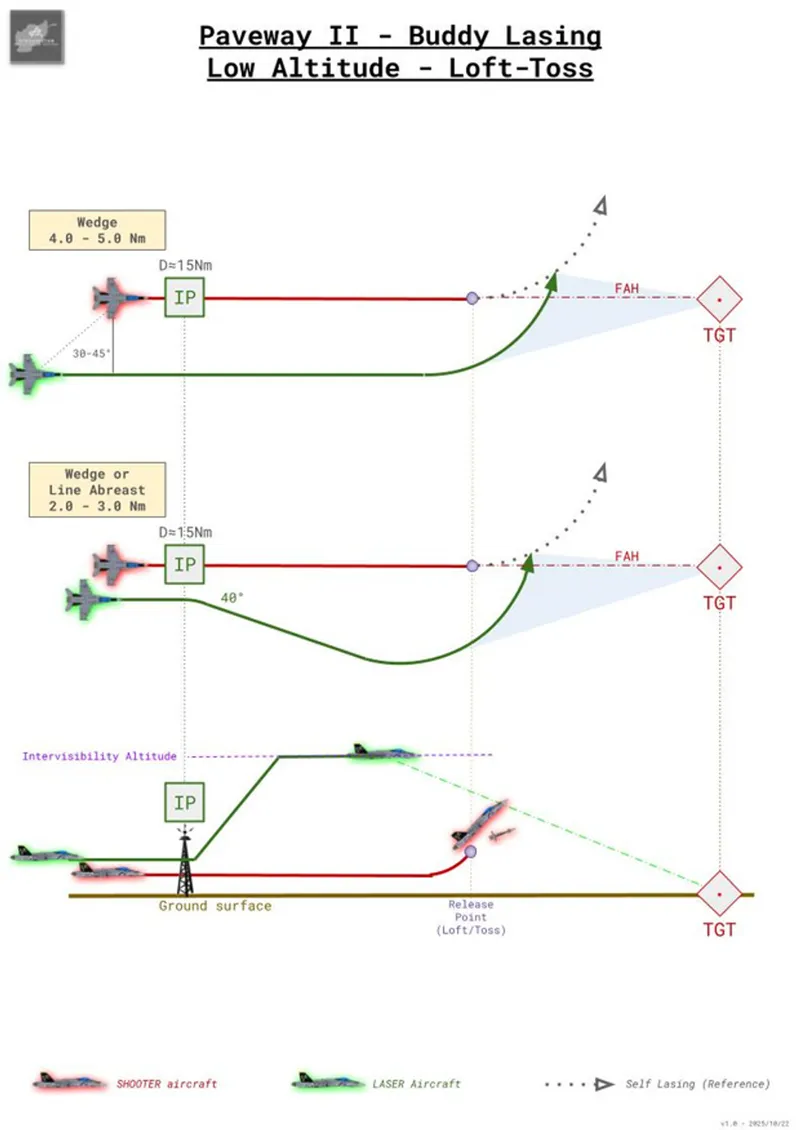
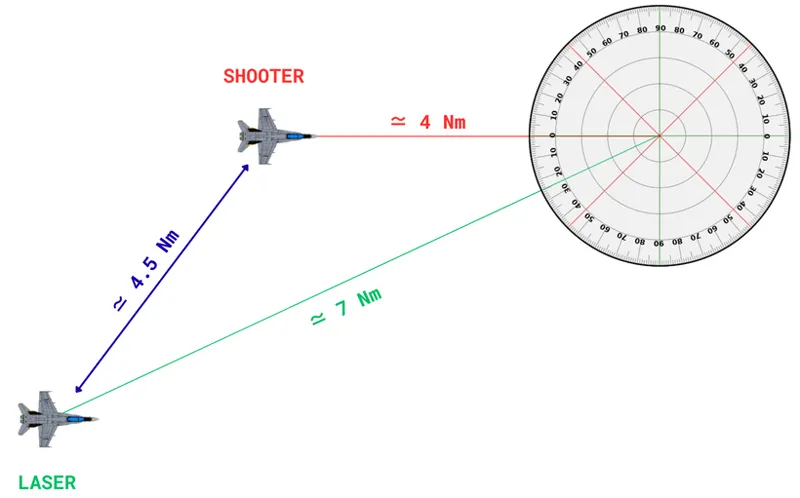
In this profile, the SHOOTER flies the standard loft/toss delivery, as described previously and uses the phraseology already published. In practice we can assume that the SHOOTER’s release occurs relatively close to the target, and a standard planning number for a low-altitude loft is around 4.0 NM from target on the final attack heading. The SHOOTER’s responsibilities are unchanged: make the preparatory calls, maintain the attack heading and timing, and execute the loft/toss as practiced. The LASER’s geometry is built around the SHOOTER release and the expected weapon time-of-flight.
I.2 - LASER
The LASER’s objective is to arrive on a predictable reference point at SHOOTER’s release, where he'll start its turn towards the target. That reference point for the LASER is approximately 7 Nm from the target at an azimuth of ~±25° off the attack heading when the SHOOTER releases. In practical terms, it means roughly 4.5 Nm from the SHOOTER and about ±130° off the SHOOTER’s nose, that is to say a wide wedge formation...
There are two practical ways to get the LASER into that position:
Option A: wide wedge, parallel ingress. Start in a classic wide wedge with the LASER 4 to 5 Nm away and fly parallel on the same inbound axis. The LASER maintains the offset until the SHOOTER releases, at which point the LASER performs the standard 30–40° AoB turn toward the SHOOTER to align the TGP LOS with the weapon flight path. This is the simplest method to fly visually and it provides good mutual support.
Option B: tighter formation then split. Start from a standard 2–3 Nm line-abreast or wedge. At 15 Nm from target, the LASER “splits” outward on a roughly 40° geometry to aim at the reference point (7 Nm / ±25°) until SHOOTER’s release, at which point the LASER performs the same standard 30–40° AoB turn toward the SHOOTER as above. This method shortens the initial transit footprint and can be useful when ingress spaces are constrained (threat, relief).
Note: you can plan a dedicated waypoint at the reference geometry (7 Nm/ ±25° from target) to simplify navigation and timing. That said, at low level crews can still establish the geometry visually from a 4 to5 Nm wedge as long as the weather is good. When the environment deteriorates, the formation can be flown nearly procedurally, and intra-flight data-link becomes then a very useful tool. Use the waypoint if you anticipate poor visibility, complex terrain, or if it just a personal preference.
In the vertical plane, the SHOOTER remains as low as possible in order to avoid detection, while the LASER climbs at the pre-planned intervisibility altitudes as discussed on the previous post.
Keep in mind that the initial climb distance (referred as D0 in the previous post) can be higher than 15 Nm, and I you plan to fly "option B", the wingman has to start its climb before the split point.
II. Tactical considerations
The wedge is fundamentally a compromise: it gives very good lasing geometry and mutual support, while keeping a reasonable stand-off. In practical low-level employment that balance is what makes the wedge attractive, but it is not a guarantee of survivability. The moment you accept the climb and the exposure required to create the intervisibility, you have exchanged concealment for the ability to achieve the desired seeker aspect.
II.1 - Advantages
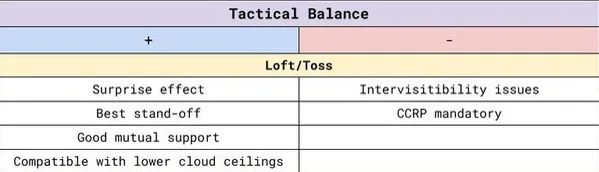
The wedge delivers excellent final-aspect geometry for the weapon seeker during TOF while remaining simple to fly visually. It preserves a useful level of mutual support: the shooter and designator are close enough to maintain visual contact and assist each other against WVR threats. At low level it also integrates well with loft/toss trajectories for deconfliction: the LASER remains far from bombs and will end up nearly in trail behind the SHOOTER, making the formation quick and easy to reform visually after impact.
This profile is also the most compatible with low cloud ceilings, provided, of course, that intervisibility can be achieved at that ceiling. Remember that the weapon seeker needs a minimum duration of lasing to get a reliable terminal track: the rule is eight seconds of continuous illumination to optimise seeker tracking. In many cases that corresponds roughly to a minimum cloud base on the order of ≈4,000–5,000 ft AGL for typical loft/toss employment (verify the exact figure with your ballistic tool). Below that ceiling the risk of a miss from insufficient lasing time rises rapidly.
II.2 - Drawbacks
The first and most important limitation of the low-level wedge is the intervisibility problem we covered in depth earlier. In practice this means the geometry cannot be improvised: every potential attack axis must be planned on the ground. That planning burden reduces real-time flexibility: in anything but very flat, obstacle-free terrain (or over water, as in the boat attack example) an unplanned, last-minute attack is simply unreasonable in a high-threat environment.
The second major drawback concerns the shooter’s delivery method. The low-level wedge assumes a CCRP/coordinate-based release from the shooter, without an opportunity to update coordinates via TGP before release. It means that 1) target location error (TLE) must be small (Category III or lower), and 2) that the shooter’s navigation and position solution must be reliable (low INS drift). A pure manual release (as with the Mirage F1 for example) is a poor fit for this profile unless the aircrew is elite under those constraints, which in most realistic scenarios is rare. If you cannot guarantee TLE and SHOOTER's navigation precision, select a different profile like the pop-up.
II.3 - SAM Threat Management
During this attack profile, the LASER will loose its concealment early, making it a possible target to terminal defense systems. In that context, more than ever, a continuous "spike inventory" and a clear spike-react plan will be very beneficial.
For the "spike invetory", keep track of who is DIRT or MUD, and be ready to immediately react at SINGER: a quick, accurate spike picture shared in the flight lets every aircrew know whether the exposure they accepted is still tolerable.
In anticipation, you must plan and brief a concise, mutually understood threat-react plan. The plan must identify triggers, assign immediate actions for each aircraft, and remove ambiguity about who moves where and when. The plan should be both simple and unambiguous: each participant must know whether they are expected to (for example) increase lateral offset, turn away to an assigned heading, descent to a pre-brief altitude, or cut the run and egress on the shortest route...
Keep in mind that in the profile, the 25° offset between the SHOOTER and the LASER is not sufficient to evade most multi-target capable systems. If against "single-digit SAMs" (SA-2, SA-3, SA-6, SA-8) the spike inventory tells you who will be targeted first, against more modern threats missiles can be launched at both aircraft simultaneously (if a SA-15 (Tor) can engage several targets within 30°, a SA-11/18 (Buk-M1/M2) can engage them a 120° sector).
A final practical point on geometry: the nominal 25° offset described here can complicate or defeat acquisition by older, single-target or short-sector SAM systems (“single-digit” legacy systems). However, it is not a reliable defense against more modern, multi-target systems. Contemporary SAM systems can track and engage across much wider sectors and handle several tracks simultaneously (eg: 30° for the SA-15 (Tor) and 120+ for the Sa-11/17 (Buk-M1/M2)). In those cases you cannot rely on angular offset alone and procedural mitigation (shorter exposure, ECM use, etc...) must be anticipated.
Conclusion:
The low-level wedge is the profile that best balances concealment and seeker aspect: it enables the boldest, most effective attacks against well-defended targets when it is planned and flown correctly. That capability comes at a cost: the wedge requires significantly more pre-mission analysis and it reduces real-time flexibility. To be efficient you must train the sequence until it becomes routine, especially for the LASER pilot who must be comfortable judging position visually.
Modern systems make the wedge easier to execute: intra-flight datalinks, HMCS/helmet cues, and precise, stable targeting pods substantially reduce the human workload. That is why contemporary platforms (Hornet, Viper, etc.) tend to fly these profiles more readily than older airframes with less integrated avionics ( Phantom-II). Even so, with disciplined procedures and sufficient practice any well-trained crew can run the wedge with a high degree of confidence.
Next we will study the last profile: the pop-up, that preserves low-level transit for longer but trades that concealment for a more exposed phase close to target.




