





Paveway II Delivery Profiles - Buddy-Lasing - Low Altitude - Pop-up (24/25)
We are nearly reaching the end: the pop-up is the last profile in the buddy-lasing series! We will follow the same structure used for the wedge: we will describe the geometry and the formation setup, then we will discuss tactical considerations and threat management specific to the pop-up.
I. Geometry
I.1 - SHOOTER
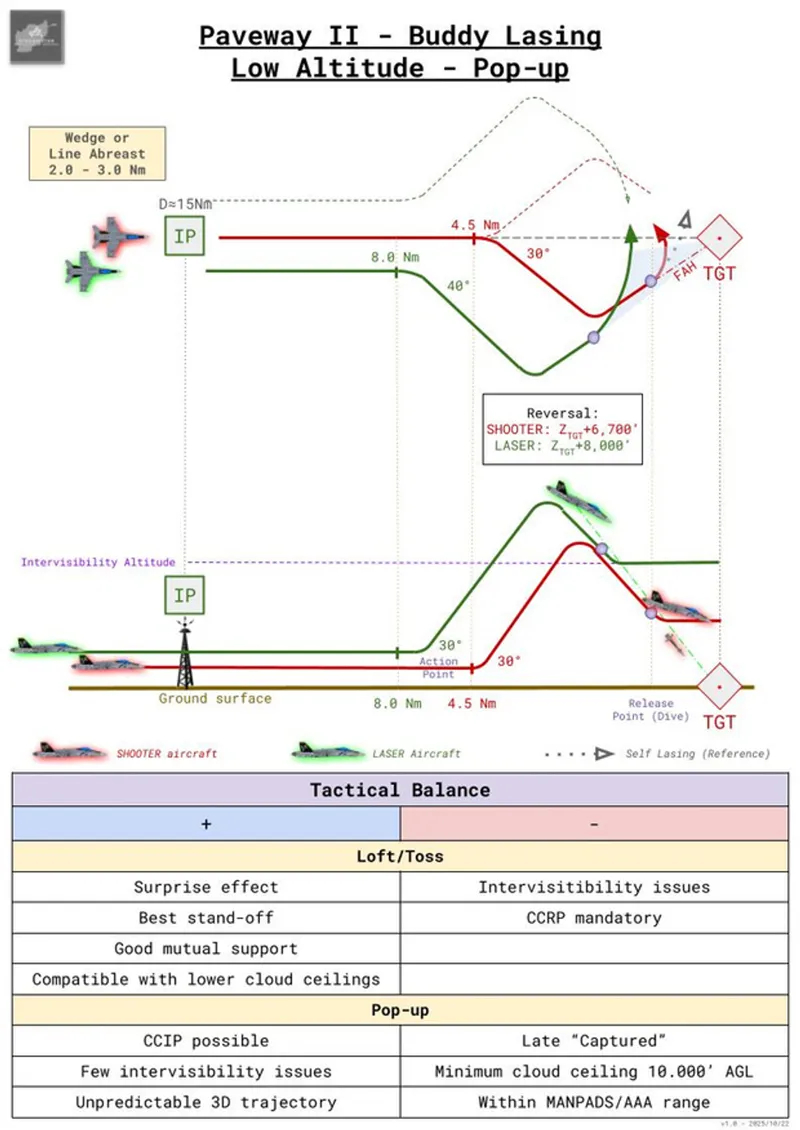
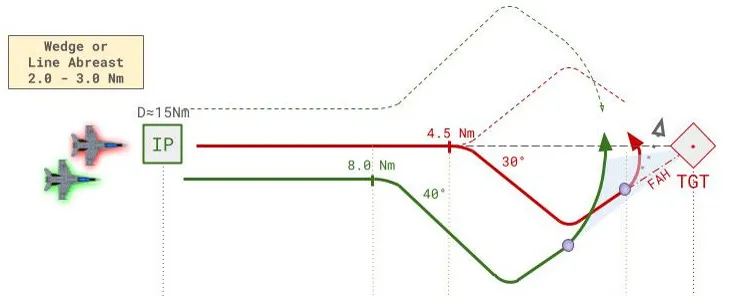
The shooter flies a conventional pop-up. One profile that works perfectly well for Paveway II with fighters like the Hornet or the Viper is to fly directly towards target, with an action point at 4.5 Nm: open ±30° of the final attack heading and take a +30° pitch. Reversal happens at 6,700 ft above target (AGL), apex around 7,5000 ft, with an inbound dive of ≈25° and a desired release speed of ≈450 kt IAS. Use a soft deck = 4,000 ft AGL and a hard deck = 3,000 ft AGL.
Note that with such low soft deck values, the fuze's arming delay must be set to 6 seconds, in order to avoid a DUD. A very strong escape maneuver is mandatory to escape frag envelope quickly. Only once clearly off target (at least 60°) can you dive back to very low level.
Use the standard phraseology previously briefed: make the "30 seconds" call before the action point and the "10 seconds" call prior to reversal. The "LASER on" call will be commanded at the apex so the shooter receives a positive confirmation of designation before weapon release.
Note that the pop-up side may be chosen on either side of the axis and does not have to match the LASER side, provided that the egress side is the same for both aircraft so the flight quickly regains flight cohesion after bomb impact.
II.2 - LASER
The LASER will begin from a standard line-abreast or wedge at around 2.5 Nm.
The "action" for the LASER will occur slightly earlier than for the SHOOTER. You can place the action point at 8.0 Nm. Without order, the LASER makes a 40° turn away from the inbound axis followed by a +30° climb to reach the pre-planned intervisibility altitude or the reversal altitude. A practical planning reversal altitude is ≈8,000 ft AGL (apex around 10,000 ft), which gives a 25° LOS in the dive geometry and is sufficient for most low-altitude pop-up presentations.
During the 30° climb, the LASER can focus on target search. If intervisibility is not a factor, the climb can be stopped as soon as the target is identified and tracked. It's particularly interesting during an unplanned attack: climb and wait until the target become visible: it will happen at some point!
At 8,000 ft AGL, or when the SHOOTER calls "10 seconds", the LASER must reverse towards target in order to keep flight cohesion.
Note: just as for the self-lasing pop-up profile, the target will probably be masked shortly during the reversal maneuver, and inertial tracking mode MUST be selected in order to avoid returning into a search phase.
At SHOOTER’s release (or at the pre-planned exit intervisibility altitude if higher), the LASER will level off and start a continuous 30° to 40° AoB turn. If the LOS and workload permit (day, weather, terrain) a slow, controlled descent of around -5° is acceptable, but don't try to keep the 25° dive while focusing on the TGP.
The weapon's TOF will be short: impact should occur around 10" after release. Immediately after impact, the LASER should look around 1 / 11 o'clock: you'll see the SHOOTER roughly 2 Nm in front of you. A single simultaneous turn and you are back combat formation!
II. Tactical Considerations
The pop-up is a trade-off: you buy extended masking and surprise for a short and clear exposure at the end.
II.1 - Advantages
The pop-up profile compensates the two drawbacks of the loft/toss profile.
First, a CCIP delivery can be planned, therefore having very precise coordinates is not mandatory anymore, provided you have enough time to find the target during the climb. Typically, a large and unmistakable target, or a smaller target in the open can be easily found in the TGP if the coordinates are a couple of hundred meters off. For example, a coordinate obtained via an EW sensor, or by manually plotting a map for the JTAC, can be attacked with a pop-up profile, where the loft/toss would be a NO GO.
Second, with the 30° climb and the high apex, the intervisibility is nearly never a factor: just like for a medium altitude level or dive bombing, you are (nearly) sure that you'll see the target soon enough. As a consequence, the intervisibility study phase made on the ground can be skipped without risks.
A last advantage is that both aircraft will stay longer closer to the ground, denying early detection to SAM sites close to the target area. If you add the fact that the pop-up is a dynamic 3D maneuver that can delay radar acquisition, you end up with the profile that maximizes surprise effect and gives you a good chance to do the full attack before the enemy operators have time to react (but keep in mind that this surprise effect works only once: no reattack)!
Overall, we can say quite confidently that this profile can be decided and executed in flight with reasonable chances of success, contrarily to the loft/toss profile.
II.2 - Drawbacks
The main drawback is that "CAPTURED" is obtained by the LASER during the climb phase only, that is to say relatively late. If he was able to assess a general target location during the very low level ingress, he was probably not able to VID the target itself until the action phase. If the coordinates are way off, or if the target is difficult to identify, the climb phase might be too short to get a good track. In that case, the "10 seconds" call should trigger an "Abort, abort, abort" answer, and both aircraft should quickly get off target.
We can also note that the necessary cloud ceiling can be as high as 10,000 ft AGL for a full profile: it's important to have a good knowledge of the cloud base in order to avoid getting IMC during the climb, while focused on the TGP...
Lastly, the pop-up profile will bring both SHOOTER and LASER within AAA and MANPADs range during the dive towards target: pre-emptive chaff and flares is advised, all the more than the LASER is clearly an easy target during the 10" to 15" of the lasing phase.
Conclusion
The pop-up is the final tool in the low-altitude buddy-lasing toolbox: it is a powerful and flexible option that can turn marginal targeting information into a successful strike. That advantage comes with clear costs: it compresses the search/capture window and places both aircraft briefly inside MANPADS/AAA engagement ranges.
I tend to think that the pop-up seems easier to fly, but in reality the workload for the LASER is increased compared to the loft/toss profile: it will require the same amount of training to master it in all circumstances, and not only when you have an easy target with perfect coordinates. In training scenarios, don't hesitate to place the target's coordinates slightly off its actual position, in order to force you to work the search phase during the climb.
The very last post of the series will bring you all the low-level buddy lasing kneeboard pages. Once that's done, we can say without hesitation that Paveway II delivery profiles will hold no more secrets for you!
Comments (1)
Of course , you kept the best for the end! 😁 Great stuff, I find the pop up attack profile is the most exciting to execute. Will the Shilka or Gepard have time to acquire me? Will there be an unplanned Tor in the vicinity? Will I recover from my dive too late and meet my maker early? 🥳