


Closet Conundrums // Update from reno-ville
So, only two rooms in this house had carpet when I signed in November. One back bedroom had commercial-ish low pile dark gray carpet, and the back "maid's" staircase had a burgundy runner stappled all down the length. I knew that before I let my cats out of their/and/my bedroom(s) (where they have been chilling since we got here with them) I wanted these carpets gone. Cats claw at carpet, which--who cares if I wanted it gone yes, but they also rub around and lay on carpet, and then snuggle with me, and I don't want old carpet dust on me, or my cats either for that matter...
So before I could free my cats, before I could use those two spaces, I needed to get the carpet out of them. Luckily both carpets came out very easily, but unfortunately, unlike on TV, there wasn't fancy hardwood floors hiding underneath. The subfloors may have been replaced sometime in the 1930's/40's is my guess, as the smaller linen closet room (it's a huge linen closet really, but will be the /smaller/ of my two room closet complex 😅✨) had some hasty 40's linoleum tossed on the floors and the same wood underneath is bare. I think there were two "updates" to this house, one in the late 30's/40's and one in the mid 1970's. This is what my archaeological finds suggest so far at least!
The maroon carpet on the back stairs left no trace, and the steps are fine and ready to use, but the gray carpeted back bedroom had dry rotted foam padding that had disintegrated into green dust. Underneath, the unfinished subfloor was a bit /too/ sad to leave as is.
The slightly splintery subfloor needed to be fixed/covered before I could move all of my boxes of clothes/accessories and clothing racks in. Luckily the new carpet is being installed tomorrow! But the whole shebang has set me back about a week of unpacking any significant amount, and means my kitties are still stuck in the two bedrooms for now while I get the rest of the house truly safe for them.
Now if I was going to be putting new carpet in the back closet rooms, I might as well get some other stuff done in those too, because who wants to unpack, only to then have to pack it all up again to paint soon after? No one right? No.
Well I couldn't just paint those back rooms, becuase they both had 1970's wallpaper on the walls. The paper in the back bedroom (aka closet) peeled off super easy, though I still have to scrub the leftover adhesive off the plaster walls. The wallpaper in the linen closet also peeled off super easy...except there was another wallpaper underneath it--
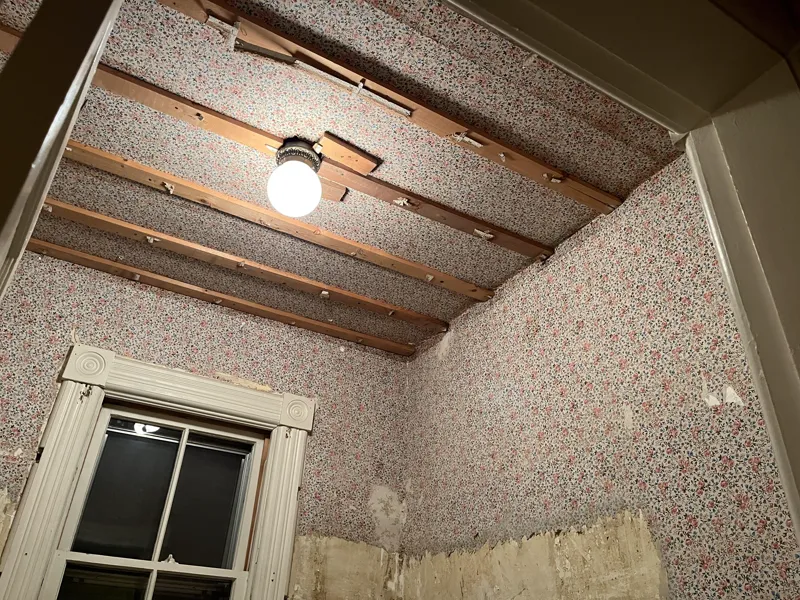
And the liberty-ish floral 30's/40's paper was older, all block printed and all paper, not vinyl. So I had to soak and then scrape it off instead. This took me all week, becuase section by section my arms got fricken tired!! I soaked the paper with hot water via a sponge, several times, waited for the water to soak in and activate the ancient adhesive, then used a 5 inch blade scrapper thingy to scrape it from the plaster walls.
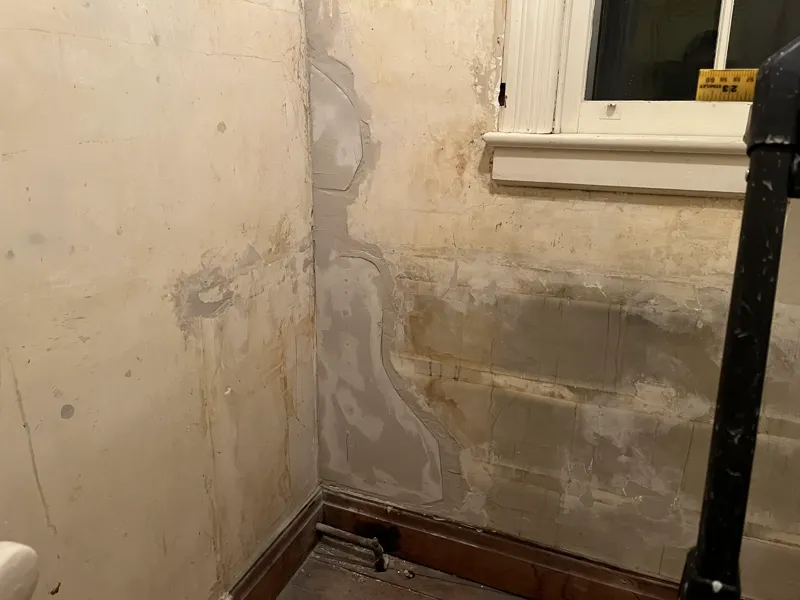
Well are they all plaster? Let's say underneath I found /mostly/ plaster, some drywall, and some mystery patches from decades ago...so who they heck knows! Then the most water damaged of corner (roof is fine now, all is dry, so this was old damage) was super lifted from the lathe so I smashed out anything loose.
This was also the only room (if a linen closet counts as a room, it's big enough I say) in the house with a drop ceiling. One knock into the cardboard-ish tiles revealed it was only dropped like 3 inches...which was weird. Surely they must have been covering up some huge hole or something right?! Luckily no, but there is still a batten of old 1 by 2 wood nailed into the ceiling over the floral wallpaper. Perhaps this was their solution to looser plaster? No idea pals. I'm going to try and drywall a ceiling, so pray to your deity of choice for me on that future endeavor.
Last night I finally finished scrubbing the paper and (most of the) leftover adhesive from the walls. Tonight I got the drywall patched into the large section of plaster loss, and got the first coat of mud up to fill in the disaster that are these walls. Thank goodness this is just a little closet no one will really see! I'm fixing it myself, and you know why? Because these walls are already /so/ bumpy and messed up, that I literally could not make them into more of a mess than they already are 🤣 Even my beginner drywall work is going to be smoother than how they started, and if that ain't saying something...
So I need to finish editing my video for the channel tonight, but I also have been scrubbing, scraping, and repairing walls all day, so we'll just see if I can get the video done in time, oof.
Thank you again for your patience. This little linen closet (it's 6ft by 6ft actually) will be my shoe and hat closet once I'm done, and I plan to paint it "dark royal blue" from Benjamin Moore, so I'll show you all first as soon as I'm done!
Comments (35)
So exciting! I love it when you say, "Oof!" The closet is a great place to practice caring for your new home! 😀
I don't know about anyone else, but I'm dying to know what is going on with that doorknob. 🤣
You're doing such a fantastic job! Don't worry about us, keeping us updated is enough for me anyway. I know you have so much to do right now. You don't need additional stress on you!
Great job, Bianca. Lots of good suggestions here from your patrons. I’m wondering if you might post “before” pictures and plans for the next task. You might get some great hive knowledge to make the next task easier.
You are doing freaking amazing so far!! And such great advice in these comments!!! I second the clothing steamer method on wallpaper and to use a big box fan to dry it afterwards. I suggest one with high velocity speeds and heavy duty like out of heavy plastic that you can take apart to wipe off the blades easily. And definitely get some kind of indoor scaffolding or step system, they can usually be broken down or folded up afterwards. I can’t recommend them enough and your back will be forever grateful. And a “tin” ceiling would look amazing and you can paint them too. Also they make lightweight plaster ceiling medallions that always class up the space and look so damn pretty too! Also, caulk is the real secret to making a paint job look amazing! And stainable wood filler if you’re keeping anything wood. And the secret to drywall is feathering out the mud, keep it thicker where it needs to be and use a scraper to pull out and get as thin as possible. It saves on sanding and leaves a gorgeous finish. I can’t wait to hear about more adventures and any all pics of kitties would be quite welcome!!
Talent galore! Not only are you a gifted designer, pattern drafter and sewist, you are also now a home renovator. I'm super jealous that you have a closet just for your shoes and hats!
Such ‘odd’ choices those (previous) residents made … or so it seems to us NOW. It’s a lot of work, but sometimes the information you can glean is truly amazing! And, frankly, whether your drywall job is good, bad, or indifferent … chalk it up to a learning experience and the NEXT one will be even better!! Looking forward to the updates and the first full-on kitty zoomie shots!! “Wait! There’s more than just these two rooms?!?!?”
Oh, the carpet dust! Those foam pads just crumble. But wallpaper archeology could turn out really interesting. ShannonMakes is renovating an old house in MUCH worse shape; I don't know if you watch her but some of her adventures could be interesting/handy. Get ready for some body changes with all this work!
yeah, sounds like a good starting project. Lots of success!
We had very very similar adventures in our 1905 bungalow, but fortunately for us we had 2 months of overlap with our apartment lease and were able to lay a floating wood floor ourselves over the subfloor where they'd installed horrendous low pile gray carpet in the 90s, BEFORE moving our 3 cats into the house. It's been a year and a half and we're finally installing the baseboard trim this week!
I'm so impressed with how much you're doing yourself. We've tackled some repairs in our history of houses, but we keep the drywall to a minimum. I wish you good luck with all the tasks on your list!
Good morning Bianca. Ah the archeology of an old house!!! Knowing you have no braincells left at this moment, I'll provide the following, brief, lessons learned for 100 year old wallpaper. 1) Zinsser 02976 Zinsser, PaperTiger 3-Head Wallpaper Removal Scoring Tool 2) Use HOT water with your adhesive remover in a spray bottle, 3) Don't let it soak TOO long or it begins to soften the skim coat over the plaster and it gouges when you scrape. The lathe over the ceiling paper was likely to be able to hang the ceiling light easily and to avoid trying to tackle the ceiling paper (easier to drop ceiling than to remove/paint. Hang in there, you are making AMAZING progress!
Thanks for the update! Good luck with the ceiling fix!
The Secret of the Hidden Wallpaper: a Nancy Drew Mystery...ooops I mean-- A Closet Historian Mystery. P.S. I too have experienced the mountain of green dust from an old carpet runner foam padding.
Closet historian, how apt. You do have some mad skills though.
This work is your soul food…it’s hard but the fulfilment is astronomical…enjoy everything my friend…🏠🏠🏠🐈🐈🐈🦇🦇🦇🩶🩶🩶
You are being an *actual* Closet Historian!
Love your can-do attitude. Sounds like you and your house are perfect for each other...you see everything she can be underneath the layers of grime and unsympathetic modifications, and she will become beautiful again with your vision, passion and determination...and skills. Seems like tools will be on every birthday and Christmas list for a while.
Hi, I'm so impressed that you are doing all this work yourself. I wouldn't know where to begin, not to mention how to do the thing. I'm slightly impressed by the former owners that had the tenacity to wallpaper the ceiling. That takes determination, when you can paint it white and be done with it. The bafflement of the human brains ingenuity never ceases. If the corner of the floor is representable of the floors you encounter, Our appartement (we live in either a condo or a co-op, I never understood which one would best represent our structure in American) that we bought 1996, was built in 1942, and restored in 1985, where the then owner, please pardon the expression, pissed off, the builders, so she never got the original parquet floor put back in (cost prohibitive to do so now) so we had subfloors in every room except two. They have been sanded lacquered and sealed. We've had a lot of compliments on our flooring, and we coexist peacefully with them. At some imd in the future we'll put in some engineered parquet floors in the rooms we haven't done so yet, but we haven't decided what to do with those rooms yet. We bought the place thinking that we'd have children. They never appeared, so we're waiting for a brain wave to enlighten us as to what to do with them. On another note; Rhonda from down under, I hope you are doing well, "down" there in the summer with the kangaroos. I haven't seen you for a while, and considering what was going on last time we "spoke" I hope your safely out on the other end. Ann from the top end of Europe. I Remain Yours etc, Ann
P.s, for doing large areas of dry wall on your own, these are your pal https://www.amazon.co.uk/Plasterboard-Height-Adjustable-Builders-115-290Mcm-Extendable/dp/B09M74KMTC
Ah, this brings back memories. My house had vinyl wallpaper everywhere, which was fine because when you peel away the vinyl it leaves the paper layer, which is like lining paper, I just painted over it.. As you said, with an old house which already has uneven and bumpy walls, if your fixes aren't 'perfect', they're 'in keeping' 😉 You're doing great!
Ooh, so exciting! What about some faux tin ceiling tiles in there? Easier than mounting drywall. Looks period too. Can glue them on the existing wood frame. https://www.homedepot.com/p/Global-Specialty-Products-Dimensions-2-ft-x-4-ft-Glue-Up-Tin-Ceiling-Tile-in-Metallic-Nickel-309-52/205298489
When my parents were renovating they found multiple layers of wallpaper under the thin timber panelling/veneer. It was like a time capsule of all the years. I think it was about 4 layers and included a lurid orange and green swirl pattern
You are doing a wonderful job a lot of hard work, but very rewarding. I am enjoying seeing your improvements. Thanks for taking us on this journey.
You have been doing a LOT, whew!
Oof, that looks like so much work. Although there is the fun archaeology aspect to going through layers of wallpaper 😆❤️
Removing wallpaper is the worst. Most of the wallpaper in my house came off pretty easily. However the previous owners PAINTED OVER the wallpaper on a half wall in the living room and it took about 30 hours to remove it all and patch the wall, so I have some tips! -A portable clothing steamer works wonders for soaking the paper and removing the glue. -Make sure you have proper ventilation so mold doesn’t start to grow if the wall doesn’t try fast enough. -Sanding the patches by hand helps smooth out the wall. -PPE, especially ventilators are important. Dust gets everywhere. Looking forward to hearing more about your home improvement adventures!
Oh the excitement of restoring and renovating a old home. The questions! The surprises! The baffling choices the past owners made! You solve one problem and then that cause three more to pop up in its place. I hope the next rooms go more smoothly!
Lest I forget!! There is a product that I want to call green dust. I'm pretty sure you can get it at Uline.com. It's a green powder that you sprinkle LIBERALLY before sweeping up construction-y mess and it keeps the dust from getting stirred up into the air. The Construction & Demolition guys used to use it when I worked in museum exhibitions where we had to be very careful of dust. You may find it very helpful.
The owners of Uline are political megadonors who oppose rights for the LGBT+ community, so Bianca would probably want to buy that product somewhere else.
I am loving the reno so far and hoping you will share the transformations on the channel! Be careful of old flooring that it’s not asbestos tiles which are usually but not always 9x9”
Yay! Drywall is a bloody art form, so good on you for trying it!
Oooh, that floral wallpaper is so pretty. Are you collecting samples at all? It would be so cool to do something with them... I hope you share some decorating/room makeover videos to the channel. I know you are going to make all the rooms exquisitely spooky and gorgeous.
haha, I'm seeing my future when someday I finally get to buy my first home. Lot's of renovations, and lots of creative problem solving!
I am absolutely beaming with your achievements. I am so proud of you, Bianca dear! Please be extra safe with all your repairs and improvements.