
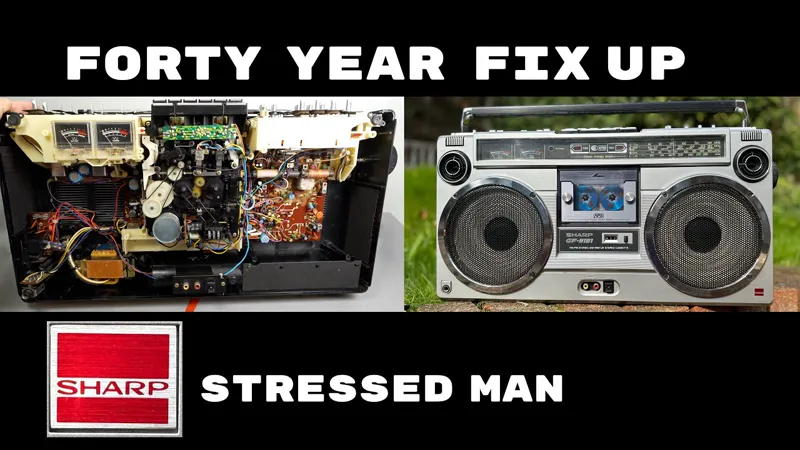
A classic mistake?
I’ve been spending a lot of time trying to fix up an old Sharp GF-9191 portable stereo radio cassette - here’s the video.
This took quite a while to record and almost as long to edit. Just out of interest I pulled all the footage I’d shot into one timeline and it ran over six hours long. The video still has a long running time but compared to how things started out, this version is positively a blipvert.
Since repairs are rarely a thrilling roller coaster ride, I’ve decided to focus on the process with this one. I’m hoping it’s like one of those three hour movies where nothing significant really happens but as it doesn’t offend, you just end up going along with it.
I trust your week is going well so far. If you’re in the UK I apologise for the recent weather. I bought an outdoor pizza oven the other week and ever since that arrived it’s not stopped raining.
Anyway have a good one and take care.
UPDATE
Taken another pass at the edit to clear up some confusing sections.
The new version is the one linked to and embedded above.
Comments (67)
Wow, I just found a Loewe TC 424 (according to radiomuseum.org from 1979 or 1980) in almost pristine condition, at the trash! Completely the cliché looks, like your Sharp, even the VU-meters are there! Only already the fun of repairing it will probably have made it worth taking it home :-D
Great video Mat. These are my favorites of the ones you do. I did what you are doing back in the late 70's when things were, as you say, at least able to be worked on. I remember taking apart and mending a great big Akai reel to reel machine...Keep up the good work!
Great video, Mat. I've rebuilt and recalibrated dozens of cassette decks for myself and others over the years (mostly high end stuff) and you did quite well considering what you had to work with. The thing with modern replacement rubber parts is that they are not always made to the appropriate spec to serve in a tape deck. Most square belts don't matter so much, but capstan belts were made to a very high standard back in the day and I have found that modern replacements that happen to fit are not necessarily intended as capstan belts. These often introduce flutter. However that said, I feel pretty confident that you issue here is that makeshift idler tire. Automotive rubber tubing is not make to any real standard. The outside just has to be approximately round and the hole just has to be more or less in the center. All that said, I don't know what I would have done differently. Maybe try using silicone tubing, which tends to be a bit more precise and make very sure the ends are not running on the bushings at either end. Anyway, well done regardless!
Fabulous video - well done indeed, that was quite an odyssey for you. Managing to edit out the inevitable expletives is almost as impressive - or have you taught yourself not to swear when the mic’s on?
Matt, I’m going to the ‘UK Hi-Fi Show Live’ at Ascot Racecourse next Saturday (21st) if you was up for it. First time I’ve ever been to anything like that, and going on my own. Lee
Thats a kind offer, unfortunately I’ll have to decline it though as I’m not in the area. Although even when things like this have been more local I’ve stayed away. The last HiFi show I went to was possibly 15 years ago in Manchester and I was in and out in around half an hour. They tend to focus on the high end gear, which I can understand as the regular consumer end of the market has vanished…but that means there’s nothing left to appeal to me. I hope its better than the shows I remember and I also hope you enjoy it, just remember to say no to the gold plated optical leads.
God I love old audio tech! Always looks so complicated, but if you just walk away from it for a bit, make a brew and then come back to it with a few diagrams… just get down and dirty… boom, sorted!! Cheers Matt.
One thing I noticed when you were putting this thing back together - one of the small white pulleys/wheels seems to be cracked (look at around 29:48 mark). I have a feeling that it will only get worse over time. Might want to put a bit of glue there, to at least slow down any further cracking and prevent it from fully disintegrating.
Hi Mat. I've recently purchased a Sony D82, tou know the one , it only plays 8cm discs. Thing is the seller has sent me a load of blank 8cm CDRWs. I didn't even know you could ever have purchased these size discs. There can't be many of them about, so I wondered if you would like me to give you a couple for any up and coming future project you may undertake. Keep up the great xontent content. Andrew.
That’s very kind of you to offer, however I’ve already got a box of these (somewhere) in anticipation of a future video.
Excellent video, loved every minute, thanks Mat.
There's a technique for repairing broken plastic that involves superglue and baking soda. Have you ever tried it? Whenever I'm faced with a problem like that broken plastic screw post (where the repaired plastic will be under stress and consequently just sticking the two halves back together won't last), I glue the part back together and then create a permanent "sleeve" of new plastic around the break using that technique. The result is like a broken arm in a cast. If I'm feeling fancy, I'll shape the hardened plastic with a file to smooth it out. You can use the same technique to build up a new plastic feature or profile if something's broken and completely missing. I most recently used that trick when one of the little flip-down feet on my Really Nice Mechanical Keyboard broke in two. It looks a little lumpier now but it's as strong as new. When you brought out the Sugru I thought about this technique. Unlike the putty, it doesn't deteriorate over time.
I have tried baking soda and superglue on something, I forget what and I don’t recall how well it went. I suspect not brilliantly given the memory lapse. For a job like this though, I thought it might be asking a bit much to recreate inch long missing pieces…but it might well have worked. If this situation arises again, I’ll try to remember to give it a go.
The hole next to the mic input is in case you're using a microphone with a permanently attached remote plug. Even though the recorder doesn't make use of the remote plug, at least it allows you to use such a microphone, whereas if it only had the mic input, you wouldn't be able to plug it in.
Great show, Mat. Very educational - it taught me that I would not have the patience to be arsed fixing something as fiddly as that. Good work.
Nicely done, congratulations! My own experiences from earlier days is that thing usually screwing up everything for me was the plastics breaking... In my childhood, I usually saw such devices where only the radio was still working. Maybe with some of the better techniques I know now (yes, by watching YouTube as well :-P) I might be able to repair such a devices. BTW: did you figure out what the problem was with the double speed? Maybe the huge W&F is due to that rubber tube not being installed perfectly... I never saw such a thing, usually the idler would just go on the metal...
I think the mech hadn’t engaged properly and found itself between two positions. As for the W&F I’m leaving it as it is, as you point out, this type of mech isn’t ever going to be anything more than mediocre.
I was really impressed by the quality of the editing. Told a thorough story, seamlessly jumping from one stage to another. Must have taken forever to achieve such a polished result. Brilliant!
Nicely done update. Have a pint 🍺 and relax.
Good job for repairing it. I do not mind the longer video, I really enjoyed it. That last battery though... :)
This 48 minute video flew by quickly! This unit would match nicely with your Technics SL-6. Maybe a quick clip of the front phonos being used with this turntable will prompt viewers to watch those compact turntable videos too?
It’s a good idea, unfortunately I won’t be able to return to this one at the moment, I’m a bit under the weather now…I think it’s all that editing. I need a couple of days to recover.
Nice video. Not sure I'd bother with the tape mech anymore. This is definately a nice object to look at and at least it plays. Actually it might have been sitting so long that just letting it play thru some tapes might rejuvenite it. Easy to do and maybe to worth a shot.
When the title says a classic mistake I knew the belt needed replacing it's a nice looking cassette boombox I wonder if the Capacitors need replacing around the cassette mech
Mat I have a niggling off-topic question that I posted in the community area - do you remember an Oddcast wherein you briefly showed a light device that flashed red/blue police car colors and you made a fun commentary about it? I could swear there was something like that but I can't find it. 🤔
Yes I do remember - I think it was one of my LED panels - I’ll see if I can find which one. As you can imagine it’s not a feature I’ve used since.
Well, at least I know who's to blame for the weather! (And thanks for another great video).
Very enjoyable video again Mat and I personally enjoy the longer videos. I particularly enjoyed the “Symphony of Bee’s Knee’s” part way through the video!!!!
That’s a great 4-band radio, and the recording from the stereo mics sounded excellent.
Thanks, great video. I have my old Philips d8814 in the bathroom, just for radio. Friends like to see it! I wouldn't dare to repair the tape mech, I lack Mat's patience. Ultimate Sugru repair, congrats.
Very much enjoyed watching this video! Thank you! Two things I missed, I think it was not shown in video... 1. What was the reason it played doublespeed and muffled? How did you solve it? 2. At 40:03 it plays cassette without front panel, but earlier you said it can't do it without front panel. How did you manage to make it do it? )
Taking some logical leaps based on context of the video, I thought: 1. It fixed itself; it got itself into gear. Sometimes it happens. 2. He initially thought he couldn't operate the tape without the door; later he discovered that he could. Editing is tough - deciding what to keep in and leave out without muddling can be difficult. It's like running against the wind ...
I feel like that could be a new T-shirt motto .. Techmoan - All the Wow, All the Flutter!
I'd def buy one!
I love these long in-depth videos about cassette tech. It's never something that's intrigued me enough to take one apart, but man is it interesting watching and listening to you do it. Something I really appreciate that I didn't notice how much I liked until recently is you don't do any noise removal on your mic and you don't have background music. (except the puppets and the gags, I know and love those too!) It really makes us feel like we're there, struggling with you, having internal theories, and feeling so satisfied when it's time to button back up, no matter how "successful" the repair was. Keep it up!
There’s a lot of breathing that I wish were quieter - especially when it gets wheezy.
Wonderful video, thoroughly enjoyable (and with audible cameo from The Bee's Knees at 18:16 🐱)
I never head that in the edit - well spotted.
A great video Mat You go through repair and you make it make sense and i never got bored once. A very good repair Mat. That was not easy at all well done. I have a hitachi trk-8290 Radio works well. But cassette does not work. This video gives me hope to repair mine.
Wobbly playback or not, I found the outcome of your repair work (and the process of getting there) very satisfying to watch. With a lot of patience you turned a broken, rattly and grimy device into a fine piece of 80s history that not only looks the part but is also usable again. Nice work!
I could never picture myself attempting to do something like this. There are so many potential pitfalls that could ruin the process. You should feel extremely satisfied that you got it to work. I guess that's what makes it worth doing. Great video, Matt.
While even unsuccessful repair videos are enjoyable to watch, it's always nicer to watch one with a happy ending🙂 Good work as usual Mat!👍
*Sharp*Stressed*Man!! I didn't get it until after reading the comments--I need to pay closer attention to the thumbnails. Also missed that Bose Wave Good Buy one last week until a read through the comments pointed it out.
Looks lovely, and an epic repair. As always, a very well put together video. There's a lot of rubber parts in that mech, and it only takes one to be slightly non-uniform to create the wow and flutter. If it's not Deck Tech or fixyouraudio, then the parts are likely to be a problem. It's getting harder and harder to find good quality requirements.
It’s a very compromised mech - I don’t rate it at all - very poor design. Anything relying on friction can go and do one as far as I’m concerned - like those rim drive mini R2Rs from the 1960s - they’re just cheaply made toys trying to look like something more professional.
Did the tape player work properly from mains power eventually?
Yes it did - the mech was just stuck in the wrong position.
As someone who’s fixed a GF9090 (identical tape mech) I have to say I enjoyed watching this video far more than fixing my own. The only two things I can think of (if you do decide to have another pop) are; - the tape head alignment screw - is the spring pulling the tyre onto the capstan rubber with enough force? - is the capstan rubber too long and therefore slightly catching on something inside (I’m sure mine was only as large as the hole) Whether you decide to have another look or not - cheers - I really enjoyed this one.
I did cut the capstan rubber down by about half because it didn’t fit properly to start with - but after assembling it all I found a piece of paper that said ‘don’t cut this rubber down any more than a few MM as it will slip down the capstan over time’ so I made sure the cutting segment wasn’t in the video to avoid creating a situation. As you can imagine there’s really no way to make a video like this without being wrong. But with this one, it’s done now and I’m done with it - I just wanted to make a video and I’m cross-eyed from looking at this thing every day for the last ten days - I need to focus on something that’s further away than two feet for a while.
Hope to see that pizza oven in a video soon! I dream for one of those but, alas, no space for one here in New York City.
You’ve got way better pizza available to you in minutes than anything I could make and so far it seems likely I’m going to be throwing away the fresh mozzarella I bought for use with this before I have a chance to use it. But yes it’s not a video topic - just something I fancied trying and I got it with a good discount on ebay.
I yelled "the capstan is not touching the roller with necessary force!" at the end... which is not something normal people ever say. I apologize for yelling as well. Fun, nerdy video.
Fantastic repair! I know some would undersell this as a "simple belt replacement", but the disassembly of those old brittle plastic components is not for the faint of heart. Your skills, dexterous care, and thoughtful attention to detail in cleaning and restoration is evident. Keep up the great work!
A solid looking machine - good to see the tweeters seem real and not just a plastic moulding! Without cheating too much, do some kind of bluetooth/microSD cassette adapters not exist? So it wouldn't be affected by the speed variation but would at least give a cassette feel to playback.
They do - but if it’s Bluetooth playback I need, I’d be using something else. While it’s fine - it’s not a match on a decent modern bluetooth speaker - or my Bose Wave.
Better be careful -- every girl's crazy 'bout a video like this... But absolutely great show -- I could watch stuff like this all day. It's like seeing someone put a 3-D jigsaw puzzle together, or getting to see the secret parts of a magic trick. Thanks.
Yes. 😉
Great video as always. I did wonder with it being 40 years old whether it would be worth changing out some of the caps? Probably not worth the time and effort though if it's just going to go in to storage? It would have been nice to see/hear it used with a record player as it's got the phono stage. Would make for a good alternative retro setup. Maybe that's a future video - 'What to hook your record player up to'.
I still think it's a cracking result in the end, miles better than a dirty example that doesn't work at all. The broken plastic towers gave me flashbacks to the Smart Roadster Coupe rear window fixings that would break in the same way.
A repair video - I love these so much. • Your dedication to getting each element (not just the drive belt) in the best working order is commendable. • '...should lift out from the carcass' is an appropriate dissection dialogue. • 'Give it a good blast.' Boomblasted ✔️ • tyre replacement ✔️ • A fear of floppy VU meters flippin' out. 🫨 • excellent idea using the screwdriver as a sugru template • the cleaning, all of it, was very satisfying • damn, wish ZZ Top was caught on the radio during the demo Nicely done video. Please send your power over the weather and make it autumn at my locale. Take care. 🤍 Edited: oh, remember that the sharp eye is quicker than the hand. https://ibb.co/7gB0t82
Cool logo/aphorism from the fine folks at Sharp--haven't seen that one before👍
The influence of your pizza oven purchase must have been delayed and reduced by distance, on my side of the Pennines it's only been raining on and off for 2 days. I much enjoyed the long form repair though.
I'd buy that for a dollar. (I know blipverts were Max Headroom and the other was RoboCop but they go well together. )
Sharp Stressed Man 😘😄 loved that Eliminator ZZ Top Album, I even have the limited red record.
Next step: the puppets do the repair.
I can just imagine the mess that Jr. would create.
Ah, so the weather's been crap AND the price of outdoor pizza ovens is going to shoot through the roof as well now? Thanks a lot! 😄