

Slime Rendering
I've often been underwhelmed by how slimes are presented in games. Especially in 2D there often doesn't seem to be much thought given to how they should be rendered. It's pretty typical that they are either just drawn fully opaque like they're made of marshmallow or ice cream, or if translucence is acknowledged it's just basic alpha blending.
And while sure there are plenty of slime and slime-like creatures which ought to be opaque, it's the translucent ones in particular I want to focus on. I don't think it should take much to improve on basic alpha blending.
In 3D you don't necessarily need to fake anything. In the worst case, you can just ray trace through your objects. There's a nice example of what we want to try to emulate here. In 2D we will have to fake almost everything.
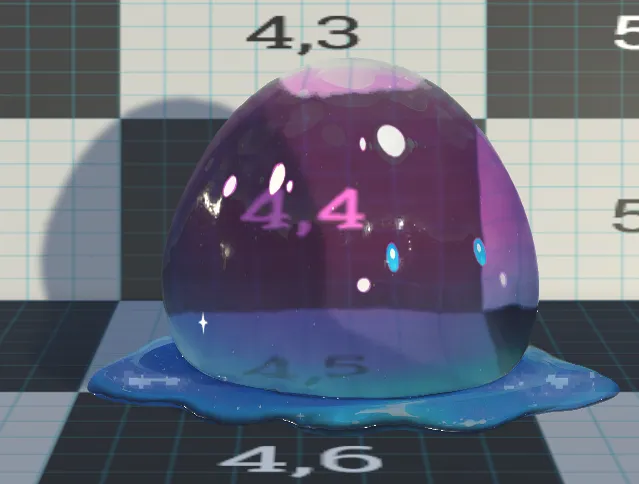
Let's get the obvious steps out of the way: adding a normal map not only helps control the highlights on the surface (which can help give a more "slimy" impression), it also gives us a vector to use for refraction. Slimes aren't made of air, after all, so you'd expect objects seen through them to be distorted a bit.
By adjusting the refraction parameters we can make it behave more like water, or honey, or oil, etc. Luckily slimes tend to be pretty "blobby" so we can be pretty rough with the normal map and still get decent results (hand painting the normals is even an option). In 3D we could just use the surface normals directly.
The next issue with alpha blending is that simply reducing opacity effectively changes the value and saturation as something becomes more transparent. This isn't really how fluids or gels behave. If you look at this example, you can see how the thin strands are nearly totally clear while thicker areas can almost look opaque. Basically, the more of the material sits between your eye and the background the more of that material's color will become apparent. So to start, I think it makes sense to switch to a multiplicative blend. This allows for the color to remain vibrant even while the background shows through, and also ensures that darker materials have a darkening effect on the background.
This looks better, but it only covers one small piece. There's another issue with translucency: transmittance. At the moment, every part of the slime looks the same even though some parts (from our current perspective) are thinner and some are thicker. This is where things get a bit tricky, especially in 2D since every part of the image does technically have the same thickness.
Ultimately the goal is to be able to support a hand-painted transmittance map, which affects the translucency at each pixel. This is necessary both to be able to convey a sense of "thickness" to the object, but also to help art direct specific elements. For example, regardless of their physical properties we probably don't want the slime's eyes to just disappear along with the rest of the slime when it becomes partially transparent. Drawing this transmittance map from scratch for every image is a fair amount of work, though, so I tried to find a good way to automatically generate something which could at least be used as a starting point.
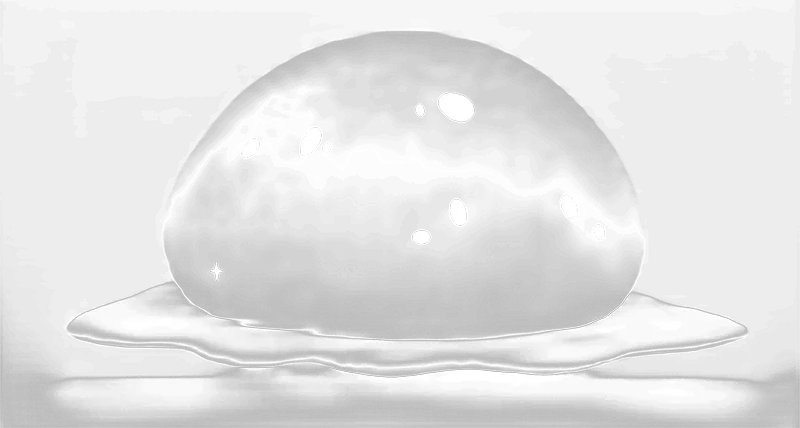
Using the normal map we've been using for refraction I estimated which parts of the image are more curved vs. flat, with more weight being given to flat areas facing towards the camera.
This isn't really correct, it's an approximation derived from an approximation based on a 2D image we've kind of been pretending represents a 3D object. If we had actually started from a 3D mesh there might be some kind of ground truth at the end of the chain, but we're just kind of stacking guesses on top of guesses and eyeballing things so it's not really worth stressing out about how "correct" things are at this point. Now we're just hand-drawing details to kind of compensate for not having any real 3D information to draw from.
This is not a bad place to start from. It's a bit rough, but it contains a lot of information that we need for pretty much every sprite. It let's us focus more on the major details, like ensuring the eyes are "more dense" than the rest of the slime so they don't disappear so easily:
I think this is a pretty decent compromise. We can get pretty far without a ton of manual work, and we still have the option to manually adjust the behavior of certain areas to ensure important features like eyes remain legible regardless of whether we're trying to make a more "milky" or "oily" or "honey-like" kind of jelly.
Side Quest: Can we do colored shadows?
We could probably get away with just not having shadows, and personally I think that might be preferable to using the default shadows. At least, it kind of sticks out to me that this looks wrong:
Ideally we'd be able to write a custom shader covering the area the shadow falls on which can sample the color of the object casting the shadow. We could then blend that with the surface color. This is possible in HDRP with ray tracing, but doesn't seem to be something you can do in URP at the moment. If this were an important feature for me I might consider switching engines to make it easier to handle accurately, but it's really just a small bonus at the moment. So let's fake this, too XD
There are some handy shader helpers available in URP which you can use to determine if a given pixel is in a shadow or not, get the shadow intensity at that point, and then apply our own shading however we see fit. So, we let the slime pass its main color to the shadow shader, which sets the main shadow color. I thought drawing a lighter outline around the edge of the shadow might make some sense specifically for blobby things like slimes. There's no physical basis for this, I just thought it might look nice.
The caustic effect is just a simple scrolling texture. If we could sample directly from the sprite it might be interesting to explore deriving the caustics from the normal and/or transmittance map, but it didn't seem worth exploring in this direction much (I'm not sure if I even need shadows at all, and caustics might just be a bit too noisy to include anyway). An alternative approach could be to just completely fake the shadows using a decal projector which uses a material containing all the same maps as the slime sprite itself. But there are some benefits to using real shadows.
Ok, so things are looking better. This has largely satisfied my complaints about slime shading in many games. But there's something else I feel is often lacking. Slimes just seem like they ought to be a bit... bouncy and jiggly. They shouldn't behave like they're rigid. There are plenty of ice or glass based creatures, but I don't think I'd call them slimes.
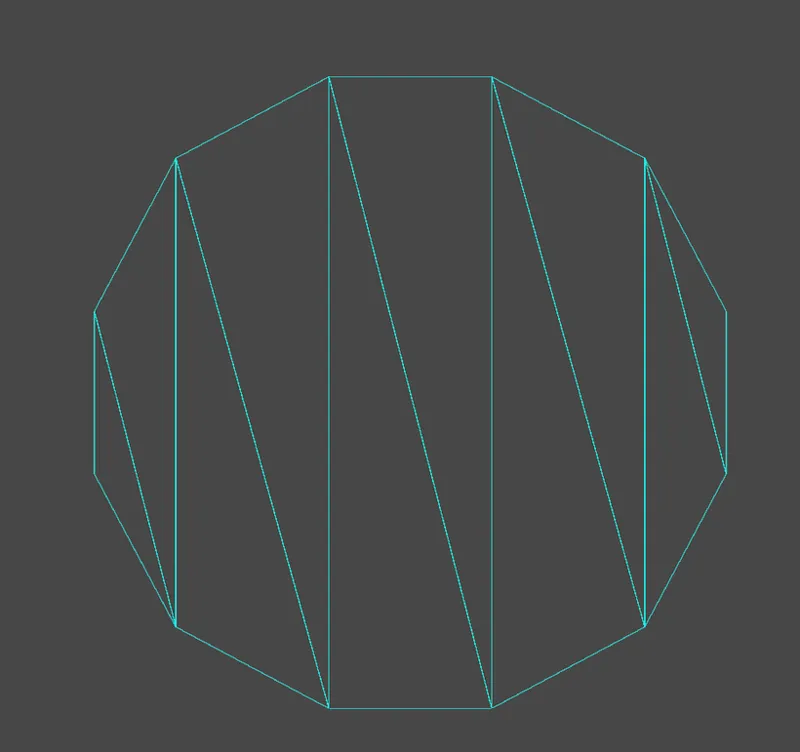
My first thought was to take a soft-body physics approach, make a mesh which fits the sprite and treat all the edges as spring constraints. Generating a good mesh in this case is the hard part. Unity can auto-generate an ok one in their sprite editor, but the vertices are really clustered around the edges which makes deformation in the middle of the sprite... not very nice-looking.
For example, the mesh unity generates for a simple circle has zero vertices inside the circle itself, meaning deformation can only happen along the edges. If there was a face in there, it would be impossible to make the face jiggle except as a side effect of the edges moving in or out.
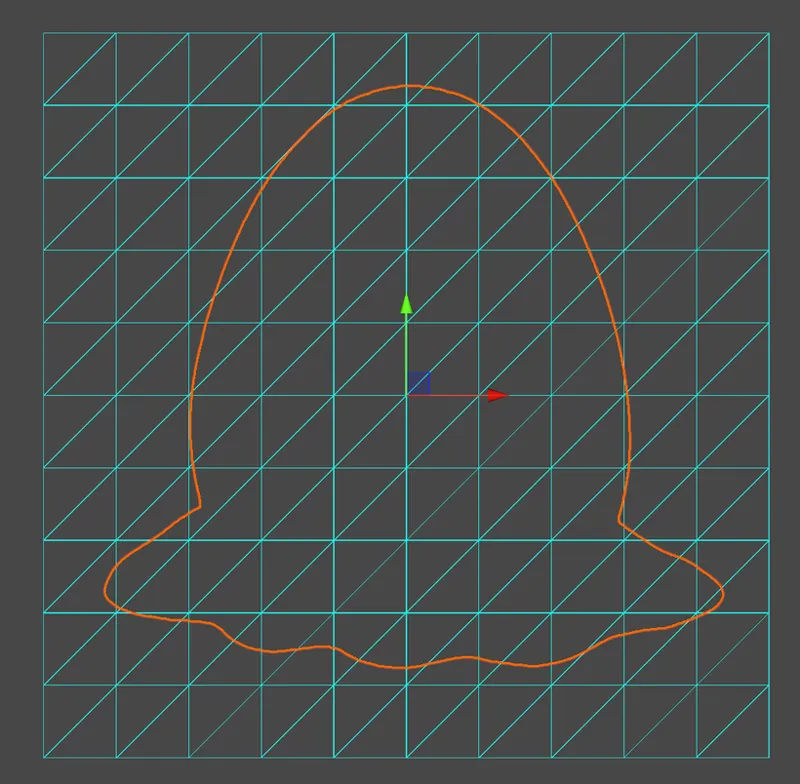
I played with a few ways of subdividing these generated meshes to add more interior points, but without creating a ton of vertices nothing really outperformed a simple plane with uniformly distributed vertices.
This doesn't work very well with the softbody-spring-mesh idea, though, since we don't really want the corners of the mesh (which are invisible) to add forces which propagate through to the center. If we would ever involve collisions with the environment or other sprites these would just get in the way.
So, we take a simpler approach: do collision testing against the visible sprite area (using a low-res mask to determine hits/misses at the pixel level) and add forces in the vertex shader to make the sprite wiggle at that point.
I started with a simple periodic function:
This is okay, but a major limitation is that it can only handle a fixed number of "source" points for any kind of disturbance (i.e. if you poke the slime on the left-hand side and then immediately poke it on the right-hand side the left side will immediately stop jiggling in order to start the jiggle on the right-hand side).
That didn't really gel with me. I remembered an old-school approach to doing a cheap kind of "wave propagation" that seemed like it would fit here, though. The idea is that you keep track of the location of a "wave" as either a positive value to indicate the wave is moving towards a pixel or a negative value to indicate it's moving away, then each frame you update any neighboring pixels to move the wave through them. The gradient essentially tells you the direction of movement. How long a wave lives and how far it can travel is controlled through a simple decay parameter which reduces its height a little bit each frame. To add a force, a new circular wave is injected at the location of the force, which then begins to move outward in all directions.
This can be improved for our case by adding a mask matching the outline of the sprite to keep the waves contained.
Now we can map the wave image onto the mesh and use the wave magnitude at any given point to apply a vertex offset:
And now you can see why I mentioned earlier that we might want to stick with "real" shadows over faking them with a decal projector: the shadows "just work" and move along with the jiggling without any extra setup or work.
There is still one thing missing, though: if a wave is moving through something and deforming its surface, that means that the surface is bending wherever the wave is. If the surface is bending, then the normal at that point is also changing. So, I updated the wave propagation shader to not only output the wave magnitude at a point, but also a surface normal for the wave. This is then fed into the fragment shader on the slime and used to bend the original normal in the direction of the wave:
This does break the illusion of depth a little bit since the wave propagation speed is constant. Maybe it could be worth looking into tweaking it to adjust the wave speed based on the surface normal at a given point or something like that, but I think this is probably good enough for now (and the addition of the ripple normal definitely seems like an overall improvement compared to not having it). While I am a bit on the fence about caustics in general for this, it would also really help sell the effect if the ripples could propagate to the shadow somehow.
Another thing that could improve the visuals further is to simulate subsurface scattering, but so far I haven't come up with a way to fake this that I'm very happy with. You can already kind of fake this by adjusting the transmittance mask and the base texture, although it's not really reactive with the light direction. I'm on the fence about whether it would really improve the visuals in 2D anyway, but I think that depends a lot on the environment lighting. This would probably require another hand-painted map describing the scattering effect in different parts of the sprite, and painting the transmittance maps is already a fair amount of work so I may or may not get around to trying this XD