In my previous post, we covered the background, airspace, and purpose of Tarnak Range. If you're here, I assume you're no more stranger to controlled airspace, pattern structure, and procedural weapon delivery.
Now let's move into the heart of the range: its target layout and the attack profiles designed to work within it. These aren’t arbitrary coordinates on a map, they’re laid out to build precision and pattern discipline to prepare you for realistic scenarios.
I. Target Layout and Types
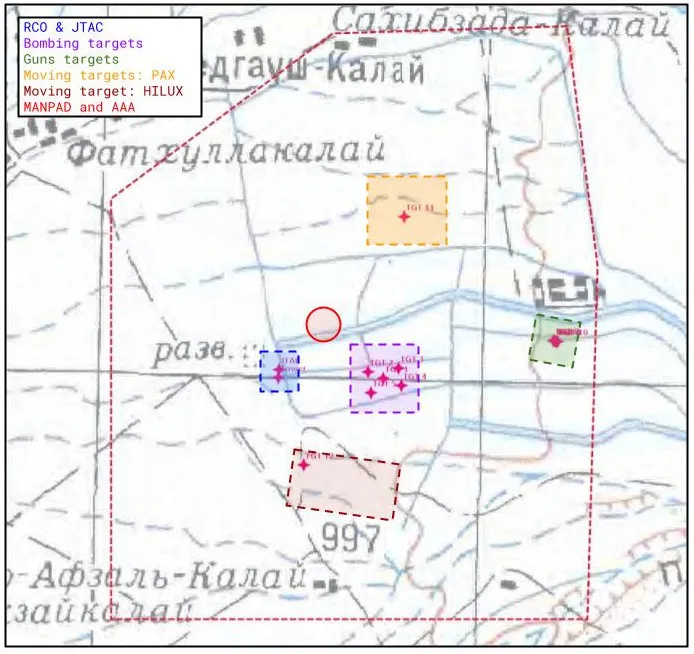
Tarnak Range offers a mix of fixed and moving targets, with defined orientations and approach headings to simulate real-world constraints. Target areas are divided into three categories: bombing, guns, and moving targets. The layout is designed for modular training, from single-ship pattern drills to full JTAC-integrated CAS runs.
Detailed targets map.
Bombing targets include five fixed objects (TGT 1 to TGT 5), located more or less at the center of the range, with mandatory attack heading centered on 050°(T) ±20°.
Gun targets (TGT 6 to TGT 10) are co-located in a secondary impact area and require attack heading 360°(T) ±20°. These simulate enemy positions or static soft targets, designed for short, controlled strafe passes under low-angle attack geometry.
Moving targets are of two types: a simulated infantry group (TGT 11 – “PAX”) and a single mobile vehicle (TGT 12 – “HILUX”). The engagement heading for both is bracketed between 230°(T) and 050°(T), allowing for either circling or offset passes depending on threat condition and mission type. It's recommended to attack them roughly parallel to their track, either from the back (easier) or from the front.
Pictures of Tarnak range targets.
All targets are configured to respond within the MOOSE range script framework, offering hit detection and post-flight analysis through log files.
II. Recommended attack patterns
II.1 - Bombing Profiles
Bombing profiles are divided into three main categories: direct attack, offset attack and circling.
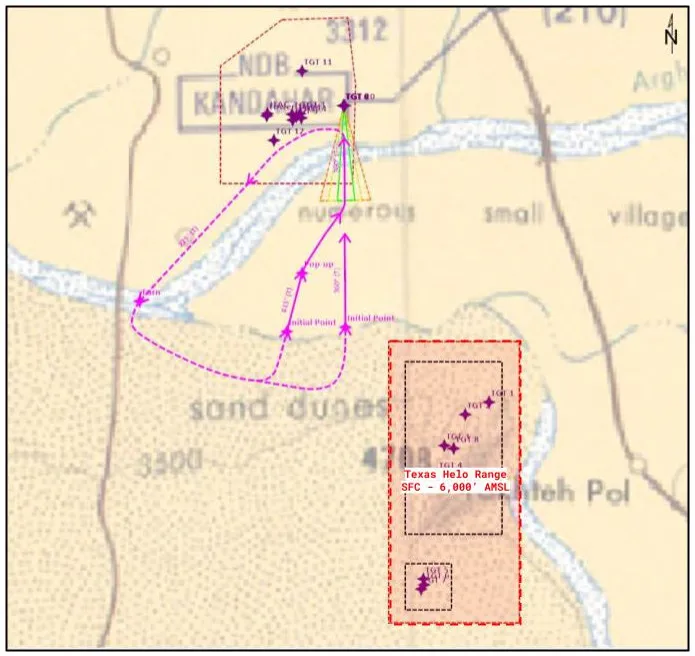
Direct attacks are initiated from IP 1, placing you on a straight-in approach to TGT 1 at roughly 9 NM distance (or 1 minute at 540kt GS). The standard track is 050°(T), aligning you with the fixed targets and enabling clear visual acquisition with minimal crosswind deviation. This profile is suited for low or medium-altitude delivery using level, direct dive, loft or toss bombing.
Direct attack patterns: Final Attack Heading 050°(T).
Offset attacks originate from IP 2, with a lateral offset that introduces angular separation between ingress and release heading. You’ll transition through a designated pop-up point and turn toward the target from a flank angle. This profile simulates terrain masking or threat constraints and is especially useful for training pop-up deliveries.
Offset attack patterns: Final Attack Heading 050°(T).
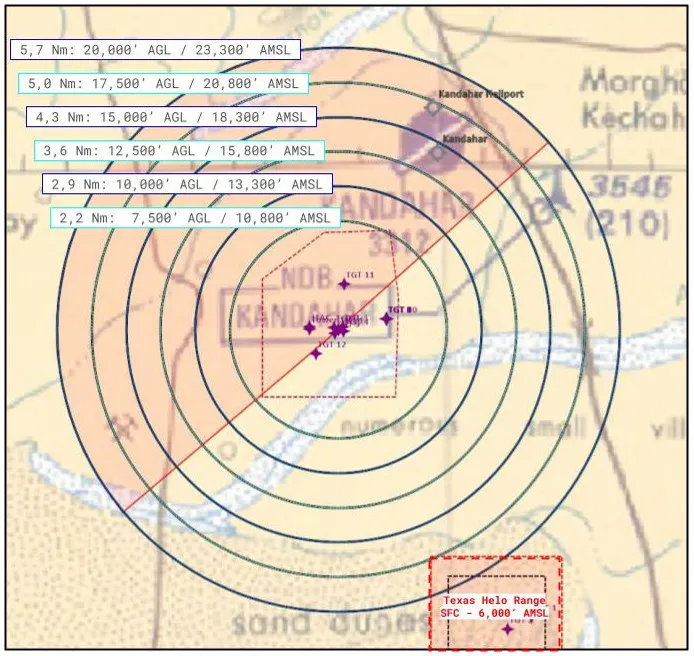
The circling profiles has been designed more specifically for moving targets (TGT 11 & 12). They give you more latitude in attack headings, with an authorized area between 230°(T) to 050°(T). This area has been designed to ensure deconfliction with Kandahar traffic: do not dive below your assigned altitude north-west of the range, and be sure that you climb back to the same altitude south-west of the range! The distances and altitudes given on the kneeboard page are intended for 30° dive angles at heights over target ranging from 7,500’ to 20,000’.
Circle-to-dive attack patterns: Final Attack Heading north-westbound 230°(T) to 050°(T).
In all profiles, you’re expected to adhere to a pre-set soft deck and hard deck, and execute an egress toward the south for re-attack.
You can the note the proximity with both Texas Helo range and Kandahar airfield. Situational Awareness (SA) is necessary in all circumstances in order to avoid interfering with other airspace users!
II.1 - Strafing Profiles
I created a single strafing pattern. The targets are 5 x T-55 lined-up East/West. You can choose any of them as aiming point: you can try to stop a column by hitting the first vehicle, or just aim at the center using rudders to simulate a area denial "spraying" attack.
You'll see once in the air that the visual references are very easy to follow: the egress is parallel to the main river, you reverse East over the desert once crossing the river, and IP are also located at the edge of the desert.
Strafing patterns: mandatory final heading is 360°(T).
The two IPs let you do either an offset pop-up attack or a direct attack with a final heading of 360°(T) in both cases.
Note: you can use TGT 12 (moving HILUX) as a strafing target. Don't forget to keep SA on Kandahar airspace and the runway in use when choosing your final attack heading.
Conclusion:
In a next post, I’ll release the .miz file along with the full PDF range brief, so you can put this knowledge to work. I'll also add the .cf file for mission planning with CombatFlite, as well as .xml overlays for debriefing with Tacview.