Now that we’ve finalized the attack profile and completed our threat analysis, it’s time to construct the flight plan.
Now that we’ve finalized the attack profile and completed our threat analysis, it’s time to construct the flight plan. In this example, the plan relies heavily on visual references, enabling effective navigation even with legacy aircraft like the Mirage F1-CE, which lacks INS or advanced navigation aids. While modern platforms are less dependent on external cues, incorporating visual references remains good practice—especially for key points such as the push point (where combat flying begins) and the initial point (the final reference before weapons delivery).
4.1 Target area
All flight planning begins with the target. Your mission exists to deliver weapons on that point—everything else should support achieving optimal attack conditions defined in the previous article.
4.1.1 - Before target
The initial point (IP) should be located approximately 10 to 15 nautical miles from the target, roughly one to two minutes prior to weapons release. The IP serves as both a final system setup opportunity and a tactical decision point: Do I have enough fuel? Is the threat level acceptable? Is my navigation accurate enough to proceed?
If the IP is placed too close to the target, you risk being overwhelmed with last-minute tasks. Too far, and the situation may evolve significantly before you reach the target, invalidating your setup.
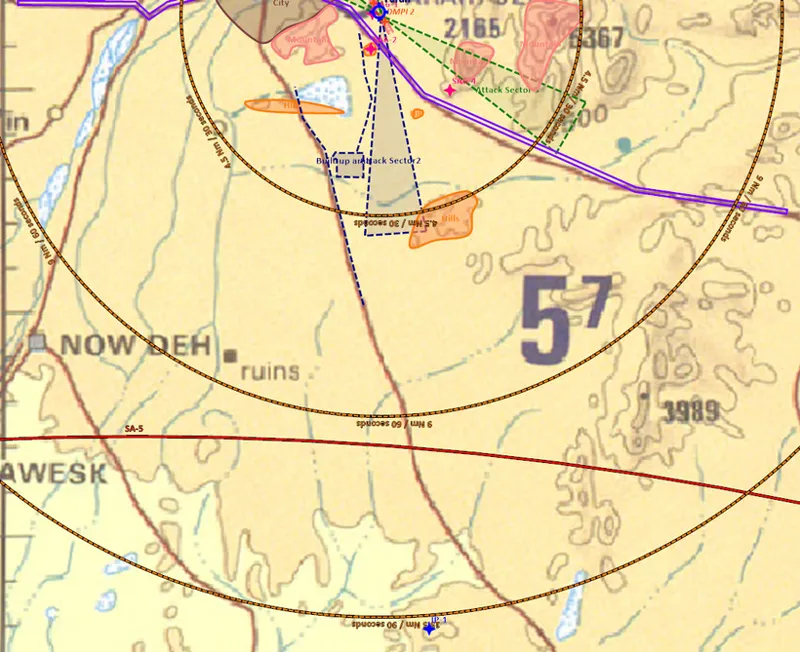
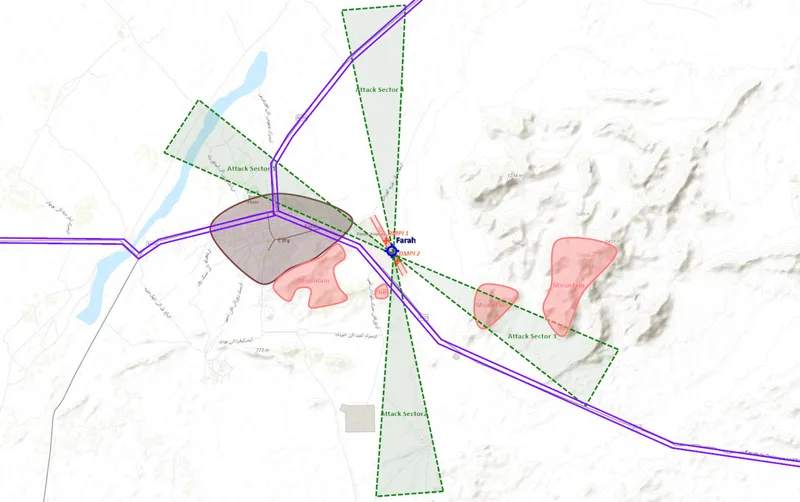
Detail of the attack sector that has been chosen, with additional useful visual references, like relief, roads or build-up areas.
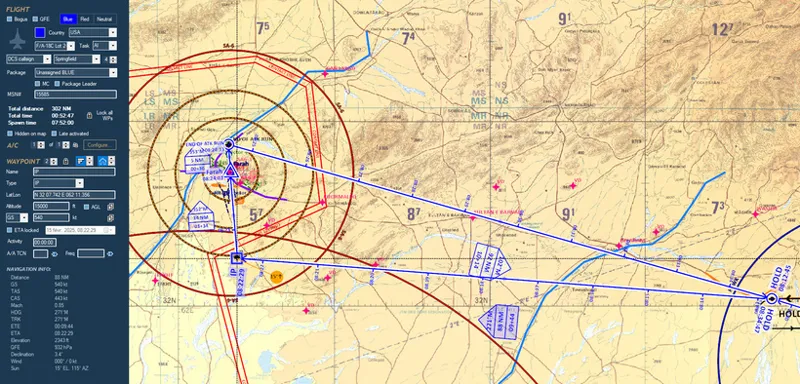
In our mission, we’ve chosen a small hilltop as the IP, 1 minute and 30 seconds from the target. Though visually subtle, it’s the most distinct feature available in the barren desert environment. Once overhead, we start our clock and expect to see the target at one minute, releasing weapons at 1'30". From that moment, time and distance become tightly coupled—if we’re on time at the IP, we’ll be on time over target. Conversely, if we’re late or early, the IP is the last viable moment to correct course. Cutting inside the planned track or slightly extending can compensate for time drift.
The selected IP is a small hilltop. It's definitely a difficult visual reference, but due to the desert landscape in this area, and the total absence of human-built infrastructure, it's our best option.
Importantly, we aim to overfly the IP on our final attack heading, so our ingress to the IP must include an offset leg to allow for a smooth final turn onto the correct axis.
Note: visual IPs should ideally be features marked on 1:500,000 aeronautical charts (such as a TPC), which include only those references considered valid for navigation. In this case, the selected hill does appear on the TPC, confirming its suitability.
4.1.2 - After target
The most dangerous part of your mission is behind you—literally—after weapons release. Therefore, you must plan your initial egress with as much care as your ingress. Our plan is to descend to very low altitude immediately after bomb release, staying fast and straight for about 30 seconds to exit AAA and MANPADS range.
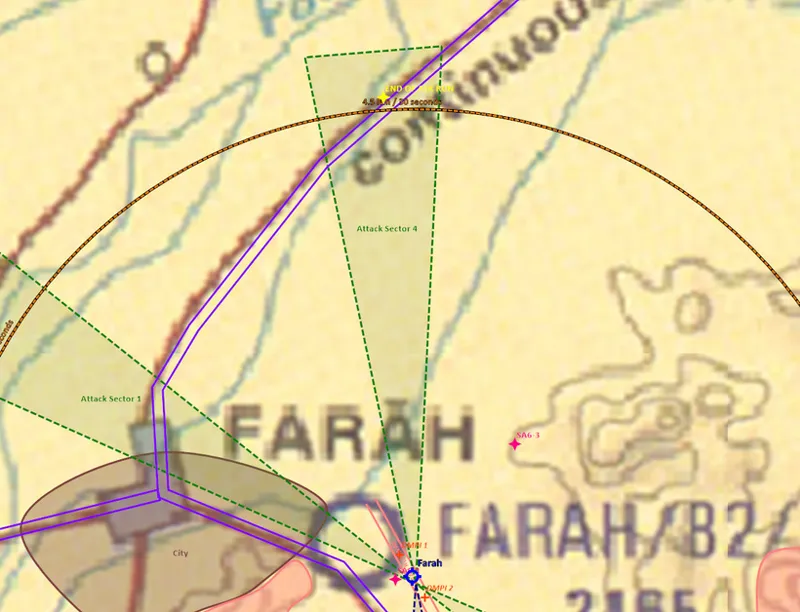
Our turning point is located at a major road just before a river. This is chosen specifically because even if we're slightly off course, we cannot miss it. Upon reaching it, we’ll turn northeast toward a terrain feature that provides masking from possible rear-aspect SA-6 launches. Only after this terrain shield is in place can we shift focus to potential air-to-air threats.
In yellow, the turning point 30" after target. It's a large road before the main river: even if we're not exactly on track, we cannot miss the road and we are guaranteed to turn at the right place.
4.2 Holding
Most large-scale strike missions begin with a holding phase, and this one is no exception. The hold provides flexibility and synchronization among various mission elements. Its purposes are manifold:
Synchronization: different aircraft types have varied speeds and roles. Holding ensures all elements are in position and timed correctly to enter enemy airspace together, with escorts and support aligned.
Buffer for delays: it provides flexibility in case of minor delays due to refueling, weather, or technical issues, preventing disruption to the mission timeline.
Situational Awareness: the hold allows mission leaders to receive updates, assess threats, and decide whether to proceed, delay, or abort.
Airspace deconfliction: airspace near the front line is limited and congested. The holding phase helps manage traffic, avoid conflicts between formations, and ensure safe separation before pushing forward.
The holding phase ensures the force is ready, coordinated, and safely deconflicted before entering contested airspace. In our case, we will use the hold to build our SA (e.g. Is the CAP flight ready to support us?) and to refine our time management and ensure that we start our navigation on time.
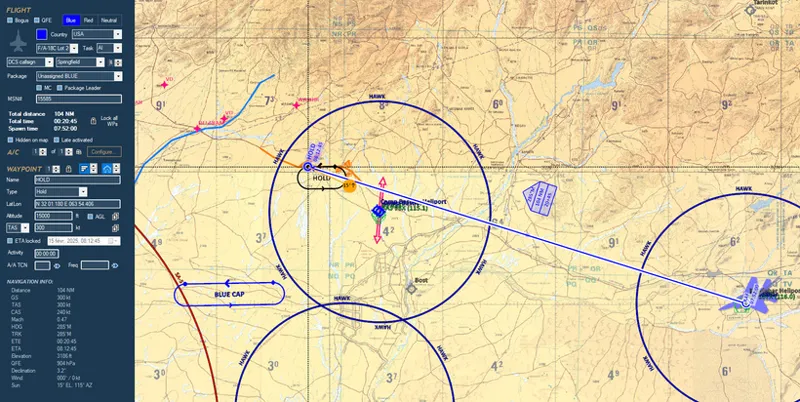
In our case, we position the hold north of Camp Bastion, within allied SAM coverage. Orientation is roughly east-west, aligned with expected air threats. Visual cues include a prominent road and distinctive terrain contours. This makes the hot leg of the hold easy to enter and track.
The chosen holding pattern: "hot" leg is following a road, the start of the hot leg is easy to identify with the relief and the bending road. A standard four-minute loop offers useful timing flexibility, allowing minor corrections before beginning the low-level ingress.
Using only one waypoint, at the end of the hot leg, for the holding pattern, is perfectly OK. Adding extra waypoints can simplify your navigation, in medium or high altitude for example.
Notes:
1 - The waypoint defining the hold should ideally be placed over a clearly identifiable visual feature. In this case, a nearby road bend or small fort would serve better than the currently ambiguous location.
2 - We can take advantage of TACAN-based navigation aids, with Camp Bastion's TACAN (98X) offering a useful fix. Mirage's VAD mode is particularly suited for this kind of short-range radial/distance navigation.
4.3 ingress and egress: low level navigation
With the hold, IP, and target defined, we can begin charting our low-level navigation route.
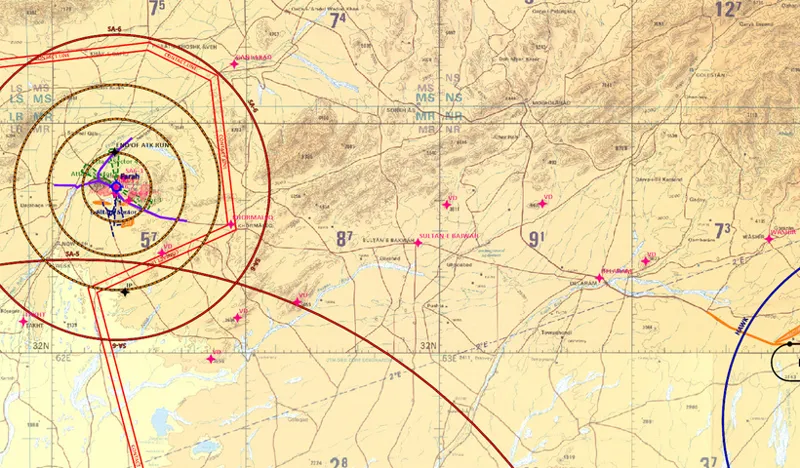
Visual navigation in this context depends on identifying vertical features—antennae, towers, hills, or large buildings—and prominent villages. Features like roads or river junctions lack the vertical relief needed to be spotted early and may be recognized only at the last moment, often too late to correct.
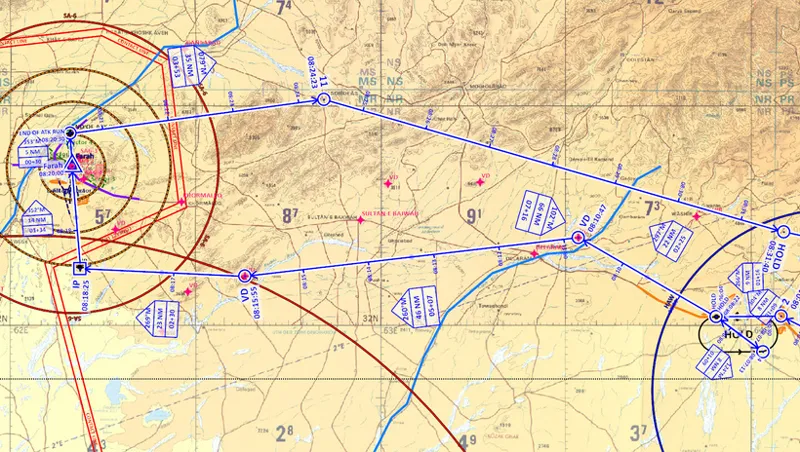
In red, the various useful visual references: vertical developments (VD) and large villages.
We initiate the flight plan by selecting the departure location (Kandahar) as a first waypoint, an for now we can simply place the first waypoint over the holding point.
We can then place a waypoint on target, another on IP, and a last one on the first turning point after target. We can already "freeze" the time line by indicated our desired TOT: in our case, TOT is set at 08:20:00, in the middle of the allowed attack slot.
Once what constitutes the backbone of our flight plan has been created, we can refine the low level navigation.
We establish turning points every 3 to 5 minutes, balancing navigational workload with accuracy. Under 3 minutes, there's little time to stabilize between fixes. Over 5 minutes, drift errors grow unacceptable. These rules are obviously just recommendations, and you have to adapt to the actual terrain that you'll encounter. Desert landscapes are much more difficult to navigate for obvious reasons.
In featureless terrain, isolated hills or unusual land shapes become crucial. For example, a lone peak may be used to guide a turn north of it, with a secondary nearby hill confirming position as we approach.
At some point in the navigation, it's a good habit to insert what's called a "dog leg". It's a geometrical offset that will be "cut off" and used to gain time if you end up late on your navigation. It should ideally be placed close to the initial point, in order to refine your last minutes of navigation and reach the IP perfectly on time. Normally, it should not be placed too early after the holding pattern, since the holding pattern is supposed to be used to refine your timing as well.
In our case, since the navigation is fairly short, the dog leg not absolutely mandatory, and just as an example, I'll still place it just after the hold. Moreover, since we have a 90° turn from the last leg to the target, we still have the possibility to cut before IP to regain time if needed.
Left: before the "dog leg". Right: after the "dog leg". The track is now 25 seconds longer. If we are late anything between 0 and 25 seconds, we can cut inside the trajectory to get back on time.
Note: the "dog leg" can be used to refine your timing and make it easier to follow. For example, without "dog leg" we were supposed to leave the hold at 08:07:55. After the dog leg, we are now supposed to exit it at 08:07:30. In flight, this "round" timing will be easier to remember and the calculations will be easier to make.
We do exactly the same type of analysis for the egress leg, with the difference that in general timing and navigation accuracy expectations on the way back are less strict than on the way in.
The egress track will mainly use relief (peaks, valleys) and roads (X-junction for example) to bring us back home.
4.4 Navigation in friendly airspace
Once that the combat phase has been refined, we can spend time on the track from and back to Kandahar.
In order to refine timings and fuel calculations, we can place waypoints exactly where we'd like to fly, but once you're experienced enough, this transit phase can be simplified to the extreme.
In the outbound phase, you may keep a straight course for 15 NM to accelerate and let your wingman fall into position. The first right hand turn can also help rejoin if spacing is off.
On the way back, it's not unusual the return to a holding pattern, in order to reform your flight or to ensure a clean transition between tactical and transit airspace control entities. Prominent visual landmarks—such as the Sangin river Y-junction or the Dahla Dam lake—make excellent navigation cues even from medium or high altitude.
Note: once again, in friendly territory you generally can rely on NAVAIDs to supporty our navigation: prepare Kandahar TACAN on 75X to help you.
4.5 Additional waypoints
With the core flight plan defined, we now consider waypoints that support situational awareness and contingency management.
Most important is diversion planning. Camp Bastion is your only true alternate; enter it as a waypoint. If other emergency strips exist along your route, include them as well.
Camp Bastion is our only suitable diversion airfield, we'll enter it in our system. If we have other emergency airfields along our track, we can also prepare them as additional waypoints.
Remaining waypoints can be used for reference or threat tracking:
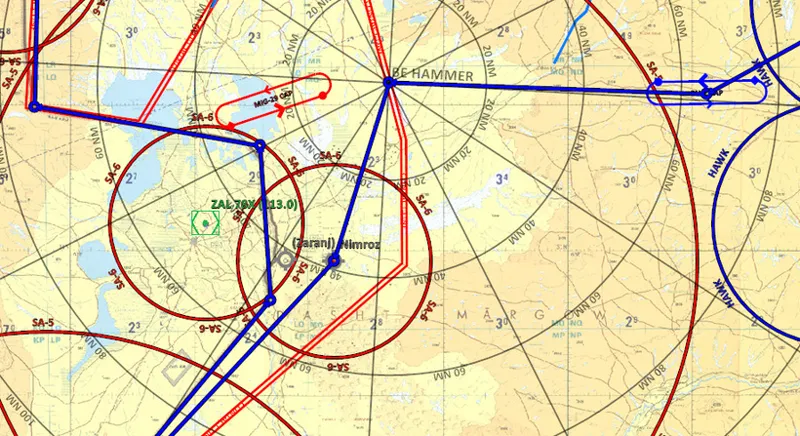
Friendly CAP orbit
Bull’s Eye (BE Hammer) for tactical reference
Known enemy QRA or SAM sites, like Nimroz airfield
The border with Iran, marked with a simple two-point reference line if limited by waypoint slots
Additional waypoints have been placed on friendly CAP, on BE Hammer, on enemy QRA and along the border.
With all primary and auxiliary waypoints set, your flight plan is complete.
In the next article, we’ll use this plan to refine fuel calculations, determining Bingo, Joker, and combat fuel, as well as analyzing our time margins. Stay tuned!