We already made half of the "4T" study: Task and Target have been analyzed and it's now time to look at the Threat and Tactics.
3.3 Threat
The threat analysis constitutes a crucial phase of mission planning, directly influencing the tactics employed to achieve mission objectives. While we already did a preliminary threat assessment during the feasibility study, a detailed, target-area-specific threat analysis is essential for mission success.
We already identified the following factor threats on target area:
SAM: SA-6, MANPADs and AAA
Aircraft: MiG-29A fighters, possible Su-25 (low threat)
A more comprehensive threat analysis must expand beyond just the baseline threats stated above to include:
Electronic Warfare (EW) capabilities:
Communication jamming: potential disruption of intra-flight communication and coordination with supporting assets (CAP, AWACS).
Radar jamming: degradation of aircraft radar capabilities, including air-to-ground radar for terrain mapping, terrain following, or target designation.
LASER jamming: interference with LASER-guided precision-guided munitions (PGMs).
GNSS jamming: disruption of GNSS-guided PGMs and navigation systems.
Note: while specific intelligence on Iranian EW capabilities in the Farah region is absent, it is important to acknowledge the potential for the threats mentioned above.
Intelligence Integration:
Threat Location: precise identification of threat locations is paramount. For mobile threats, intelligence must focus on probable deployment areas and high-threat zones.
Threat Avoidance: can the identified threats be avoided through route planning, timing, or other tactical measures?
Terrain Influence:
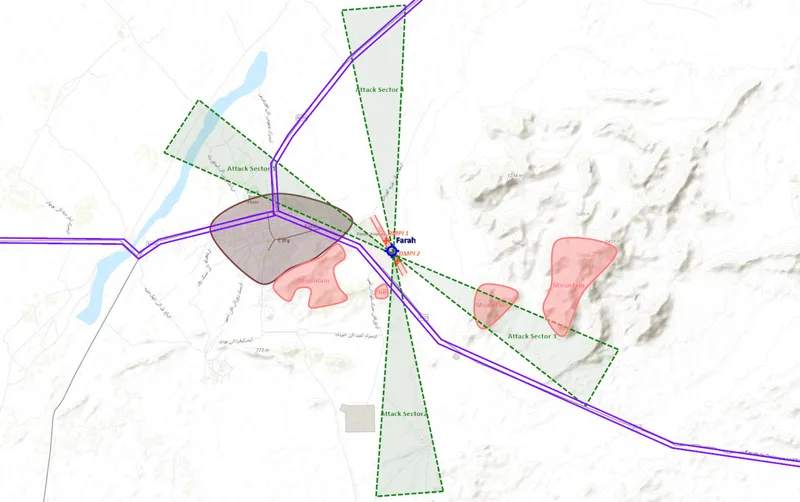
Elevated Terrain: SAM systems and visual observers may exploit hilltops and mountainous terrain for increased detection range and line-of-sight.
Population Centers: densely populated areas may present a higher risk of concentrated small arms fire.
Major Roadways: military convoys and their associated Short-Range Air Defense (SHORAD) systems are likely to utilize major road networks.
In red: the main reliefs. In brown: the main populated places. In blue, the main roads.
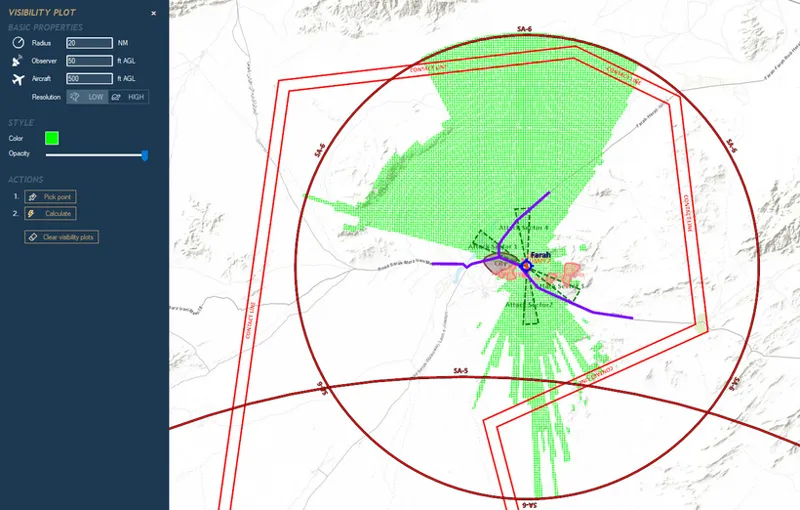
We need to make another terrain analysis in order to mitigate those same threats as well. For that, we will make an intervisibility analysis. Tools like the "intervisibility tool" in CombatFlite are invaluable for assessing SAM engagement zones. This requires accurate Digital Elevation Model (DEM) data, that can be easily added for any theater in CombatFlite as explained here.
Due to the inherent uncertainty in threat locations, intervisibility analysis should employ conservative parameters (like exaggerated observer height and aircraft altitude) and analyze multiple potential threat locations, especially for mobile systems.
Example 1: SA-6 system located within the airfield perimeter.
Example 2: SA-6 system located on a nearby hilltop, demonstrating the significant increase in coverage.
Analyzing the air-to-air threat is crucial for coordinating with CAP and developing effective tactics:
MiG-29 response time: estimating the time for Quick Reaction Alert (QRA) or Combat Air Patrol (CAP) MiG-29s to reach the target area post-attack.
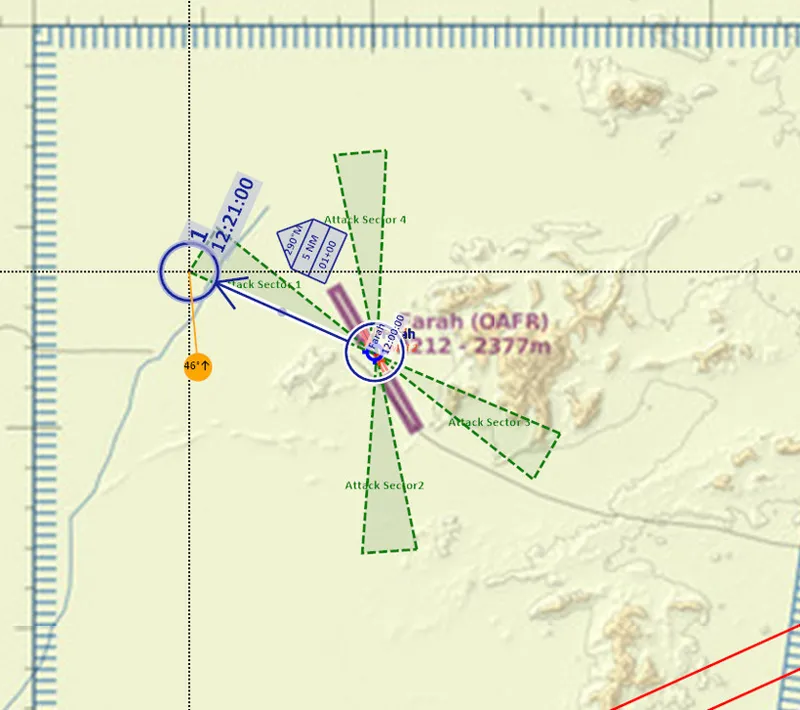
Attack Sector Optimization: Selecting attack sectors that minimize exposure to enemy CAP. For example, an attack heading that increases the distance from a known CAP station after weapon release should be favored (South to North).
This refined and expanded threat analysis provides now a very robust foundation for developing our final tactics.
3.4 Tactics
The "Tactics" section details the specific actions employed to achieve the mission's "Task," considering the "Target" vulnerabilities and mitigating the identified "Threats." In our case, tactics must address the challenges of runway denial while maximizing aircraft survivability in a high target threat environment.
Runway Attack Tactics
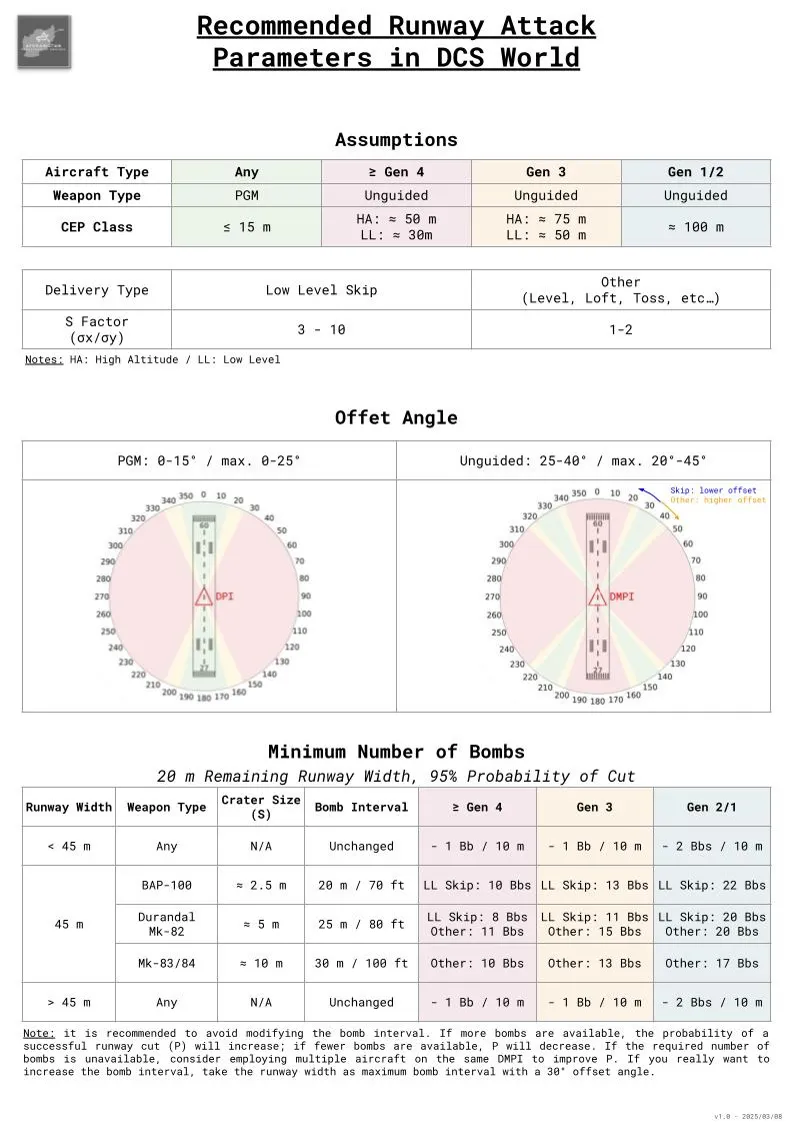
The mathematical principles of runway attack, that were detailed previously, dictate specific tactics to maximize damage and disruption:
Attack offset angle: employing an optimal attack offset angle is crucial. This angle maximizes the probability of multiple bomb impacts on the runway surface, increasing the effectiveness of runway denial.
Outlining the 4 optimal attack sectors will help us identify the best one.
Weapon spacing: the spacing between impacts must be tailored to the runway's width, weapon's effects (crater size) and the minimum runway width required by the aircraft.
Considering a runway width of 100 ft and the Su-25's minimum runway width requirement of 70 ft (20m), we know that employing Mk-82 bombs requires a minimum of 7 bombs with an 80 ft spacing to achieve a runway cut. Since our aircraft carries 8 bombs, we face a choice: preserve the 80 ft spacing to enhance the probability of success, or decrease the spacing to 70 ft to potentially increase overall runway damage while keeping the same salvo length. However, the anticipated high threat environment over the target area necessitates jinking maneuvers to evade AAA, which will degrade aiming accuracy. Therefore, retaining the optimal 80 ft spacing is advisable to maintain accuracy, even at the cost of potentially less extensive damage.
Final Attack Parameters
Attack Heading: the chosen attack heading is determined by balancing the mathematical principles of runway attack with the need for threat avoidance: we don't want to overfly the city, we don't want to attack towards the MiG-29 CAP area, and we'd like to see the target area no later than 30" before bomb release for a visual delivery. The southern attack sector is our only remaining choice.
Delivery Profile: due to the weapons employed, we don't have much choice on delivery profile: it will be a low-level skip bombing. But we still need to identify the best release parameters.
In order to stay as low as possible, and make a minimum climb in the very last seconds, the delivery altitude will be between 200 and 300 feet above ground level, with the precise altitude dependent on the specific weapon release parameters dictated by the ordnance being employed.
The delivery speed will be approximately 540 knots, which represents the approximate maximum speed at which the aircraft can effectively release the designated ordnance.
When using the recommended bomb fuze settings kneeboard, we see that the maximum recommended release speed with a mechanical nose fuzes is 525 kt. You need to plan an attack at 520 kt only if you plan to use a mechanical fuze. Normally, the type of fuze is perfectly known during the planning phase, and it should have been detailed in the mission briefing!
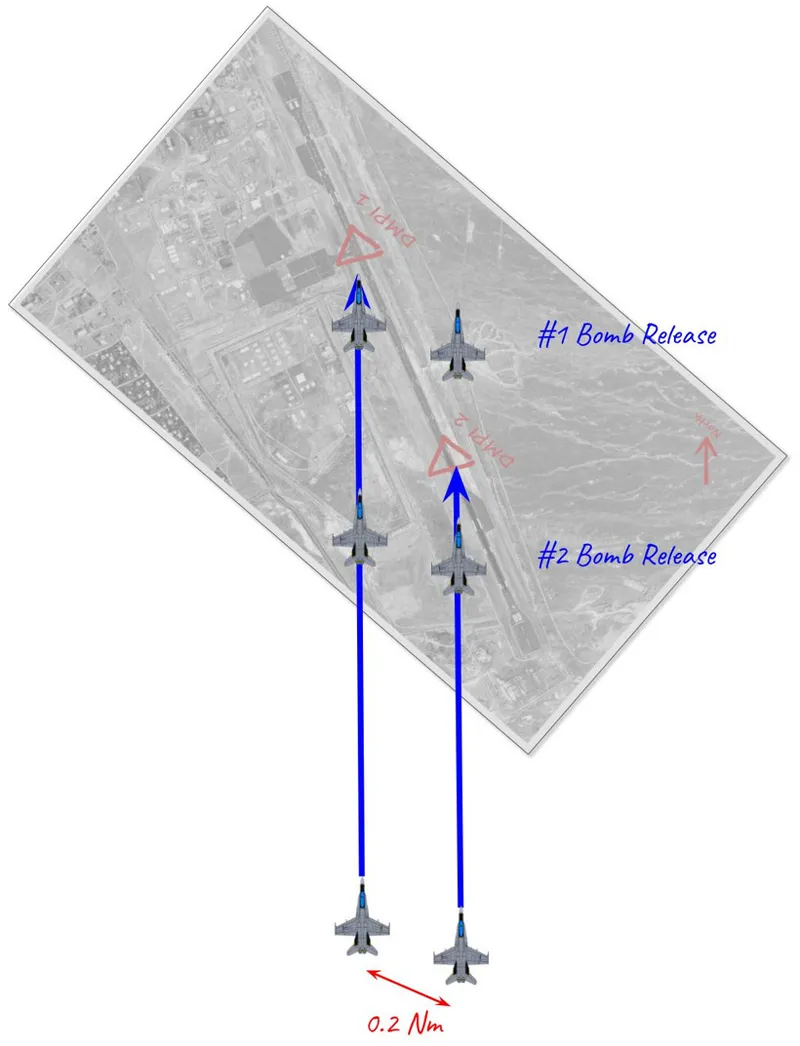
Timing: to achieve maximum surprise and overwhelm enemy defenses in a 2-ship scenario, a coordinated, near-simultaneous attack will be executed. The lead aircraft will be positioned on the left, with the wingman on the right in a close fighting wing formation (approximately 4 o'clock position from the lead aircraft). This specific positioning and timing sequence—wingman releasing over DMPI 2 fractionally before lead's attack on DMPI 1—is crucial for safety, ensuring the wingman avoids the bomb fragment envelope generated by the lead aircraft's ordnance.
The optimal 2-ship attack formation is designed to position #2 directly in front of DMPI 2 as #1 achieves precise alignment on DMPI 1. This formation employs a lateral separation of approximately 0.2 Nm between #1 and #2, which is determined by the distance separating the two DMPIs (approximately 800m in this case).
Now that we have determined the final attack parameters, we can walk through the entire sequence of events with a clear understanding of the tactical decisions required at each phase of the strike on Farah’s runway. This section finalizes the “Tactics” component of your 4T analysis by detailing how you should behave or what to anticipate at each critical point of the mission.
Phase 1: Transit to Target Area (Beyond 30 NM)
At this distance, your primary concerns are "regional" threats, especially long-range SA-5 SAMs and the potential for MiG-29 intercepts. Though not in immediate danger yet, this phase demands full situational awareness. You must monitor radar and electronic warfare systems, coordinate with the CAP (Enfield 41), and begin your ingress along a pre-selected low-level route designed to minimize exposure to both SA-5 tracking and fighter intercepts.
As you approach the 30 NM range, this becomes your first decision point. You need to ask yourself: Am I directly threatened right now? Is there a chance I’ll be intercepted before I can complete the strike? And what happens after the target? Will I be safe to egress, or am I running into trouble? Depending on your answers, you can choose to push forward, delay to allow the CAP to sanitize the airspace (possibly requesting a "Delouse"), maneuver evasively, or abort the mission altogether.
Phase 2: Entering the Target Area (Within 15 NM, Entering SA-6 Coverage)
Now, the threat begins to intensify. You're entering the danger zone of a known SA-6 battery operating near Farah, and you're still potentially within range of MiG-29 patrols. AAA and MANPAD threats also become more likely the closer you get. In this environment, aircraft must shift to very low-altitude, high-speed flight. You’ll want to activate any onboard electronic countermeasures (e.g., jammers), set countermeasure programs to automatic dispensing, and use the terrain for masking whenever possible.
Around 15 NM, you’ll hit another key decision point: Is there any sign that the SA-6 active? Is your RWR lighting up? Are you being tracked or locked? If so, you must decide whether to press, execute evasive maneuvers, or abort. If the threat is manageable and expected, continue; if it’s very unexpected or overwhelming, break off and regroup.
Phase 3: Target Area (Within 5 NM)
At this stage, you are fully committed. This is the most dangerous part of the mission due to the concentration of AAA and MANPADS in the vicinity of the airfield. The aircraft should remain at very low altitude, flying fast—ideally 540 knots—and maintain a height of 50 to 150 feet AGL. Visually scan for tracers and smoke trails; deploy flares proactively; and make jinking maneuvers in both the horizontal and vertical planes to evade AAA.
Just before reaching weapon release range, a final check must be made: Is the target positively identified? Am I safe from any immediate threats that would prevent me from dropping bombs? If yes, weapons can be released as planned. If not, you may decide to abort.
Phase 4: Weapon Release and Egress
Just before the moment of release, the aircraft must maintain precise parameters—altitude, speed, attitude—for around 10 seconds. Flare dispensing should be intensified just before and during release. After the bombs are off rails, wait a few seconds to ensure clean separation, then immediately descend back to minimum altitude and begin egress.
To avoid being easily engaged during this vulnerable phase, it is critical to keep the target in your six o'clock position for the next 30 seconds. This increases your survivability against AAA and short-range IR missiles by flying away from the engagement range. Terrain masking becomes your best friend again as you begin to evade potential SA-6 launches. Simultaneously, switch to air-to-air mode to prepare for any sudden A/A pop-up threats.
Phase 5: Exiting the Target Area (Beyond 15 NM)
Once clear of the target area, you're not out of danger yet. MiG-29s may be looking for you. Resume your low-level navigation plan and begin rebuilding your situational awareness. Check your radar, listen for updates from friendly CAP, and start thinking about recovery. If you're in good shape, press on to Kandahar. If you're damaged, low on fuel, or being pursued, you may need to divert to a closer alternate like Camp Bastion, and jettison remaining air-to-ground stores.
This is also the point where you reassess your mission outcome: Is the aircraft okay? Are there any live weapons left? Is a safe return to base possible?
With this in-depth threat behavior breakdown, you now have a pilot-focused, tactically sound understanding of what to expect and how to act during the entire strike sequence. In the next section, we’ll build a flight plan and precisely calculate our fuel milestones — like Joker, Bingo, and Combat Fuel — to complete the flight planning.