Paveway II Delivery Profiles: Level Bombing - Fuzes (3/25)
As we progress in our study of Paveway II delivery profiles, we must now address a critical element of weapon effectiveness: fuze settings. We've examined the general procedures for level bombing, but without the correct fuze configuration, even a precisely delivered bomb may fail to achieve its intended effect. This article will explain fuze selection for level bombing, focusing on the relationship between fuze arming delay and aircraft escape maneuvers.
1. Paveway II: Choosing the Right Fuze
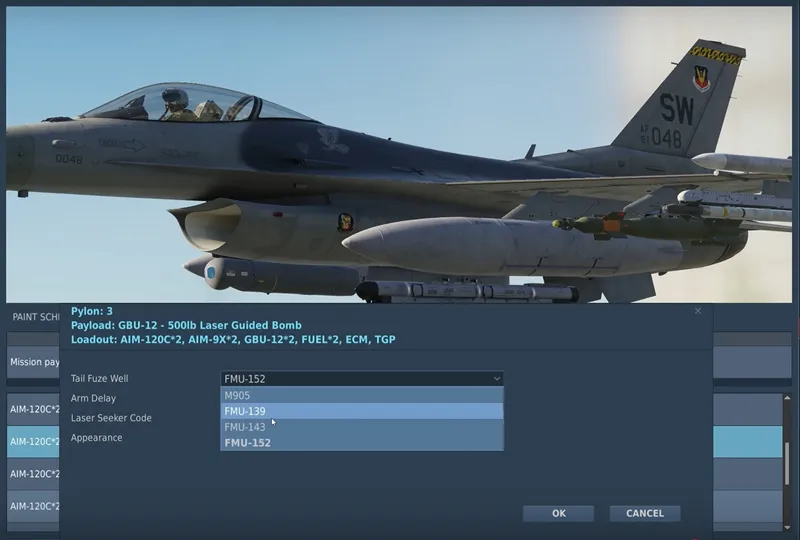
When you go to the (re)arming panel in DCS World, you can discover the fuzes that are proposed with the Paveway II bombs: M905, FMU-139, FMU-143 and FMU-152.
If you've already read my previous articles about bomb fuzes, you already have a good understand of each one of these fuzes' particularities, and which ones should be chosen or not.
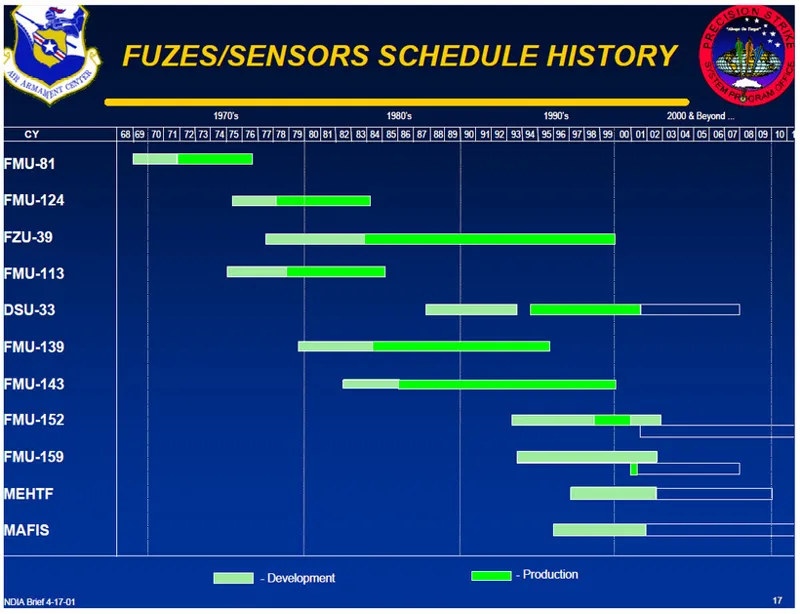
Let's start with the M905: it's a mechanical fuze that requires a vane fitted on the MXU tail kit to operate. It was the standard tail fuze used in the 1970s, when the Paveway II bombs entered into service. Its main drawback is its reliability: its failure rate was supposedly relatively high (but I couldn't find exact failure rate figures), especially when the fuzes aged. In order to increase the reliability, nose fuzes like the FMU-26 were also used in redundancy. The FMU-139 electronic fuzes were designed to sort out this reliability issue among others. This fuze should only be selected for historical accuracy purposes: if you're flying a F-4E Phantom II in a Cold War environment (let's say before 1990), then it's your only choice. But after that date, you should keep mechanical fuzes for dumb bombs, and take electronic fuzes for PGMs.
FMU-139 entered production only in 1984, and Desert Storm certainly saw their first significant operational use.
Let's quickly deal with the case of the FMU-143: it's a fuze specifically designed for "bunker buster" weapons, with a very high explosion delay (0.30 to 0.60 ms). The Paveway II bombs only used Mk-8x bodies, and were therefore not compatible with the FMU-143: simply forget it!
FMU-143 ares simply not compatible with Mk8x bodies used by Paveway II bombs.
We are now left with the FMU-139 and FMU-152 electronic fuzes: you have to select one of these two. The FMU-139 is historically the most common one with Paveway II, but the more modern FMU-152 has started replacing it in modern inventories. Let's say that to be historically accurate, before 2005 the FMU-152 was not available, and that it was more likely used primarily with JDAMs until at least 2015. I couldn't find current details, but interestingly we can see on US arms sales notifications that the latest version of the FMU-139D/B is supposed to replace all three FMU-139C/B, FMU-152 and FMU-143 fuzes: in post-2025 scenarios, your fuze choice could be limited to the FMU-139...
Note: you know have a better understanding of how I build the kneeboards for correct bomb fuze settings in DCS World, like this one for the F/A-18C.
2. Selecting the Right Arming Delay
Now that we've studied the possible fuzes, let's look at the existing arming delays:
M-905: 4/6/8/12/16/20 seconds;
FMU-139: 4/6/7/10/14/20 seconds;
FMU-152: 4/5/6/7/8/10/14/25 seconds.
Are they all relevant? In order to answer that question, we have to remember that one of the primary roles of the arming delay is to protect the shooter: you want to be outside of the bomb's fragment envelope at the end of the arming delay to make sure that you won't be killed by your own bomb, in case it explodes prematurely...
If we consider that the bomb's fragment envelope is a sphere with a diameter ranging from 3000 ft (Mk-82) to 4000 ft (Mk-84), we want to make sure that we'll be out of range at the selected arming delay. The most constraining trajectory, meaning the one where the aircraft gets furthest from the bomb the slowest, is a level bombing without escape maneuver, as the aircraft continues to fly parallel to the bomb, which is slowly bending its trajectory under the natural influence of Earth's gravitation.
Studying the range between the shooter and the bomb in a "no escape" scenario.
Any other trajectory with an horizontal turn (cf. the 30° to 40° AoB escape maneuver) will make the distance even greater.
If we make a comprehensive study, we see that:
at or below 10", you are always within fragment envelope;
between 12" and 14", you can be within fragment envelope, depending on the release altitude and the Mk-8x version;
at 20" or above, you are always out of the fragment envelope.
Since as we've seen it previously, bomb's TOF is greater than 20" as soon as you release the bomb above approximately 7000ft AGL, it is recommended to select a 20" arming delay for all level bombing profiles at or above 10.000 ft AGL.
As soon as you plan to release the bomb lower than 10.000 ft AGL, you can select a 14" arming delay, but then an escape maneuver is mandatory: you must egress left/right, and maybe even initiate a climb, in order to increase the range with the bomb more quickly.
Notes:
Unless you are in a very particular situation (vertical target, poor weather): you should not plan to release Paveway II bombs below 5.000 ft AGL. In that case, a particular study of the actual weapon's TOF must be made, in order to select the arming delay accordingly (at these low altitudes, small variations in release parameters can significantly impact the bomb's TOF).
It's also important to consider the tactical context. If you are in a scenario where you have several bombing profile options, such as a Close Air Support environment, you must account for the most limiting scenario, i.e., the one requiring the shortest arming delay for safety. This will often be the case, and in these situations, you now understand how crucial a well-executed escape maneuver is for your own safety!
Explosion delays are related to the target study, not the delivery profile, that's why they have not been discussed here.
In summary, selecting the correct fuze and arming delay for Paveway II level bombing is critical for mission success and aircraft safety. By understanding the available fuze options, considering the aircraft's release parameters and potential escape maneuvers, and accounting for the tactical situation (especially in dynamic CAS environments), you can maximize the effectiveness of Paveway II employment.
The kneeboard pages that I will publish in a next post will provide a practical means of translating all the previous advice. You'll have all the tools to really make sound choices during the planning phase or in the cockpit. This refined understanding will prepare you for our subsequent discussion on the dive bombing profile, a more dynamic and demanding delivery method.