Paveway II Delivery Profiles: Level Bombing (2/25)
Now that you've seen all the possible delivery profile, let's start with the most common one: level bombing.
The official ED video attached above is already self-explanatory, since the profile is quite straightforward: you fly inbound the target for a given distance, you automatically release the bomb when you are at the release point, and eventually you make an egress manoeuver during which you will lase the bomb.
However, let's try to break it down into details.
1. Importance of the Initial Point (IP)
Without going too much in details about the significance of the IP (that I can cover more in depth in another post if you want), let's say that you should select an IP 10 to 15 Nm away from your target. The time between IP and Release Point (RP) must be sufficient for you to make final corrections to be cleanly established on Final Attack Heading (FAH) no less than 20 to 30 seconds before RP.
In general, and contrarily to low level profiles, in high altitude the IP doesn't need to be a clearly identifiable feature on the ground, since it will not be used for navigation or INS update. If an INS update needs to be done, it can be performed via the Targeting Pod (TGP) once the target has been "captured".
Keep in mind that overflying the IP is the last moment to do your final weapon checks: 1 - A/G mode; 2 - weapons/store parameters (they should have been programmed on the ground or during the transit in friendly airspace), correct weapon and hardpoint selected; 3 - LASER parameters on the TGP (LASER code, auto-lase if needed); 4 - LASER safety 5 - MASTER ARM ( and stick trigger safety, if any)
2. From Initial Point to Release Point
During your flight from IP to RP, you have two main tasks: 1 - fly the aircraft to reach the desired bomb release parameters (you should already be close to these parameters when reaching the IP, and make only small adjustments); 2 - ensure that the target is "captured" before RP: either by working yourself with your own TGP, or by coordinating with the person in charge of target acquisition and lasing. This can be your WSO (e.g. in the F-4E), another aircraft, or someone on the ground.
The bomb release parameters must have been chosen on the ground during the planning phase, since different flight parameters will result in different effects on target (from sub-optimal impact parameters, like final angle of dive, to a dud if the time of flight is lower than the fuze's arming delay). During the planning phase, the crew members use what's called a "6DOF" (6 Degrees of Freedom) software to predict bomb's behavior at the chosen release parameters. They will know among others the exact Time of Flight (TOF) of the weapon.
In particular, you should have a good understanding of the release distance at the chosen release speed/altitude in order to avoid being surprised by the release cue.
3. The Release Point
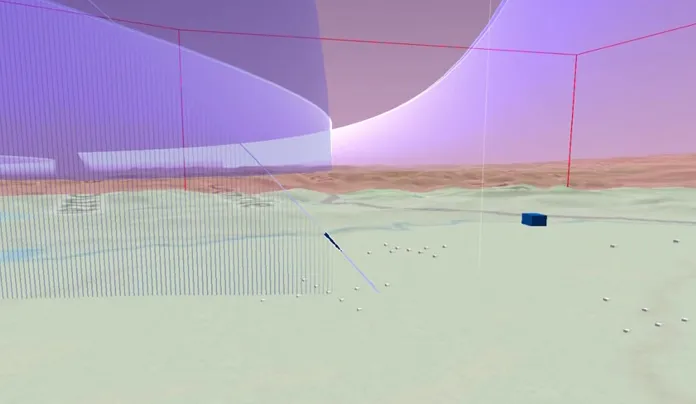
You'll notice that even if theoretically the Paveway II bombs are "domain" weapons (like PWY-III, JDAM or cruise missiles), they are generally released like "ballistic" weapons at a unique RP. This is because the Dynamic Launch Zone (DLZ) of the weapon is so small that the release point is chosen in the middle of the DLZ.
Comparison of the DLZ for GP, PWY-II and PWY-III bombs.
In general, that RP is chosen so that an unguided PWY-II would hit slightly "long", that is to say a few hundred feets after the target. This "extra range" given to the weapon upon release can be considered as a kind of energy reserve that will be depleted during the guided phase of the weapon's flight: since the PWY-II use a "bang-bang" guidance, it will tend to deplete energy much more quickly than other guided weapons.
In DCS World, as for real, an unguided PWY-II bomb will hit slightly "long".
4. Egress Phase
After bomb release, a continuous turn away from target is highly recommended. It has three main purposes, which are by priority: 1 - increase the range between bomb and aicraft at the end of the arming delay (to avoid frag envelope in case of early detonation; 2 - ensure an optimal target lasing during the guided phase; 3 - stay as far as possible from target area, in order to avoid possible terminal defenses (and in particular MANPAD and AAA);
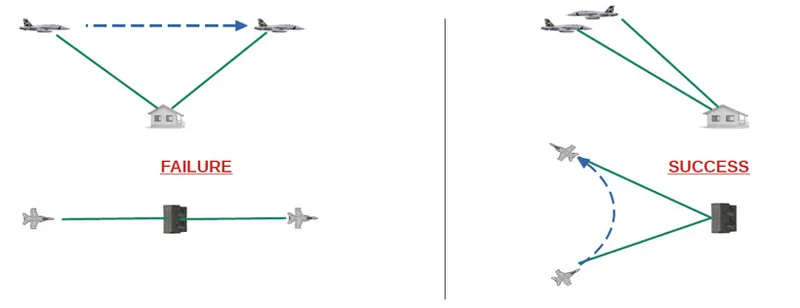
Without going too much in details into the target lasing techniques at this point, we can note that, in general, remaining wing level (straight into the target) will make you overfly the target and change of visible face, which is likely to block the LASER spot during the last seconds before impact and can thus result into a miss (this is called the "podium effect).
Illustrating the "Podium Effect".
In order to make a successful LASER illumination, you must make sure that you will be able to keep the target in view during all the egress phase, and the main factor for that is the TGP mask management (you enter into a mask when your own aircraft is blocking the TGP's line of sight to target, or when it has reached its gimbals limit.
In order to maximize your chances to remain out of the masks, keep in mind that you will maximize your time out of masks: 1 - if your TPG is on one side of the aircraft, by turning to the other side; 2 - by decreasing the anlge of bank during egress: if a 40° AoB is suitable for short TOF, a 30° AoB might be necessary for longer TOF; 3 - by choosing an optimal weapon load. For example, you can use an asymmetric configuration to keep the wing clear on the side of your TGP, or put the first bomb you'll drop on the side of your TGP, etc...
5. After the hit... or the no hit...
Good flight parameters will let you know precisely the weapon's TOF, and you can therefore precisely know when you should expect the impact.
As soon as you observe the hit: 1 - you can zoom out the TGP view, in order to help your system limit the saturation/blooming effect following the explosion; 2 - you can now make a maximum performance turn away from the target in order to continue your mission.
Example of TPG picture saturation following the explosion.
If you don't observe a hit upon the end of the expected weapon's TOF: 1 - be patient, keep lasing the target, real TOF can be up to 10 seconds longer than expected TOF... 2 - after these extra 10 seconds, keep TGP on target but zoom out as much as possible for another 5 to 10 seconds, in order to try to see the actual impact point; 3 - after these 20 seconds, you can move your TGP around the target area in order to try to see the actual impact point.
Points 2) and 3) are obviously valid only in a low threat environment. In a high threat environment, after 1) it's time to egress ASAP and stop thinking about the target. What has happened cannot be undone, and you have to keep your questions for a deeper debriefing on the ground.
Also, keep in mind that Battle Damage Assessment (BDA) is in general NOT required after bomb impact. Trying to record the target after the attack is nice, but not a priority. Even after a miss, other means like satellite imagery can be used to assess actual consequences, like Collateral Damages.
6. Summary: Kneeboard Page
You'll find below (and attached to one of the following posts in a near furutre in .pdf format), a kneeboard page summarizing all the explanations you were given above.
Kneeboard page for PWY-II Level Delivery Profile
Among others, you'll find here: - recommended release speed: the faster you are, the more energy you give to the bomb, and therefore the higher the distance between RP and target. Obviously, UAVs like the MQ-9 Reaper can drop their bombs below 250kt, and it's working perfectly. Nevertheless, higher speeds are recommended;
MQ-9 Reaper equipped with GBU-12 and Hellfire missiles taxiing at Kandahar.
- impact angles and final velocity as measured in DCS World. You'll notice in particular that a level bombing below 10.000' AGL will result into a very low impact angle. It has to be taken into account, since it can be both an advantage (vertical target) or a drawback (horizontal target) depending on the situation; - a "tactical balance" study to help you decide if this profile is the best for a given situation.
Note: don't drop your bombs with more than 25.000' of altitude difference with the target: just like some missiles, PWY-II bombs use a thermal battery that has a limited life. If we assume that this life is around 60", it's safe to avoid weapons TOF above 45 seconds.
I hope you've enjoyed this post, and that I was able to prove that even a basic profile like this can be used to extend your knowledge and proficiency!