









SUPIR 1 Click Windows, RunPod / Massed Compute / Linux Installer & Free Kaggle Notebook
Full version of this post here for members where downloads enabled : https://www.patreon.com/posts/99176057
Join discord and tell me your discord username to get a special rank : SECourses Discord
SUPIR: Scaling Up to Excellence: Practicing Model Scaling for Photo-Realistic Image Restoration In the Wild 1 click installer scripts.
For those whose models fails to download for some reason, here single zip file that include all models. Extract into SUPIR folder. 45 GB. You can download from browser and resume. Or you get download with software like uGet : click here
14 April 2024 Update
Quick RunPod tutorial published : https://www.youtube.com/watch?v=RjMJh9fAO10
Download new zip file : SUPIR_v45.zip
Massed Compute instructions and installers added
Massed Compute is so many times better than RunPod
No broken Pods, amazing download and hdd Speed
31 cents per hour only for A6000 GPUs
A new tutorial will be hopefully recorded but I have an amazing recent tutorial for Massed Compute
You can watch this tutorial here : https://youtu.be/0t5l6CP9eBg
Please register Massed Compute from here : https://bit.ly/Furkan-Gözükara
Please watch the above video and read Massed_Compute_Instructions_READ .txt file
All files are renamed to understand easier inside the zip
RunPod instructions improved
For those whose models fails to download for some reason, here single zip file that include all models. Extract into SUPIR folder. 45 GB. You can download from browser and resume. Or you get download with software like uGet : click here
18 March 2024 Update
SUPIR upgraded to V44
Morve improvements and fixes
New starting arguments added
New full FP8 model precision support which reduces VRAM usage to around 7 GB for 1 Megapixel upscale
New full FP16 support which means now we can use on a free Kaggle account or on older GPUs that do not have BF16 support
Working Kaggle notebook included in the zip file
available_command_line_arguments .txt file is updated read it to see all arguments that you can add to your start_SUPIR_Windows .bat file
update_windows_requirements .bat file updated and improved
run_linux .sh and start_SUPIR_Windows .bat files updated and new options are added
How to upgrade? First close SUPIR run update_windows_version .bat file and see if works or not
If that fails, close SUPIR and run update_windows_requirements .bat file
If this also fails, please do a fresh install under a new folder such as c:/SUPIR_v44
17 March 2024 Update
SUPIR updated to V41 and the changes are as follows:
Version info moved to the About tab
Folder listing added to the Outputs-Metadata tab
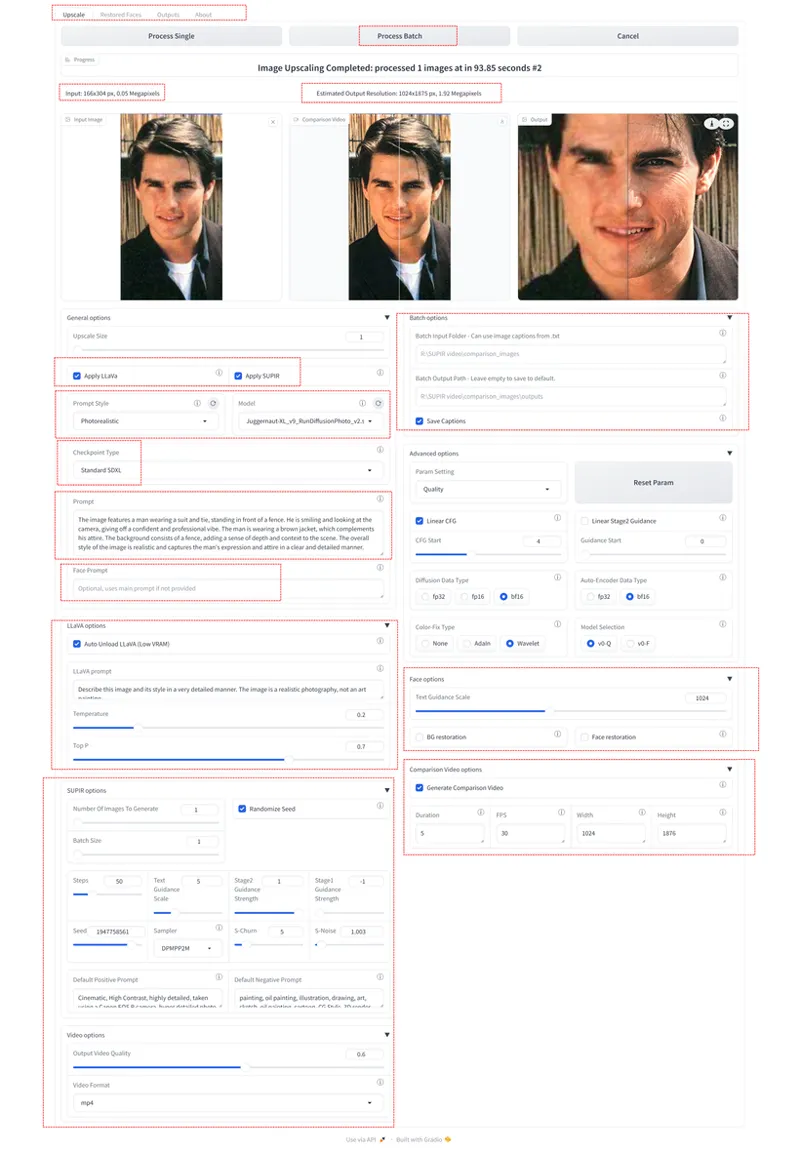
Interface is redesigned
Auto Unload LLaVA to reduce VRAM is now under LLaVA options section in the interface
All of the processes are now displayed properly including steps which were not displayed at all even at the command line interface
The back end code also completely redesigned
More starting arguments and their descriptions added
--use_fast_tile option added - may impact quality - I haven't had time to test yet
available_command_line_arguments .txt file added to the inside of zip file to make it easier for you to read
This is a massive update and lots of changes, therefore, first install into a new folder such as SUPIR_V40, verify working and delete older folder
When installing do not make parent folder name SUPIR
Now you can use a video as an input
It will let you select beginning and ending frames
The middle icon just displays that current frame on the screen
Video final output merge is not still working fully but you can manually merge upscaled images which will be inside outputs/extracted_frames
You can manually combined extracted frames with FFmpeg or any tool such as Davinci Resolve
extracted_frames folder will be cleared each time when you run a new video processing be careful
Prompt Styles feature added
Prompt Styles are useful according to your input image type
Embedded into images Metadata description improved
Checkpoint Type added
If you are using SDXL Lightning model check it and it will make steps count = 10 and Text Guidance Scale = 2 automatically for you
I have made a comprehensive comparison between SDXL full model vs Lightning model with different parameters
You can see comparison results here : https://imgsli.com/MjQ3ODQ2
Play with drop down selections to compare different configurations
Face restoration working amazing in some images tested thoroughly
Carefully read all of the options on the interface with expanding all options
Please report any bugs and issues from our Discord channel
downloader .py file will automatically download WildCardX-XL LIGHTNING model as SDXL Lightning model into the models/checkpoints folder
I compared several SDXL Lightning models and found this one is best
run_linux .sh which will make starting the app easier with options on RunPod or on Linux systems
We made SUPIR working on Kaggle hopefully coming soon
We made SUPIR working with 8 Bit loading - reduced VRAM - hopefully coming soon
There are some new libraries so you need to at least run update_windows_version .bat and update_windows_requirements .bat files but I suggest to do a clean install
11 March 2024 Update V2
Auto Deload LLaVA - Free VRAM checkbox added
When this checkbox is checked, it will deload LLaVA from VRAM after captioning input images including batch folder processing
Apply Stage 1 checkbox fixed. This will be applied and displayed as output
Apply LLaVa fixed. You will see the Apply LLaVa checkbox generated prompt in prompt box
So you can only check Apply LLaVa checkbox and get the image prompt. Don't forget to uncheck Apply LLaVa if you make changes to the prompt
Apply Stage 1 will not be applied to Apply Stage 2 anymore
So for best quality you can check Stage 1, LLaVA and Stage 2
If you check all these 3 it will work as below
* Apply Stage 1 > generate Caption with LLaVA > Use Main input image > Apply Stage 2 (Upscale)
Open Outputs folder button added - it will use your set outputs folder via --outputs_folder
11 March 2024 Update
If you had updated to V26, just run windows_update_version .bat file, otherwise do a fresh install better
Model Selection v0-Q and v0-F fixed and working with hot reload - run time change
Face processing fixed. Both supports face prompt and default
If output face is not merged, try to change output resolution slightly. This works
Now you can upscale images that has multiple faces
Hopefully I will add auto caption face with LLaVA and multi face prompt - every line a face prompt
Min number of steps reduced to 1 for faster SDXL models
Batch processing bugs fixed, properly save in desired outputs folder or in default output folder
Read existing captions if there are caption files during batch processing
Display full batch processing status properly
Save every image after each batch processed image immediately after processing finished
Apply on the fly batch LLaVA captioning
Please test all above batch processing and let me know if any errors i am also still testing
Show batch processing results as Gallery
Batch processing related bugs fixed
Slider comparison fixed
Processing output messages improved
Do not save original input image when upscaling in outputs folder
New feature model hot reloading added
Now put SDXL models inside models/checkpoints folder
Use refresh button and select any model while running, whenever you change model, it will reload the new model
10 March 2024 Update
Updated to V26
Please do a reinstall
You can move models folder - to not download models again edit windows_install .bat and delete the lines download_models .py and downloader .py
The downloader files will automatically download all of the models including LLaVA 7b and Juggernaut-XL_v9
Put your old SDXL models into to models/checkpoints folder to work including Juggernaut-XL_v9
Initial download of all models may take a while - around 40 GB
Complete code and interface redesign
Therefore, there can be new bugs and there are still some issues
I will hopefully do a new full Tutorial ASAP
Image slider now will have full screen feature
LLaVA batch caption on the runtime working with 4-bit LLaVA 7b model - uses less than 4GB VRAM
Now when you first time load the app, you can pick any base model from --ckpt_dir argument - by default inside models/checkpoints folder
If you don't want to change default --ckpt_dir argument, put your SDXL models into the models/checkpoints folder
Apply Stage 1 and Apply LLaVA will be used both at batch processing and single image upscale
Hopefully I will add generate LLaVA caption button and batch LLaVA caption folder features soon
Hopefully I will add batch extract frames of input video and the batch convert back upscaled images into video feature soon
Please report any bugs you might encounter
Known Issues At The Moment
Number of images will still display only 1 image as slider but all generated images will be saved in outputs folder
Outputs folder opening button not added yet
When batch processing a folder if you enable video comparison generation it will cause error after first image processed
Select your base model at first load otherwise changing model load will not work yet
So if you want to use different model, restart the app and select base model before starting
Face restoration works but in some cases it will not merge the face with the output final image
You can see restored faces on Restored Faces tab
5 March 2024 Update V2
If you didn't install V19, you need to install new libraries as written below or do a fresh install
Face restore worked very well for the last test i made
However still may not work at some images
New feature generate comparison video added
This will generate a very smooth video that shows slider movement left to right amazingly working
If you enable it, it will generate videos for batch processing as well
The videos will be automatically saved inside outputs/compare_videos folder
Stage 1 button is moved to the very below
I found that Text Guidance Scale 6 working better than 7.5 for reducing the hallucination for XL_v9_RunDiffusionPhoto_v2
5 March 2024 Update
If you didn't install V19, you need to install new libraries as written below or do a fresh install
If you have installed V19, just run windows_update_version .bat file
Base model changing logic changed from yaml file modification to argument passing
Edit start_SUPIR_Windows .bat and append your wanted model path as below example
python gradio_demo.py %lowvram% %tiledVAE% %slider% %theme% --ckpt "R:\auto1111 installer\stable-diffusion-webui\models\Stable-diffusion\sd_xl_base_1.0.safetensors"
To use auto queue system, open http://127.0.0.1:7860/ on multiple tabs and set your parameters and start upscaling
It will queue each upscale automatically for you. You can open as many as tabs you want
The effect of Text Guidance Scale significant. If you get too much hallucination, reduce it to like 6 or 5 and try
Target output resolution info added below to the input image
So you can see what will be the target resolution as you change the upscale ratio
Model loading logic & pipeline updated
Now the app will start immediately but models will be loaded when you first time use
Dark theme option added - you will be asked when starting start_SUPIR_Windows .bat file
direct_start_no_options .bat file added as example. Rename it and modify so you won't have to select options again and again
Supported parameters are as below
parser.add_argument("--ip", type=str, default='127.0.0.1')
parser.add_argument("--share", type=str, default=False)
parser.add_argument("--port", type=int, default=7860)
parser.add_argument("--use_image_slider", action='store_true', default=False)
parser.add_argument("--log_history", action='store_true', default=False)
parser.add_argument("--loading_half_params", action='store_true', default=False)
parser.add_argument("--use_tile_vae", action='store_true', default=False)
parser.add_argument("--encoder_tile_size", type=int, default=512)
parser.add_argument("--decoder_tile_size", type=int, default=64)
parser.add_argument("--ckpt", type=str, default='models/Juggernaut-XL_v9_RunDiffusionPhoto_v2.safetensors')
parser.add_argument("--theme", type=str, default='gr.themes.Default()')
#parser.add_argument("--theme", type=str, default='d8ahazard/material_design_rd')
parser.add_argument("--outputs_folder")
4 March 2024 Update
Updated to V19: You need to install new libraries. I suggest to delete downloader .py, install into a fresh folder and move models folder if you had previously downloaded models folder. If you can't make this, just do a new fresh install
Our app updated to latest original repo code
Linear CFG is auto enabled and set to 4 now (authors did this way)
Image Comparison slider option added
You will be asked to start image Slider or Gradio Gallery option in start_SUPIR_Windows .bat file
Gradio slider is not at the quality level we want yet
So I made a topic about it please leave a support reply : https://github.com/gradio-app/gradio/issues/7588
Face restore feature added
It hugely restores the faces however there is a bug currently
So restored face is not applied to the final image yet
You can reply to the bug thread i opened : https://github.com/Fanghua-Yu/SUPIR/issues/57
Still, you can see the restored face at the Restored Faces tab at the top of the Gradio app
Let me know if you encounter any bug. Please report bugs with steps and details
More info about how to use:
2 March 2024 Update
Just run windows_update_version .bat file
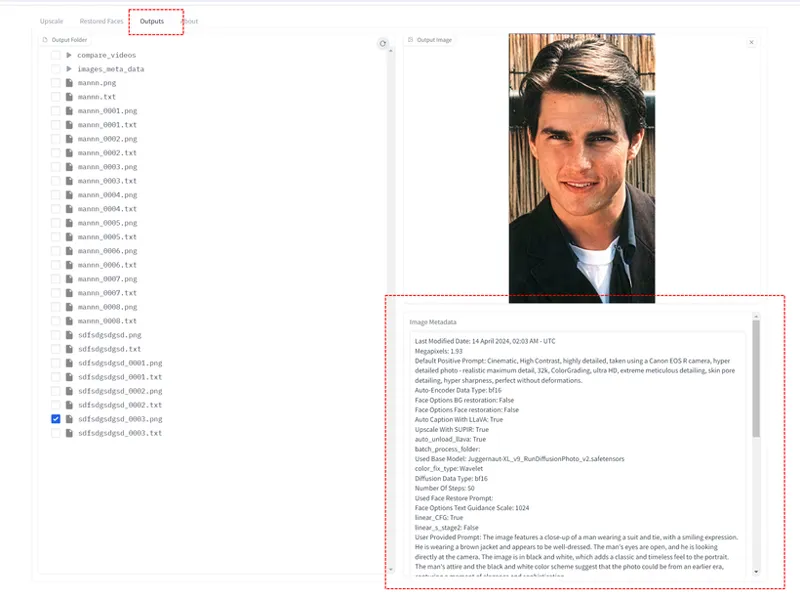
Requested MetaData feature added
All config of generation saved inside image as MetaData
Moreover, it will save all MetaData as txt file inside desired outputs folder under images_meta_data folder
If you apply Stage 1, that info will not be saved in MetaData so if you don't get exact same image, apply Stage 1
I also added MetaData viewer tab - at the very top of the Gradio app
In MetaData viewer tab, you can load image and see its MetaData
It should support every Image MetaData including Automatic1111 SD Web UI Generation
--outputs_folder bugs fixed. It will be used if you set it in start_SUPIR_Windows .bat file
Example : python gradio_demo.py %lowvram% %tiledVAE% --outputs_folder "R:\SUPIR_v8\test2"
Apply stage 1 before stage 2 feature added
Newest interface image metadata.png , updated interface.png
I am working on other requested features. Thank you for keep supporting me
29 February 2024 Update
Output naming completely changed as you requested
It will save images with the same file name e.g. bird.png
If bird.png exists then it will start naming as bird_0001.png then bird_0002.png
If you delete bird_0001.png and left bird_0002.png, it will name next as bird_0001.png
So it will scan folder and name as same if exists it will look for next empty spot
All you need to do is run windows_update_version .bat file if you had installed V8 or above previously
Important Tips From Our Discord Members
If you want to upscale an image that already has decent quality, do not use Stage 1! Stage one is there to smooth out extremely low res images so the upscaling process can re-add details. But if you do this on decent quality images, you rather lose details instead of gaining the best quality output. I have tested this with a few images and the output was always better to not use stage one on already good images. You can just upload your own image instead of using stage 1.
Another tip is, if your test case image has text, SDXL Base 1.0 may work better. I am working on a way to be able to change models while app running.
28 February 2024 Update
For your convenience windows_update_version .bat file added
It will do git pull automatically for you. But it will not install new libraries if the update includes new libraries
Now you can set outputs folder from start_SUPIR_Windows .bat with adding a parameter like below
--outputs_folder "R:\SUPIR_v8\test2"
I am currently working on adding face restore option + better naming of output images like input_image_file_name_00001.png + saving used prompts in the same outputs folder so you can carry on captions.
27 February 2024 Update V2
Image upscale ratio slider improved. Now you can set values as 1.5 as well. Working great tested.
Batch processing added
You can give no prompt and it will use default positive and negative prompts still will work
If you had installed V8 or V9, just do a git pull on the SUPIR folder and restart
27 February 2024 Update - Works at 12 GB VRAM:
Base model changed to Juggernaut-XL-v9 and this model will be auto downloaded
Juggernaut-XL yields way better results
2 new optimization added
--loading_half_params and --use_tile_vae
The start_SUPIR_Windows bat file updated so you will be asked to start with them on Windows
Also updated RunPod instructions and added them
Now uses around 12 GB VRAM
Tested on RTX 3060 12GB and worked perfectly - make sure that you use around 500 MB VRAM before starting the app
Please do a new fresh install
Original repo is here : https://github.com/Fanghua-Yu/SUPIR
Full tutorial video added : https://youtu.be/PqREA6-bC3w
Requirements
Tested on Python 3.10.11 so use Python 3.10.x
C++ tools has to be installed for InsightFace library
Don't forget to install git : https://git-scm.com/downloads
Don't make parent folder name supir or SUPIR make like SUPIR_install
Full tutorial to install these 2 : https://youtu.be/-NjNy7afOQ0
If you use RunPod please use my referral for Register : https://runpod.io?ref=1aka98lq
I don't make money but get credits so I can do more research
How To Install
Download latest zip file from the attachments and extract files wherever you want to install
Double click windows_install .bat and let it install and download necessary models
Requires 12 GB VRAM without LLaVA. Tested on RTX 3060
Make sure that your VRAM usage is not bigger than 500 MB before starting the SUPIR
If you want to use LLaVA you can use our better installer : https://www.patreon.com/posts/90744385
LLaVA is not mandatory as shown in full tutorial video : https://youtu.be/PqREA6-bC3w
Extra Features
1 click install including automatically downloading necessary models
Generate any number of images each time with different seed
So you can generate 200 different images with different seeds at 1 click
Every generated image saved in outputs folder automatically
Display progress via progress info of Gradio including each image generation speed
This info displayed at the CMD / terminal as well
Improved more useful Gradio interface
Randomize seed feature
Includes pip freeze info for future library fixes
Auto installers for both Windows & RunPod (Any Linux)
Supports VRAM optimizations and now works at 12 GB GPUs
Tested on RTX 3060
Make sure that your VRAM usage is not bigger than 500 MB before starting the SUPIR
How To Use
In Stage 2 options you will find many settings
Try different settings
After uploading image hit Stage 2 and it will start generating upscaled & enhanced images
When using try to play with Linear CFG and Linear Stage2 Guidance
They make difference
All generated images will be automatically saved inside outputs folder
I tried enable Linear Stage2 Guidance and made 0.5 and I think improved
As I said try parameters
If you also want to use LLaVA we have better LLaVA scripts which supports 4-bit, 8-bit and 16-bit loading
So you can also install it with 34b and use it for captioning
LLaVA auto installer : https://www.patreon.com/posts/90744385
But even with simple captions it works great you can just type
Image comparison sliders to Test : https://imgsli.com/ , https://web-toolbox.dev/en/tools/image-compare-slider , https://www.diffchecker.com/image-compare/
Here example. All default except Linear Stage2 Guidance is enabled and set 0.5
input image : input_1.png
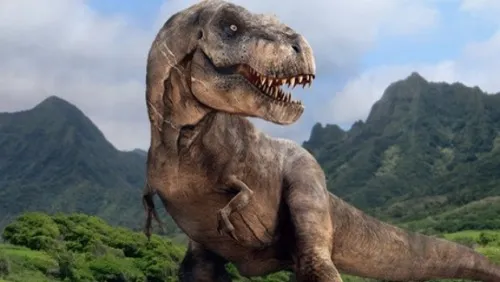
Basic Caption : a trex dinosaur in jurassic park
Output : basic_caption.png
Better caption : A gigantic dinosaur with sharp teeth is standing in a lush green landscape with mountains in the background. The sky is partly cloudy, and the dinosaur appears to be in motion, possibly running or lunging forward. The setting seems to be reminiscent of prehistoric or Jurassic environments, likely intended to represent the natural habitat of such a creature.
Output : better_caption.png
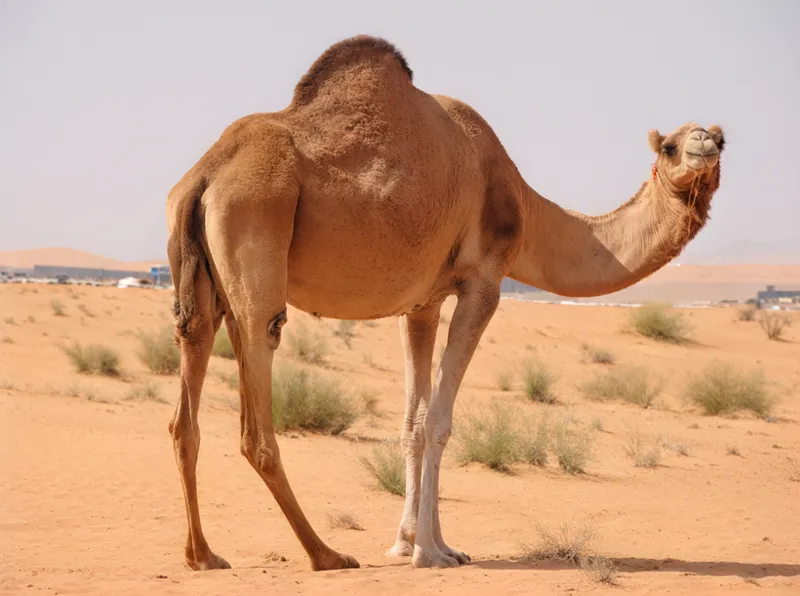
Camel
A family photo