
















Solving CUDA and C++ Tools Compiling Errors Once and For All for Python AI Applications
This post is full up-to-date as 11 July 2026 and once you followed it for 1 time, you will be ready to install, compile and run any AI application out there including our 100+ AI Apps. You will be able to use Torch Compile with 0 issues and more.
========
Patreon exclusive posts index to find our scripts easily, Patreon scripts updates history to see which updates arrived to which scripts and amazing Patreon special generative scripts list that you can use in any of your task.
Join discord to get help, chat, discuss and also tell me your discord username to get your special rank : SECourses Discord
Please also Star, Watch and Fork our Stable Diffusion & Generative AI GitHub repository and join our Reddit subreddit and follow me on LinkedIn (my real profile)
========
New literally 1 click Linux and Windows installers published that setups everything : https://www.patreon.com/SECourses/posts/1-click-windows-172290854
WARNING : Do not have non-English characters in your Windows account username such as Cyrillic characters, Japanese characters or such or you will get very random unexpected errors
WARNING : Do not use non-English and space characters in your folder paths / names to not have any issues
11 July 2026 Update
We are more moving into CUDA 13+ and Python 3.12 realm
Also Python 3.13 version updated to 3.13.14 - Forge Web UI using this
CUDA 13.1 is now default not 12.9 anymore
Moreover, I am coding newer apps to auto detect in more robust way CUDA and Visual Studio C++ Tools and MSVC even if they are not in expected paths
I have removed Visual Studio Build Tools install requirements since now only installing Visual Studio Community Edition is sufficient
Our first fully torch compile working app is with updated workflows and Torch 2.13 ACESTEP XL 1.5 premium app : https://www.patreon.com/posts/157675060
We have so significantly improved Torch Compile with ACE-STEP 1.5 XL read changelogs
I have updated Visual Studio Commuity edition install part of this post with newer info and higher quality screenshots
We have updated FFmpeg to latest version and installation instructions, moreover, I have added automatic FFmpeg installer bat file (you have to right click and run as administrator)
This bat file Install_FFmpeg_Latest.bat downloads and installs and setup FFmpeg latest and FFmpeg shared latest, see below FFmpeg section for more info
17 Feburary 2026 Update
We have upgraded to cuDNN 9.19.10 and TensorRT 10.13.2 GA
I have upgraded all links and screenshots
Visual Studio Build Tools
We don't need Visual Studio Build Tools anymore, uninstall it like below if you have installed
You can uninstall and do fresh install or update Visual Studio Community 2022
Make sure that you have installed all below checkboxes, with modify button after update you can see
Visual Studio Community Edition
Now we only need Visual Studio Community Edition. I recommend to uninstall first all existing Visual Studio Community Edition and Visual Studio Build Tools like above image
Download Visual Studio Community edition install link 2022 : https://aka.ms/vs/17/release/vs_Community.exe
When running, right click and Run as Administrator
Which checkboxes to check - Simply select all
I am using Visual Studio 17.14.35 but you can use newer version too
It may give you warning like below ignore and continue
Next We will add this folder to our system and user path - Important!
C:\Program Files\Microsoft Visual Studio\2022\Community\VC\Tools\MSVC
Find the latest folder named like 14.44.35207
If you install 2026 edition of Visual Studio it may have newer name but i recommend 2022 at the moment
And find this folder \bin\Hostx64\x64
So full path on my PC
C:\Program Files\Microsoft Visual Studio\2022\Community\VC\Tools\MSVC\14.44.35207\bin\Hostx64\x64
Here screenshot
Then add that path to both Environment Variables into System Variables Path and User Variables Path
We duplicate everything both in system and user path don't forget
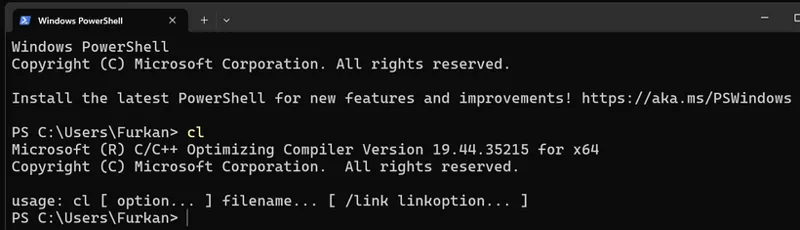
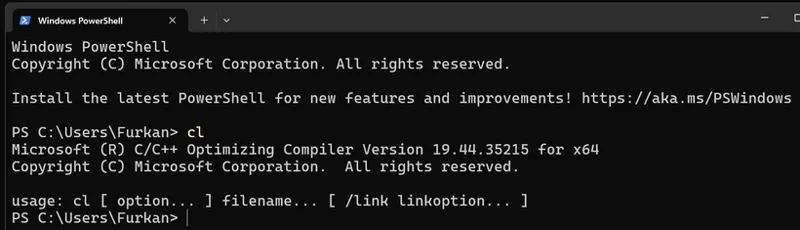
After click ok and close open a powershell (not cmd) and type below and see if working
cl
Screenshot of cl result
CUDA Installation Both 12.9.1 and 13.1.1
New preffered CUDA version is 13.1 not anymore 12.9.1
If you want to uninstall older versions here how
CUDA 12.9.1 download link for Windows 10 and Windows 11 :
Alternative Link on Hugging Face
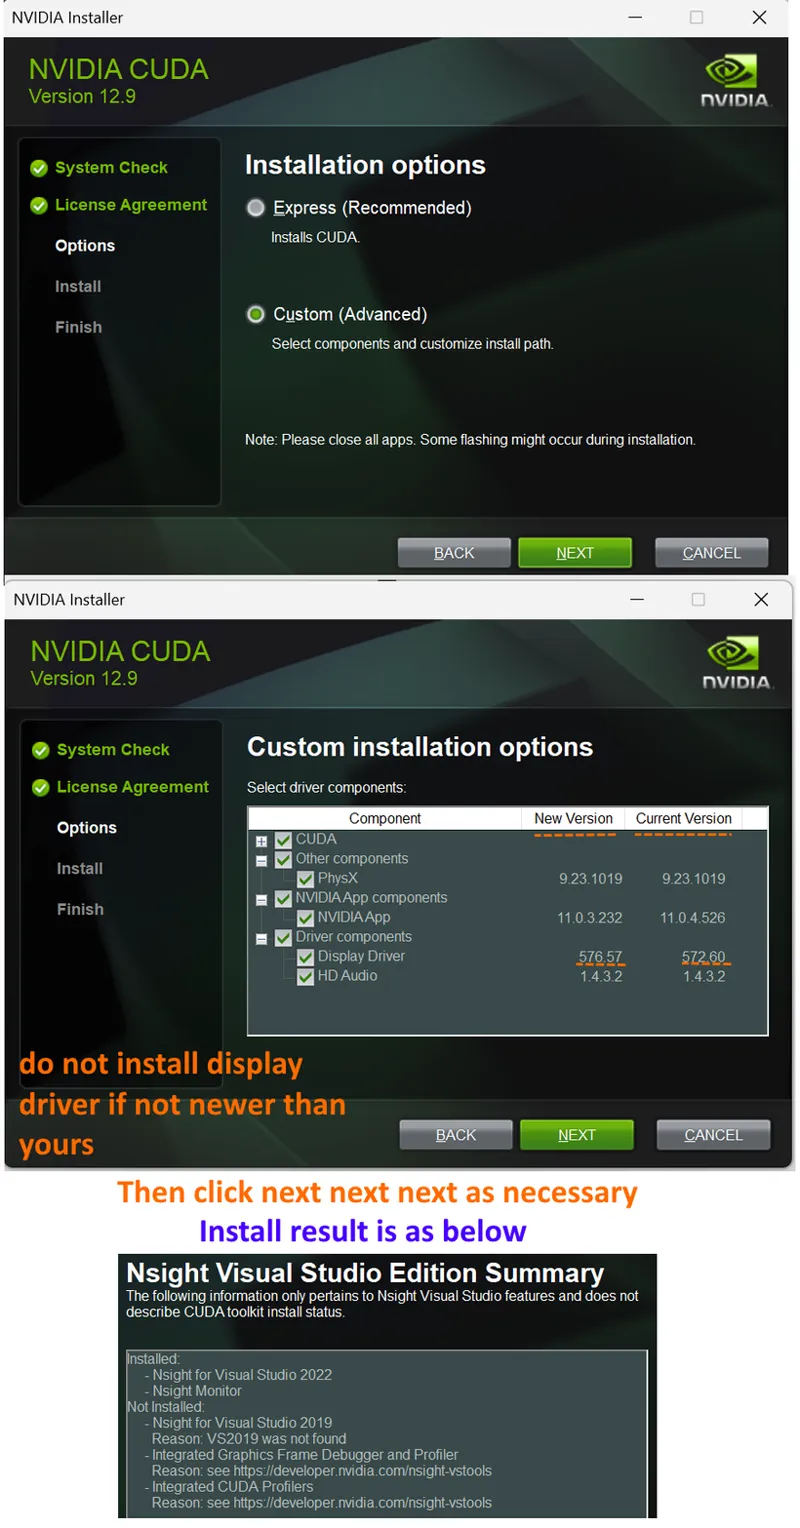
Install selection as below : CUDA_Install_New_September_2025.png
After installation restart PC
Then open a cmd and type nvcc --version and make sure you see as below
CUDA 13.1
CUDA 13.1 is now our preffered CUDA
Install with Custom (Advanced) and don't change any selections
CUDA 13.1.0 download link for Windows 10 and Windows 11 :
Alternative Link on Hugging Face
You will see summary like below : CUDA_13.1_SUMMARY.png
System Variables As Below - 8 January 2026 : System_Variables_8_Jarnuary_2026.png
System Path Variables As Below - 8 January 2026 : System_Path_Variables_8_January_2026.png
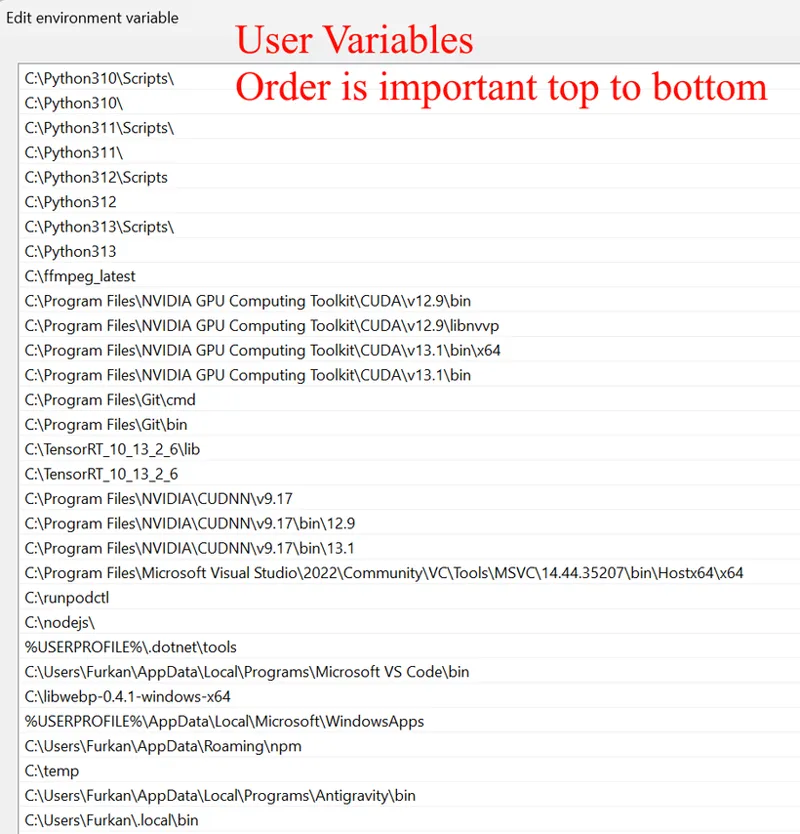
User Path Variables As Below - 8 January 2026 : User_Path_Variables_8_January_2026.png
Installing cuDNN
We are moving to cuDNN 9.19.0
\bin\12.9 will be default for now in CUDNN_PATH
There is 1 extra path you need to add here don't forget that
To download it use here https://developer.nvidia.com/cudnn-archive
Version changelogs : https://docs.nvidia.com/deeplearning/cudnn/backend/latest/release-notes.html
Here direct download link : https://developer.download.nvidia.com/compute/cudnn/9.19.0/local_installers/cudnn_9.19.0_windows_x86_64.exe
Here Hugging Face backup link : https://huggingface.co/MonsterMMORPG/Wan_GGUF/resolve/main/cudnn_9.19.0_windows_x86_64.exe
We install as default
It is installed into here by default : C:\Program Files\NVIDIA\CUDNN
Therefore you have to manually add it into both Environment Variables into System Variables Path and User Variables Path
The folder you need to add to the paths is \bin\12.9, \bin\13.1 and main folder
e.g. C:\Program Files\NVIDIA\CUDNN\v9.19\bin\12.9\x64
e.g. C:\Program Files\NVIDIA\CUDNN\v9.19\bin\13.1\x64
and C:\Program Files\NVIDIA\CUDNN\v9.19
Extra Path you have to add is CUDNN_PATH
Add it into System Variables directly like below
e.g. : Variable name : CUDNN_PATH
\bin\12.9 will be default for now in CUDNN_PATH
Value : C:\Program Files\NVIDIA\CUDNN\v9.19\bin
Python 3.10, 3.11, 3.12 and 3.13 Download Links
We are moving to Python 3.12.10 as preffered version - but still keep 3.10.11 at the top for older apps
However, we still need to have Python 3.10.11 and 3.11.9 installed since some apps and libraries still requires them
So have Python 3.10, 3.11, 3.12, 3.13 all installed - our apps will generate accurate venv folder and you won't have any issues
Don't forget to install as in tutorial video directly into C drive with Python Launcher and don't forget to make Python 3.10.11 added to Environment Variables into System Variables Path and User Variables Path and set as top - check path variables screenshots at the very bottom of the post
Older apps still could be using your default Python
Make sure to select all options when installing, pip, tcl/tk and py launcher are mandatory to select
3.10.11: https://www.python.org/downloads/release/python-31011/
3.11.9 : https://www.python.org/downloads/release/python-3119/
3.12.10 (new preffered version) : https://www.python.org/downloads/release/python-31210/
3.13.14 (this is the worst one right now least supported) : https://www.python.org/downloads/release/python-31314/
FFmpeg Installation Automatic
I have made automatic downloader and installer for FFmmpeg
This is optional and you need to run as administrator
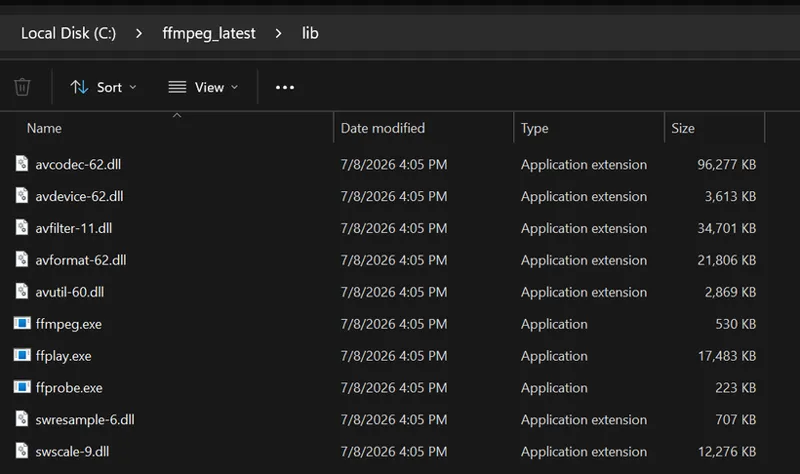
This will download FFmpeg (9 static version) into C:\ffmpeg_latest and FFmpeg (8.1 shared version) into C:\ffmpeg_latest\lib
ffmpeg version n9.0.1-11-ge47273f4d9-20260903
Then it will set user and system path automatically that is why right click bat file and run as administrator
Bat file link : Install_FFmpeg_Latest.bat
FFmpeg Installation Manual
FFmpeg Static Version Download Links
https://github.com/BtbN/FFmpeg-Builds/releases
Use this specific version for now to not have any issues :
Extract exe files into C:\ffmpeg_latest
Remember exe files that is located inside bin folder of the zip file
Add C:\ffmpeg_latest into your both Environment Variables into System Variables Path and User Variables Path
Then open a CMD and type ffmpeg and see like below
You will see ffmpeg version n9.0.1-11-ge47273f4d9-20260903 since we upgraded
We also need shared FFmpeg dlls libraries for TorchAudio and TorchCodec
Sometimes you may need to compile some stuff - libraries with FFmpeg
This compile requires you to use shared version of the FFmpeg
Shared version includes lib files so you can use its path for such specific cases if happens
Git Installation
Download link : https://git-scm.com/install/windows
Download and install just with next next next
After installing add these 2 folder into your both Environment Variables into System Variables Path and User Variables Path
C:\Program Files\Git\cmd
C:\Program Files\Git\bin
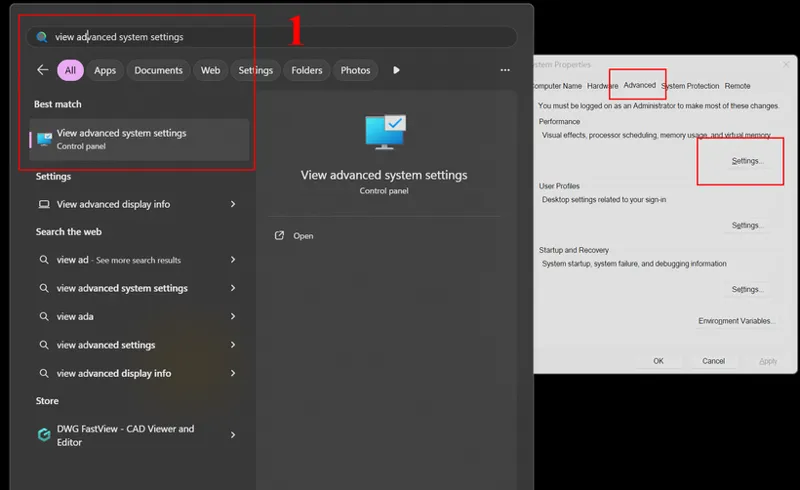
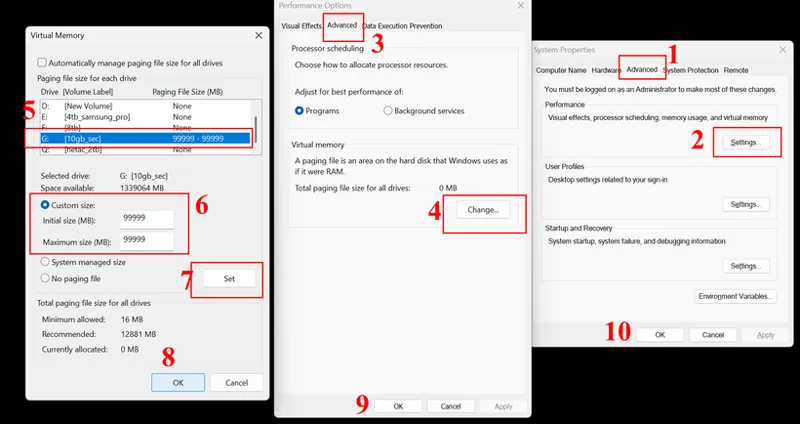
Virtual RAM Setup
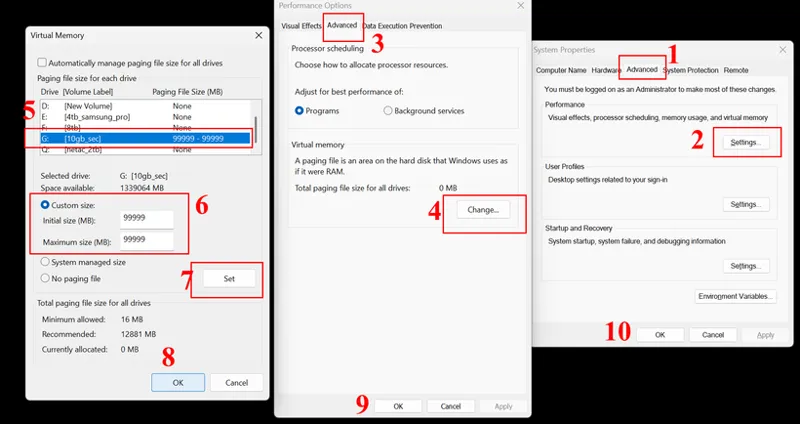
You must setup at least 100 GB virtual RAM on your fastest drive
Tutorial Windows 10 : https://www.windowscentral.com/how-change-virtual-memory-size-windows-10
Tutorial Windows 11 : https://www.windowscentral.com/software-apps/windows-11/how-to-manage-virtual-memory-on-windows-11
This is super important since when loading an AI model initially, virtual RAM may be used
System_Settings_Virtual_RAM_Part2.png
TensorRT Installation
In some cases TensorRT is necessary therefore we will also download and install it
Download link : https://developer.nvidia.com/tensorrt/download
It requires a free NVIDIA account
We are using TensorRT 10.13.2 GA
Alternative link on Hugging Face : https://huggingface.co/MonsterMMORPG/Wan_GGUF/resolve/main/TensorRT-10.13.2.6.Windows.win10.cuda-12.9.zip?download=true
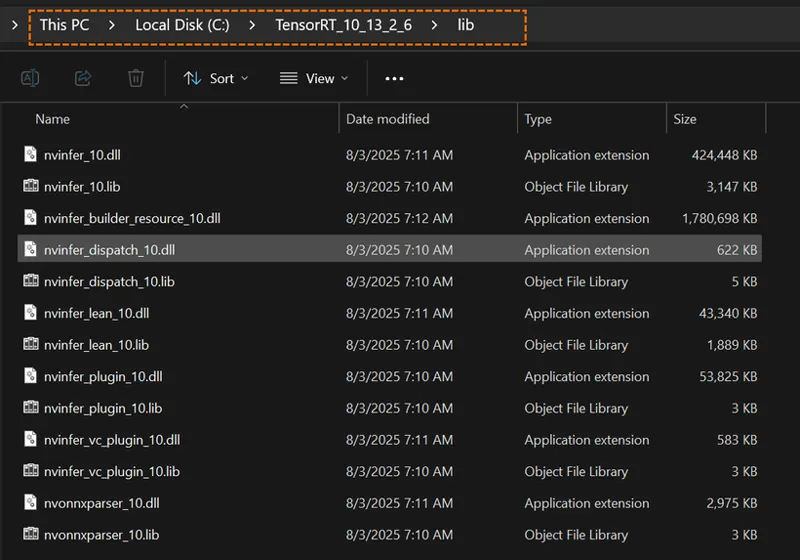
Extract the zip file into C drive like C:\TensorRT_10_13_2_6 and enter inside \lib
You must see nvinfer_10.dll and such files
Now add this path C:\TensorRT_10_13_2_6\lib and this path C:\TensorRT_10_13_2_6 into your both Environment Variables into System Variables Path and User Variables Path
Enable Windows Long Paths
Full article here : https://learn.microsoft.com/en-us/windows/win32/fileio/maximum-file-path-limitation?tabs=registry#enable-long-paths-in-windows-10-version-1607-and-later
Reg file just download and run : Enable_Windows_Long_Paths.reg
NodeJS Installation
Also install NodeJS 22.20 since some apps need it like Ostris AI Toolkit
When installing install all as default / next no changes
Download link : https://nodejs.org/en/download
Direct link : https://nodejs.org/dist/v22.20.0/node-v22.20.0-x64.msi
Fixing Triton Related Errors
If you get Triton related errors we need to delete the Triton cache folder
e.g. C:\Users\Furkan\.triton
So we clear whatever inside C:\Users\Furkan\.triton
I made a bat file for this so use this zip file, extract anywhere and double click and execute the bat file - don't run any of my bat files as administrators
Download clear cache zip file : Clear_Triton_Cache.zip
Example Compile Logs - For Advanced Users
You will see which versions of what is used like this
K Lite Mega Codec Pack Profile 9 Is Also Recommended
Select advanced option to get this screen
This is optional but useful tool
Environment Variables Screenshots - Rememer Top To Bottom Order Matters
Updated 8 January 2028
Main Screen : System_Variables_8_Jarnuary_2026.png
User Path Variables : User_Path_Variables_8_January_2026.png
System Path Variables : System_Path_Variables_8_January_2026.png
Comments (41)
Hi, folks, anyone facing this error with ComfyUI ? SystemError: ffi_prep_closure(): bad user_data (it seems that the version of the libffi library seen at runtime is different from the 'ffi.h' file seen at compile-time) I read online that it might be due to comfyui-angle, but I'm not sure.
Hi. Thanks for your work. I'm interested in installing your tools, but I have no trust in Microsoft shit. There are always problems. So before proceeding, I have some questions you should have answered at the very beginning of your tutorial. First, what is the minimum hardware setup to work with your Musubi trainer in general and for LTX 2.3? My goal is to train LTX 2.3 character Loras with a 24 Go Ram and Nvidia RTX 3090 24 Go Vram system. Is it enough? You don't mention it. Second. If I install a new version of Cuda Torch blabla will it ruin my ComfyUI setup ? I don't want to reinstall it if there is a risk of messing up Sage attention and Triton. It is known, that a lot of old nodes will break with a new Cuda-Torch version. Third. I don't want to install Win11 and to update my Win10 version. Is there a Win10 version minimum mandatory to run your system ? Anyway maybe the best solution would be to install a second windows version for training. What do you think ? Thanks for your help.
1 : 24 GB VRAM good if you have min 64 GB RAM 2 : wont affect but i recommend use our comfyui installer for best quality 3 : win 10 will work perfect same. 4 : make sure to have installed python 3.10 3.11 3.12 3.13 because we generate venv based on necessary python version
thanks for the update doctor.
you are welcome
These instructions are exactly what I have needed. I have been with you for several years and this is a cleanup on my system that was overdue. I have a clean and efficient setup now - and faster. Thanks!
you are welcome
Hi, I missed the visual studio build tools install when I first went through this process, so I installed it at the very end. Will that order cause me problems? BTW, your tutorial is really spectacular, thanks.
thanks a lot. shouldnt cause any issues. sorry for late reply.
Super post
thanks
Hi..Could you please clarify which package versions need to be installed for Kohya v41? I followed a tutorial to set it up, but encountered an error with Torch during flux training. "D:/Kohya_FLUX_DreamBooth_LoRA_v41/kohya_ss/sd-scripts/flux_train.py --config_file D:/SwarmUI/Models/diffusion_models\model/config_dreambooth-20260203-172805.toml W0203 17:28:10.226000 17280 venv\Lib\site-packages\torch\distributed\elastic\multiprocessing\redirects.py:29] NOTE: Redirects are currently not supported in Windows or MacOs."
multiple gpu not supported on windows. for torch compile you have to follow this post : https://www.patreon.com/posts/click-to-open-post-used-in-tutorial-111553210
i see cloudflared on path but where i have to download it? any step by step for doing that? thank you
hi what you want to download? cloudflared is used to access links that is running in like runpod or massed compute from your browser
CAN WE USE THE NEW cuDNN 9.15.1 ?
you may use but the version i mentioned is being tested
VS 2022 Community is no longer available. With VS 2026 Community, do we still need to install the 2022 Build tools as well as some of those features are no longer supported with 2026
looks like i have to update links according to new VS 2026. but logic is same. give me some time to update
This was incredible, and you've fixed every single issue I've had with AI repos in general. I never knew that the order of values in path mattered. So many days/weeks of jerry-rigging things fixed in a few hours. Permanent subscriber for how much you've done for me
thank you so much appreciate the comment
Hi I downloaded cudnn 9.7 but it appears to be a zip folder instead of the installer. I extracted it and copied to "C:\Program Files\NVIDIA GPU Computing Toolkit\CUDNN\v9.7\bin". I also added a path to it as well. Is that correct? I also copied to the bin folder for CUDA 12.8, 12.4 and 11.8. Is this ok?
yes it is accurate as long as that folder has the cudnn dll files. i personally prefer C:\cudnn_9.7 since it doesnt have space character
Hello I have 5090, should I download the latest versions of cuda and cuDNN (there are newer ones) and make those default? Or should I just use the ones shown in this post? Should I also still include the old versions like cuda 11.8? Thanks!
sorry for late reply. CUDA 12.8, cuDNN 9.7 are good.
hi, I am having an issue when i download cudnn it does not show up in my environment variables path, is this an issue or can i continue with the next steps?
you need to manually add as in shown in video in that case easy
Hello, I am getting this. I am new and installed the requirements, but every time I start generating an image, I get the following issue: ComfyUI execution error: Model face_yolov9c.pt not found, or yolov8 folder path not defined
that means you have to download that model. model downloader has it : https://youtu.be/fTzlQ0tjxj0
Hi, i would like to install comfyui with rtx5090 support. But i am a little lost with your page jumping from one page to another and from one video to another. What is the best way to install it on a fresh win11 pro system?
hi this installer has RTX 5000 series support : https://www.patreon.com/posts/105023709
Got to the point of Human or Animal live portrait and it insisted I must have an Nvidia gpu. Can this not be done with AMD?
i don't know sadly. some libraries are nvidia depended and probably need to be replaced. check this out if works : https://github.com/KwaiVGI/LivePortrait/discussions/482
Installing Python310 failed for me. "The feature you are trying to use is on a resource that is unavailable" it seems ro be looking for test.msi for some reason. I have a log file from the set up failed window if tat helps? Not sure how to uplaod it here?
well without debugging i dont know. if you upgrade gold tier i can help you via remote desktop
finally! thank you that did resolve my issue with the image sorter (I guess that was an issue with cudnn default not being the right one. I might play a bit with the install options of Visual Studio and Build tools, because that's a lot of space installing all. thanks again!
awesome
thank you! that fixed some problems
awesome
Thanks heaps. After I installed LTSC 17.8 BuildTools and CUDA 12.4 it solved my issue where your latest ROPE versions couldn't import face images.
awesome