



(FREE) The COMPLETE Uta Guide Part 2 (Mirror and Japan National Champion Uta's Gameplay)
[Link to Part 1: https://www.patreon.com/posts/complete-uta-97729047?utm_medium=clipboard_copy&utm_source=copyLink&utm_campaign=postshare_creator&utm_content=join_link]
Hi again.
My name is Kai (@ikailakai) and I’m a Japanese OPTCG player who plays basically anything, but loves green the most.
About a week ago, I uploaded a guide to Uta that was around 13000 words long, and received the most positive feedback I’ve ever received on anything. Countless people have sent me messages telling me they managed to win the Uta Deck Battle, or place high in their championship (or treasure cup? I don’t know the difference we don’t have them in Japan), and local wins. I would first like to say thank you for the feedback, and all of the questions. If you do have any questions, always feel free to DM me.
I wanted to make my Complete Uta Guide, a little bit more complete as a thanks for the explosive feedback.
I said in the previous post that I would update my guide with information from OP06, EB01, and possibly even OP07 given the timing, but this update is not related to that. This is a small update on one thing I forgot to add in my first part, as well as something a bit new for me. A vod review!
The part that I forgot to include is a brief section on the mirror in OP05. Although the guide explains what to do in most situations, I thought that it would be useful to aggregate that information into the parts that are most applicable for the mirror. I don’t believe there will be anything new in this section that wasn’t said at some point in the article, but it will make it easier to refer back to.
The vod review will be of Uta versus Sakazuki by the player 月うさぎ(TsukiUsagi) at the Japanese Nationals. If you aren’t aware, the Japan Nationals was on February 10th, where Uta won the entire tournament. Although this game is in EB01, most of the cards are out already, and the gameplay flow generally does not change for Uta throughout sets. I’m going to be going through one of the games that happened on that day in detail explaining my thoughts and his logic behind every decision.
However first, let’s go through the Uta mirror, as any green mirror is a battle of fundamentals.
OP05 Uta Mirror
Side Selection: Second
Mulligan: 8 Kid
Firstly, the mirror for any green deck is very complicated. The green mirror is purely just a resources war. Although it may seem like 10 cost Doflamingo is the strongest in the mirror, being a 10000 power body, and stopping 3 attacks next turn, it doesn’t have the same long term pressure that Kid has. Kid makes your leader 8000 power, and green does not have any way to clear it without simply overcoming it with force. By keeping your hand’s counter healthy, it doesn’t matter if you’re at 5 life or 0 life, because once Kid comes down, he is your first, and last line of defense. The way that we want to play it out is similar to how we play against RP/PLuffy, where we will play 8 cost Kid on 8 Don instead of 7 Luffy.
Refer back to “🎤Why should I play 8 Kid on 8Don against RP/Pluffy and the Mirror?” on why this is optimal. As everything we do in the mirror is just a resource war, rather than finding massive ways to swing the game, we need to find incremental advantages over time that eventually lead us to breaking the opponent’s fortress before they can break ours.
Hit at equal value
FUNDAMENTAL:If one player is at 5 life and 0 cards in hand, and the other player is at 0 life, and 15 cards in hand, who is in more trouble? Although of course the board will play a part in this, the player with 0 cards will generally not have any board as they can’t defend it. Even if your life is at 0, you only lose when you run out of all of your resources. Hitting with 7000 or 9000 in the early game and getting your opponent down to 2 life on turn 4 may feel good, and advantageous, but they will in turn, have perhaps 11 cards in their hand as a result. This means that you’re only artificially closer to lethal. If you do not scrape your way through all of the counter in their hand, you cannot kill them. OPTCG isn’t a game about getting your opponent to 0 life as soon as possible, it’s a game about getting your opponent’s hand to 0 as soon as possible. As such, you very often do not want to be attaching Don to your characters or leader, when you could be developing your board. By developing your board, you are setting yourself up for a higher number of attacks, and therefore more pressure on the opponent’s hand in the long term.
When it comes to the green mirror, we are rarely looking for ways to simply break through the opponent’s defenses. Green has many ways to dissuade and shift the opponent’s lethal, using cards such as 8 Kid or 10 Doflamingo to make it very hard to simply ignore the board. As such, the goal in the mirror is to reduce the opponent’s counter in their hand until they can no longer defend their board. As Mono-Green can hold onto games for a very long time, there is no need to desperately kill every character that is played. When you hit at equal value, it’s always proposing the question: Do you want to let his character die from a small attack, or do you want to lose 1 card in hand. By stacking many of these smaller attacks to characters, we slowly make a resource advantage over the course of the entire game.
This is particularly important when you remember that we are focusing solely on playing and defending 8 cost Kid well. By chipping away at the opponent’s characters, either they die cheaply, or they make their 8 cost Kid weaker. Every attack that is defended that wasn’t an attack to 8 cost Kid, is one less attack that you need to do to 8 cost Kid. In many cases in the mono-green mirror, we want the opponent to waste counter on small characters. As such, we want to be constantly hitting at equal value to keep proposing these situations.
As playing 8 cost Kid and defending it with as much counter as possible is the gameplan in the mirror, the next point is something to consider occasionally.
2. Don’t mindlessly play Brook
Brook is the star in most matchups. It lets you play Nami or Usopp, or even Uta for very cheap, and immediately spreads out the board. However, Brook has something that sometimes can be more useful than spreading the board in matchups where we play 8 cost Kid. And that is!!!!!!
1000 counter.
I’m not kidding. Play like 15 8 Kid matchups and you’ll notice that due to the opponent either becoming 6000 power (purple Luffy), or becoming 8000 power (green Uta), your Brook may never attack, and eventually gets replaced by an Uta. It’s not that we need every bit of counter that we can get, but rather, that his 1000 counter might have more value than the occasional hit he may never get. In the mirror, you will still occasionally want to play Brook to ensure that your board is more powerful in the early game, but depending on the board state and timing, look out for situations where it seems like playing Brook is just a waste.
Just know that there is no absolute, “Never play Brook,” or “Always play Brook,” and keep your mind open to unique situations.
3. Prioritize 3 cost Uta in searches
For 8 cost Kid matchups exclusively, the search priority is completely different. As the gameplan is not to spread out the board, but rather to defend 8 Kid, we want to prioritize 3 cost Uta and 7 cost Luffy. The reason we still pick 7 cost Luffy in searches is because he is a blocker. When 8 cost Kid is dropped, we want to defend the attacks that can be defended with 1 card, and block attacks that require more cards generally. Blockers let us defend hits that would normally cost 2-3+ cards in hand. As such, we want to have as many as possible, as this also contributes to the incremental resource advantage we are going for.
The core of playing Uta is already in the guide, but I hope that some of these tips made you go “hm!” or “oh!” The green mirror is one of my favorite matchups in the game, despite it sometimes being very grueling. Embrace and become one with the war of attrition and showcase your fundamentals to diff your opponent.
Vod Review
In this section, we’ll go over the Japan National Champion, TsukiUsagi’s Uta play in the semifinals against Bee’s Sakazuki.
For those who don’t know, you need to qualify through 3 rounds to reach the Nationals.
Qualifying Rounds: 16-32 man tournaments where the top 3 get invited to the Championship.
Championship: 1000-1500 man tournaments where the top 16-32 get invited to the Finals Tournament depending on the tournament size.
Finals Tournament: Two 160 man tournaments where the top 16 are invited to the Japan Nationals.
Japan Nationals: One 32 man tournament where the top 6 are invited to the World Championship Finals next month.
I fell at the Championship stage, where I barely missed out on the Top 32 in the Tokyo Championship.
ビー (Bee): Fukuoka Championship Top 16, Finals Tournament 2nd Place
vs
月うさぎ(TsukiUsagi): Tokyo Championship Top 16, Finals Tournament Top 16
TsukuUsagi went on to win the entire tournament, and this is his decklist.
As of course, I did not manage to reach this stage, TsukiUsagi is a better Uta player than me. I will do my best to explain all of the reasoning behind each turn to the best of my ability, but as I’m not him, I may miss out on some other factors that contribute to decisions made. In any case, I hope that going over vods like this is helpful to apply what we are discussing throughout my Uta guide to a real game.
Sakazuki has chosen second.
Starting Hand:
New Genesis, Sanji, Usopp, Sanji, New Genesis
Sanji, although a very powerful new 2000 counter, is a 2000 counter nonetheless. It is relatively rare that you will be playing Sanji out of hand, so for all intents and purposes, we can imagine that this is just Izou or Carrot. Against Sakazuki, we do not desperately need 2000 counters, so getting 2 in our starting hand is a bit of a minus. However, it is better to have it than to not due to the nature of Uta.
New Genesis will help a lot as going first doesn’t allow us to use our leader ability as often as we’d like to to find the crucial pieces such as Luffy or Brook.
Usopp isn’t the greatest card to have in our starting hand if we’re second, but as we’re going first, we do want a 3 cost 5000 that can be played, without feeling forced to use New Genesis, or worse, just miss out on playing a character.
If I had this starting hand when going second, I would mulligan and look for stronger pieces like Brook or Luffy. However, because we are going first, I think this hand is perfectly good to keep.
Funnily enough, 2 of the 5 cards in this starting hand were in TsukiUsagi’s hand until the final turn of the game.
TsukiUsagi keeps his hand.
TsukiUsagi doesn’t use New Genesis on turn 1.
Refer to “🎤Ok fucking why?” for the reasoning on this…
In context of the first part of the guide, the name of the section made more sense… but referencing it here is very random without context.
On 3 Don, the only option is to attack for 5000 and play Usopp. We of course prioritize chipping away at the opponent’s resources more than getting a card with leader ability. Sakazuki can only develop the board while simultaneously KOing Usopp if he plays Lucci. However, as Uta spreads out the board, getting Sakazuki to waste a key board-clear card on turn 2 helps Uta in the long run if Sakazuki fails to draw more Lucci. Additionally, we just saw Sakazuki draw 4 cost Borsalino from Brannew. We can play under the assumption that he wants to play this Borsalino next turn. As such, it’s generally a good play to just drop 3 cost Usopp and not use leader ability, as TsukiUsagi does.
Sakazuki hits for 5000, then plays Borsalino.
This first 5000 attack we will gladly take as Uta, as it is essentially a bonus draw to find more cards that can help push our gameplan.
Although it wasn’t anything actively helpful, his next draw is Brook, which is exactly what we need to keep the tempo of the game.
This is TsukiUsagi’s hand.
We have Zoro, or we have Brook and no target for Brook. As we’re against Sakazuki, and we want to break his removal ladder, it’s a good time to use New Genesis. We really want a 3 cost to play off of Brook to try to make it as difficult as possible for the Sakazuki to clear the entire board.
He uses New Genesis, and although It’s hard to see exactly what his choices were, we saw both Usopp and Nami in the search. Regardless of if we use the on play effect or not, we will be playing the 3 cost character no matter what. As such, picking the stronger one is better, as Usopp’s counter will not play a role in this game.
With 5 Don up, Usopp and Leader, against Borsalino, what’s the best way to spread out the board?
5k 5k, Brook -> Nami + Effect
5k 6k, Mihawk -> Brook -> Nami +Effect
5k 6k Brook -> Nami (no effect)
6k 6k Mihawk -> Brook -> Nami +(no effect)
The answer is D. I believe in the moment I would have messed this up and went B.
Because the opponent has Borsalino, anything that results in us hitting with 5000 last is pointless, so A is immediately out.
As we’re trying to spread our board hard, not using Mihawk to make it even more difficult for the opponent to clear the board feels counterintuitive with the objective. Therefore, anything not using Mihawk is out in this situation.
I believe the reason why TsukiUsagi went 6k 6k Mihawk -> Brook -> Nami +(no effect) was because he did not want to let Sakazuki block an attack for free at all. By hitting with 6000 2 times, you ensure that you poke out a little bit of counter out of Sakazuki’s hand, and then spread out your board very suddenly.
I would have felt obligated to search with Nami to try to find cards like Brook to keep being able to put up a wall of characters that can’t be completely cleared. One thing to consider is that if we play Luffy next turn, Mihawk can’t hit, and it ends up becoming a bit of a waste. This is one of the awkward problems with Mihawk, as a 4000 power attacker. As such, Uta may need to pivot into finding a way to attach Don to her characters and hit next turn to not waste the Mihawk she played. By playing Mihawk here, and not having Luffy or any solid target in hard, I think that he is setting up to hit big next turn. If he were to play Luffy next turn, then Mihawk would most likely not be worth it in this matchup.
As OP05 still does not have Mihawk, this will be something to think about in the near future. If he did not have Mihawk in this exact same scenario, then 5k 6k Brook Nami is the optimal play to try to keep spreading the board to the best of his ability.
For a better explanation on the math behind when to / how to use Mihawk, refer to “🎤When should I play Mihawk?”
This is the board after the turn is over. It seems nearly impossible for Sakazuki to clear everything next turn.
On Sakazuki’s turn, Sakazuki is looking to clear as much of the board as possible. Meanwhile, Uta is looking to keep her board healthy, rather than her hand. As long as the attacks aren’t 7000+ Uta should aim to defend her board so that Sakazuki is forced to use removal.
Sakazuki uses Rebecca -> Hina -> Ama no Murakumo to Bottom deck Brook and Nami
As such, 2 characters stay on the board. If Sakazuki was still at 3 life, this would be a very bad spot to be in. However, as Sakazuki took 2 5000 power hits, Uta is in a spot where she can push for damage, as was set up last turn, and look to close the game with I’m Invincible in a few turns.
On this 7 Don turn, there is really only one choice. If he were to hit with Mihawk, Usopp, and Leader, and then play Sanji, or another character that’s pulled off of Leader Ability, then almost certainly, Uta’s board will be completely cleared next turn. I think the only option on this turn, given his hand, is to either, 7000 7000 7000 with the 3 characters, or to 5000 6000 6000 and Brook + 3 cost to try to aim for continuous board pressure.
TsukiUsagi sequenced his attacks from: 7000(Leader), 7000(Mihawk), 7000(Usopp). As we don’t have Brook, I believe that he hit from leader first to roll his chances to see if he happens to top deck Brook from his leader ability. Although he is of course a higher level player than me, I think this is a mistake.
I think that the correct sequence is 7000(Usopp), 7000(Mihawk), 7000(Leader). Although it is nice if we draw Brook, we only have 3 left in the deck. Conversely, Sakazuki has triggers that can eliminate 3 costs. Ice Age, which KOs a 3 cost or less, and Hound Blaze, which bounces a 3 cost or less. We still have not seen a single copy of them, so there are likely 6 lurking somewhere. I do not think the risk / reward is equivalent, and therefore, you should hit from the 3 cost characters first in my opinion.
Then when it comes down to either hitting with Usopp or Mihawk, I would hit with Usopp first.
If after the first Usopp hit, we hit a trigger that KOs or bounces a 3 cost, they will KO / bounce the character that hasn’t attacked yet most likely. This means that the 3 cost 5000 will stay on the board, and not the 3 cost 4000. Additionally, if it’s Hound Blaze, at the very least, we will get a 2000 counter in hand, and not a 1000 counter.
Therefore, with my understanding, I think hitting from Usopp is better, then Mihawk, and lastly Leader as there is no worry of it being KO’d or stopped.
The next turn, Sakazuki clears the board very easily with Great Eruption, and Lucci.
Uta is in a situation where she needs to finish the game very very soon or else she will lose.
Her hand has 5000 counter, but Sakazuki has a full board.
The public information available from Sakazuki is Hound Blaze only, meaning that there are potentially 4 cards with or without counter.
Uta cannot finish the game on this turn with her current hand, so it is finally time to use the last New Genesis and look for either Backlight, or I’m Invincible if she decides to go for lethal.
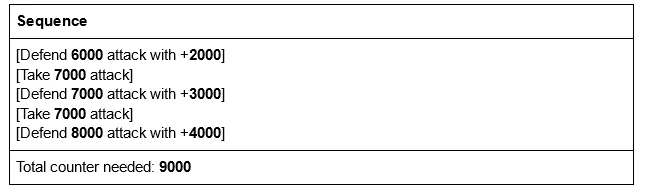
Firstly, we need to count how much damage Sakazuki has next turn. This is important to understand, but difficult to apply to your games without practice, so I heavily encourage thoroughly understanding this and just trying to do this in your games, even if it takes 15 minutes at first. I cannot do it perfectly every time, but I can find good choices within a minute now after practicing. If we calculate how much damage is coming through, we will know how urgently we need to finish the game. If there is almost no chance of surviving, we need to end the game now.
Brannew (3000), Borsalino (5000), Hina (5000), Tashigi (2000), Lucci (6000), and Leader (5000)
With 10 Don, and Hound Blaze, this can be spread to evenly to
8000 8000 8000 8000 using neither Tashigi nor Brannew.
7000 7000 7000 7000 7000, not using Tashigi.
6000 6000 6000 6000 6000 7000 using all characters.
As the opponent has 2 life, we will want to hit in a staircase, meaning lower values to higher values to account for the extra counter they may draw from their life. There are situations where you don’t want to make a staircase, or even be at equal value, but this is not one of those times as the Uta has 2 life Sakazuki needs to get through.
I we divide this into a staircase, we get
7000 8000 8000 9000 using neither Tashigi nor Brannew.
6000 7000 7000 7000 8000, not using Tashigi.
5000 6000 6000 6000 6000 7000 using all characters.
This isn’t the only way to divide it, but it is a good metric.
Uta cannot play 8 Kid on this turn and still have a chance to win, so we will just look at the raw numbers for this example.
Sakazuki needs to get through 2 life to win on the next turn.
If he goes with option A, at least 2 of the attacks need to be defended. This means that Uta needs to have at least 8000 counter in total no matter what.
Option A: 7000 8000 8000 9000 using neither Tashigi nor Brannew.
It may feel smarter to defend the 8000 attack rather than the 9000 attack, but due to Brannnew being on the field, it actually hurts more. Just thought I should point that out while we’re here.
In option A: Uta needs to have 8000 counter, but gets to draw both of her life.
If he goes with option B, at least 3 of the attacks need to be defended. This means that Uta needs to have at least 9000 counter in total no matter what.
Option B: 6000 7000 7000 7000 8000, not using Tashigi.
Compared to option A, option B actually requires 1000 more counter no matter what. Making it a better option without any sort of public hand information.
In option B: Uta needs to have 9000 counter, but gets to draw both of her life.
If he goes with option C, 4 of the attacks need to be defended. This means that Uta needs to have at least 9000 counter in total no matter what.
Option C: 5000 6000 6000 6000 6000 7000 using all characters.
Option C doesn’t leave any characters left that can attack after you start hitting at a low number, meaning that not only are the attacks weaker, but there is no backup plan.
In option C: Uta needs to have 7000 counter with only 1 life taken, or 8000 counter, but gets to draw both of her life.
Therefore, firstly, Sakazuki should go with Plan B, and hit with 6000 7000 7000 7000 8000 to require the most counter out of your opponent’s hand, and secondly, Uta need 9000 counter to survive.
Although I used Sakazuki for this demonstration of lethal math, it really applies to any leader going for lethal. Whether it is you calculating your own lethal, or you calculating your opponent’s lethal, it is important to understand this to a fundamental level. When I first figured this out, I had a flashback to every time that I was 1000 damage off. Maybe I did have lethal and just sucked?
All of this math is to tell us that Uta needs 9000 counter to survive the next turn. After her leader ability, she has 6000 counter in hand, meaning that her life needs to be 2000 counter and 1000 counter, disregarding weird triggers.
As Uta has already seen 4 2000 counters throughout this game (3 Sanji and 1 Mihawk), and we know as the Uta player that we run 10, the odds of getting a 2000 counter and 1000 counter out of life, while not impossible, is low.
Therefore, the odds of Uta dying next turn are very high. This means that we have to try our best to go for lethal.
We use New Genesis now that we need to, and are looking for either Backlight, or I’m Invincible to have enough attacks to finish the game on this turn.
TsukiUsagi draws I’m Invincible, and gets the green light to go for lethal.
It’s honest to say that it was a bit of a miracle that the attacks went through and Uta won, but it was the one and only chance he had to win. He spotted it, and was rewarded.
One small base to cover: “Why not play 8 cost Kid?” Perhaps Uta can hold on to the game until she can go for lethal, so why not take this into account when calculating the opponent’s damage? The answer is not because it’s Sakazuki and he will clear it. Sometimes we need to pray that the opponent just doesn’t have the card that would make them win. The real reason is because 8 Kid does not bring us any closer to lethal. Even if Sakazuki doesn’t have the tools to kill Kid, and the game is prolonged for another turn, Uta (only at 9 Don this turn) can only hit at 5000 while activating Kid, if she chooses to do so. Not only is the 5000 power attack absorbed for free by Borsalino, but next turn, Sakazuki gets 1 draw, and 1 use of his leader ability to potentially get 2 more cards with counter. The longer the game goes at this point, the more counter Sakazuki will get, and the harder it will be for Uta to close out the game. Playing 8 Kid to stall a turn only hurts the Uta player.
TsukiUsagi made great decisions every turn given his hand and managed to grab the win, and eventually, the whole tournament.
Thank you again for all of the support. I hope that this article was helpful and interesting. I can always do more like this when the scenario is right.
Feel free to ask me questions about this, or the Japanese meta @ikailakai on Twitter or Discord.
If you are not subbed to the Patreon, I would appreciate it if you consider doing so. Cross and I put in a lot of hard work into our decks and thinking and try to explain it in ways that accelerates everyone’s learning so that you can immediately start being competitive.
If this whole article is to be considered a part of The Complete Uta Guide, it now brings us to a total of ~17500 words. Very sorry about the length, but I tried to explain everything as clearly as possible in every situation. Of course, there will be another part of this coming out in the more distant future pertaining to OP06, EB01, and potentially OP07, but the fundamental moves of Uta have not changed, and probably will not change for a long time. Although the guide is long, I believe it’s a great introduction to many many concepts in the game, not just for Uta, but all leaders.
Thank you for reading.
Comments (4)
Great Arrticle rocking Uta for my treasure cup next week
Always a great read! thank you for the article 🫶🏽
Goated article as usual! On the turn the Uta player goes 7, 7, 7 with Mihawk, Usopp and Leader, do you think there is any merit in swinging into the board rather than life? The answer is probably no, but could you explain why? I kind of get it, but maybe I would have made this mistake during the game, and I would like to avoid that in the future.
Apologies for the late reply (congrats on the good tournament results in the mean time though). In many matchups, you do want to take the board. However, in this situation, where there isn't much of a future in sight, Uta can't afford to let the game go longer. If the opponent takes the hit when characters are being focused, although their fire power is lower in the coming turns, it also means that they weren't forced to counter a 7000 power attack. Sakazuki's only goal in this matchup is to survive. If he survives, he wins. Uta's only goal is to finish the game before Sakazuki makes that prospect impossible. As such, especially as Uta didn't have 7 Luffy to play, she needs to make the attacks that she does have on board, count.