



The Ironcast Dead: The Forlorn Encyclopedia: Chapter 1
It took me a while to decide which of the clash bosses I would cover first, as I discussed previously there are a few wrinkles that make it harder to explore the bosses in Kingdoms Forlorn when compared to other boss battlers. The main thrust of what makes this challenging is caused by the randomised nature of what is available and encountered. When you are delving in the standard campaign there are a randomised group of monster options based on the tier you at, the kingdom you are exploring and the district you are in.
While the Rosengraal uses a different system it is also randomised on a table. As such it is incredibly time consuming to explore these designs, especially when you consider that they also have four or five levels across the two campaign designs (and more in the end game dungeons). It's slow, hard work, especially because I prefer to have natural experiences against bosses as many times as possible before I write about them.
However, one has to start somewhere and the Ironcast Dead are the first Kingdoms Forlorn (KF) boss I ever encountered because they were the mob in the introductory demo edition and they showcased not just the game, but also what acrylic standees would look like and how they would function (of course we ended up getting miniatures instead). Also they are utilised a lot in the early portion of many of the current selection of Knight stories so their encounter rate is a bit more elevated than the others.
That means, for the purpose of getting started on this series this seems like the best starting point, after this I'll rotate around three different types of foe. Going from Principality of Stone → Sunken Kingdom → Wandering Monsters in a rotating fashion for each tier. I'll also cover each of the Knights and the Squire System after I've explored their unique cards and gear as much as possible.
Mechanical Themes, Keywords and Traits
The Ironcast Dead (I'll call them Ironcast from here on) have mechanics that are initially held on the AI cards, this in combination with a reduced amount of additional keywords on the various cards themselves helps keep the Ironcast's mechanical complexity down. This does not mean they do not pack some tricks to mess with player plans though.
At their heart the Ironcast's combat philosophy focuses around divide and overwhelm. They seek to force knights away from each other and instead attack the now separated group in small mobs. This is expressed through the mechanics of Gangup and Swarm.
Gangup X: Move up to X spaces toward the Target. Then, move the Targeted Knight the remaining number of spaces, ignoring the source, toward another closest Monster along the shortest path, or until adjacent. Treat this as involuntary movement. If the Target is already adjacent to another Monster, they suffer Knockdown instead of being moved.
Afterward, the source always moves adjacent to the Target. If the Target would end this movement on a space occupied by the source, the source is Displaced to the previous space the Knight moved through.
Swarm X: The attacked Knight loses -X Vigor for each other adjacent Monster.
They also have the Principality of Stone's core mechanic of Parasitize X and some generic keywords with Choke X, Bane X, Knockdown, Knockback, Armor, Overcome X, Heal X and at level 4 they also gain Odd Spawn, which is a timed spawn that occurs under set circumstances, so for the sake of completeness here are all of the rules for those mechanics.
Parasitize X: Principality of Stone keyword. If you don’t have the Panzer Parasite Condition card, gain it. Then place X Generic tokens on the Panzer Parasite Condition card.
Bane X: Gain X Bane tokens.
Choke X: If you don’t have the Choked Condition card, gain it and place a black acrylic cube on “0” on the track—this is your Choke Limit. Then, increase the Choke Limit by X-1. Your can never go below this limit.
If you already had the Choked Condition card, increase the Choke Limit by X. Then, if your is below the Choke Limit, gain enough so that it is above the Choke Limit.
Knockdown: Knockdown is aspecial Condition. When you get knocked down, you put your miniature on its side and take a Knockdown (falling down) card. While you have the Knockdown (falling down) card, you cannot move voluntarily, perform any actions, reactions, or free actions, or use Gear abilities or Techniques, unless stated otherwise.
At the end of your next turn, you fip the card to the Knockdown (standing up) side. All Knights with a Knockdown (standing up) card stand up at the start of their next turn. If, for whatever reason this card is discarded, stand up too.
Knockback X: Move the affected miniature up to X spaces directly away from the source of Knockback in a straight line. For additional details see rulebook page 84.
Overcome X+: If you failed to deal a Wound but your Total Power was X or more, resolve the Overcome effect. If you dealt aWound and your Total Power exceeds the value by X or more, resolve the Overcome effect.
Heal X (Mob Clash): Take the top BP card from the Wound Stack and place it in the left most empty space of the Mob track. Take acorresponding Mob miniature and place it adjacent to the source of this Heal (or in the closest unoccupied space), facing most Knights. If the Mob track is full or there would be no more miniatures to place, instead discard that card and ignore miniature placement. Note it has been confirmed that this counts as Spawning the Mob so it will enter face down.
Armor: The creatures of the Principality of Stone make use of Armor just like your knights-or in some cases, even better.
Armor tokens are placed on the BP cards of the Mobs. Each Armor token raises the AT of the specific BP it is placed on by 1.
Odd Spawn: Spawn at specific times, checking for specific conditions. In those cases, proceed as instructed by the appropriate specific spawning rules.
One of the areas I found challenging when playing KF is remembering all of the unique rules that each monster has, while some of the most unique are all printed on the trait card. The rest are all in the glossary and I found I'd have to look them up very often. This was a real time sink.
So I put together a reference card for each of the Ironcast Keywords used in the Clash and also the same for other monsters so that when fighting each of them I didn't have to refer back to the book and search through the entire keyword list if I forgot exactly how a given mechanic works. This became incredibly useful when facing the later monsters as complexity climbs up a lot as you pass up the tiers. If there is sufficient interest then I'll put together and release a full set of these reference cards for printing out at home or via a printing service.
To return to our Ironcast; what this collection of keywords results in is that - outside of the baseline keywords that can be found on monsters across all kingdoms - the Ironcast seek to isolate and gang up on individual Knights while occasionally inflicting the kingdom's Parasitize curse. They also utilise armor and are capable of reforming/generating new individuals when they reach higher levels at rapid rate. In short, this is like fighting a small swarm of regenerating armored enemies that separate and overwhelm their foes.
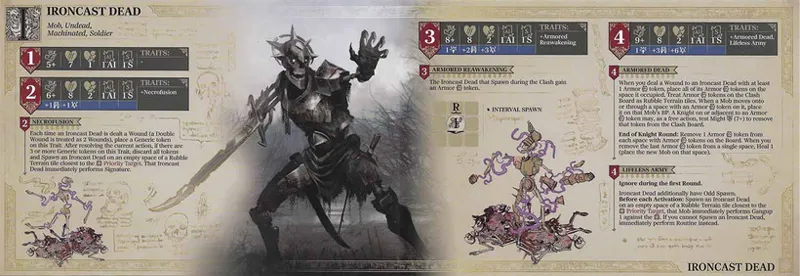
When we look at the two parts of the Ironcast's Monster Sheet we can now see how these themes are expressed more deeply as the mob levels up. At Level 2 they gain the Necrofusion trait which spawns a new Ironcast each time there are 3+ generic tokens on the Necrofusion trait (this is called an Interval Spawn). This checks after each current action, so most of the time this means that it will trigger at exactly 3 generic tokens, which means we've should expect 2 extra spawns from Necrofusion at levels 2 and 3 for both Full Clashes (8 divided by 3 rounded down = 2) and Expedition Clashes (6 divided by 3 = 2), however that can get higher if the Chaplain of the Church (BP2 Ironcast) is left casting heals. It can also climb higher once we hit level 4 because we now have self healing from the armored respawns.
This is due to the trait that arrives at level 3, causing the freshly Spawned Ironcast to come in with an Armor token, that extra durability on them in combination with the escalation mechanic means that these reinforcements are more tenacious and are usually not the targets you want to take out. It's usually best to concentrate on reducing numbers and leaving the harder targets till later on. A BP1 Ironcast hits as hard as a BP3 one after all.
When we reach level 4 these tokens do not despawn when the Ironcast wearing them is slain, instead they stay on the board and other Ironcast that move over them will don them. You have the ability to remove these armor tokens on the board if a knight is adjacent to the token and passes a 7+ might roll. As this is a free action it is important to think about how to position in order to get this roll because at the end of the Knight round if we have armor tokens on the board removing the last one from a space will cause the mob to Heal 1 and respawn a unit from the wound pile, the dead keep coming and they won't stop coming. Clean up those armor tokens at all costs.
Also at level 4 we get the Odd Spawn triggering from the second round onwards and this is why you have 10 Ironcast miniatures even though the BP total caps at 8. These freshly reassembled beasts are very threatening, but what is even worse is the result that happens if nothing can spawn. That triggers the Ironcast Routine and you do not want that to happen. Keep removing enough Ironcast from the board to avoid the Routine triggering.
This is on top of the Ironcast becoming harder to hit, more durable and dealing more damage (see the blue portions of the sheets, I won't go into these in detail because this is a standard part of all monster level progression) .
The Body Part Deck
We'll start with the BP deck for the Mob analysis because each of the BP cards represents a specific miniature on the clash board. It helps to know what each of the three tiers of BP cards contains because then you can memorise them and as you reveal given cards you'll know more precisely what the unrevealed ones are. Note that when I write about the numbers on these cards I'm going to refer strictly to their base numbers, these numbers are higher when the Ironcast are higher levels or have armor. So adjust their numbers upwards as appropriate.
Before we get into the cards, a common thread to watch out for on the Ironcast is how often their BP cards will trigger AI card draws, this is one of two elements that can really spiral Clashes out of control and that is why you need to be considered with your attacks, hitting something and not taking it out isn't good news in Mob Clashes, but it's even worse with this potential level of punishment. The last Knights attacking each cycle are in particular very vulnerable because the AI cards can then set them up for swarms.
BP Level 1
2x Armor Head (AT 4)
2x Bone-At-Arms (AT 3)
2x Bone Squire (AT 2)
Before we get into the three different cards, the first thing to note here is that if you are attacking any of these when they are all unrevealed you're aiming to have an attack that can hit that 4 Armor Threshold if possible because taking out Armorhead in a single blow really helps a lot. Also if you hit the Bone Squires scoring 4 power hits that Overcome 2+ threshold for the Power 1 token. So that is a good goal for opening against these guys.
The Squires are priority targets if you hit them and fail to take them out in the first hit, that accuracy reduction is worth taking off the board but also you get some information about unrevealed BP cards and getting to peek at those without revealing them and therefore suffer the “revealed BP punish” is huge. If you can't remember what you've peeked at I'd recommend taking notes or leaving the BP card face up but with some form of token on it to note that it is not revealed. This isn't a memory test game and KF is complicated enough without having to also remember known information. Also while we're on the subject of face up/down mob BP cards, if you know where a Man-At-Bones is you've got a card that on a critical can flip down some other troublesome mob BP card. It's not something you can lean on due to it being low chance, but the option is there if wounding hasn't worked out and you've got a knight out of position.
BP Level 2
1x Bone Knight (AT 6)
1x Chaplain of the Church (AT 5)
1x Damned Sergeant (AT 4)
2x Panzerdead (AT 4) – there is a difference between the two Panzerdead also, one has an Instinct reaction, the other has just a Wound reaction.
There is a bit more uncertainty when it comes to the BP 2 cards, going from 4 cards to 5 may not seem like a lot, but it has quite an impact on the odds. With BP 1, when we have zero information we can still know what the card is going to be with reasonable accuracy (33/33/33% of each card) this portion of the BP deck changes the odds to 40/20/20/20% with 1+ of them not appearing during set up (depending on level and Exhibition vs. Clash). We also have heavier punishments on the reactions, with failure being painful on almost every single one of these cards. We very much want to be aiming for 5 power minimum when we hit these because the Chaplain of the Church surviving the attack is an incredibly unpleasant experience due to that Heal 1 on Fail and the repeated Heal 1 at the end of the monster round. Additionally because of the Chaplain's threat of Heal and the Mindless Veteran's Escalation of both BP and AI card, we want to be smart about when we start hitting the Level 2 BPs. I ideally want to go after the BP 2 mobs when there is one unrevealed BP 1 Mob left on the Clash board because then if I hit the Veteran it isn't escalating a 2 into a 3.
The overcomes here are also a lot harder to achieve, we need a total of 7 power to get the Overcome for the Panzerdead and that climbs to 10 for the Bone Knight. Generally when I'm taking down these guys we're in the back half of the Clash and while Passion has naturally increased the overall force that the Knights can project, aiming for Overcomes here stops being a goal and instead becomes a nice bonus/consolation prize.
As Overcome has become hard to get, my goal is instead to go for attacks against BP 2 is aiming for power that should result in 5 or 6 power results. Setting this up in as best as possible during the end of the previous Knight's turn is very desirable because then if you hit the Chaplain and fail to secure the kill you've got the maximum amount of remaining Knights to try and secure the kill against that guy. I wouldn't go hitting an unrevealed BP 2 Ironcast unless the Chaplain has already been sent to the boneyard and isn't lurking hidden among the cards at the top of the Clash board. Heal X is a major threat in this Clash and working around it is very important, you don't have control over it, but I always hope that the Bone Squires reveal where the Chaplain is lurking in the BP 2 cards.
On the subject, don't forget to pay attention where that Chaplain ends up in the Wound deck, if it's the next returning respawn then you'll want to track where it is located because it returns face down. Not hitting this card which will result in it flippings and letting the Chaplain get to do its thing is a very important part of this Clash. Anything that the monsters can do to increase the length of Clashes in this game is not good news. Heal bad.
The Damned Sergeant is another one we want to deal with as soon as possible because it also has a persistent revealed effect, rather than healing it instead buffs the Gangup effect. It's behind the Chaplain in priority if they are both revealed but otherwise it needs to be sent off to the wound pile as soon as possible.
BP Level 3
1x Accursed Wanderer (AT 8)
1x Automail Smith (AT 7 + 1 Armor)
1x Heavy Enforcer (AT 7)
1x Ironcast Knight (AT 8)
1x Necronode (AT 7)
1x Plaguebearer (AT 6)
We have no duplicates at this stage and the Power goal for overcoming the AT is now 8. The honest truth is you often want to leave these guys face down until you've mopped up all the BP 1 and BP 2 mob cards you can if your power rolls aren't up to scratch yet. This is a general good rule to follow, but it applies especially here because there are “While this BP is revealed” effects on all of these that can really spiral a Clash out of control. The Necronode is the Chaplain of this BP level, so once again this is your priority target if revealed, however just about all of these demand removal if they are left revealed without being wounded.
There is a bonus in respect to tackling these cards though as like all Mob BP3 cards they represent double wounds. So if you're likely to be rolling an 8+ for your power roll then cracking one of these can result in a lot shorter Clash and that's always a good thing for the Knights, because we do have limited resources to expend while the Ironcast can effectively go on forever with the right combination of cards.
Also before we move onto the attack cards, a wish from me. I wish that an Ironcast Knight was one of the possible Knight choices for players, I'd love to play one of those and/or a Knight of the Fen that has gained sapience plus speech. I've got a thing for reformed bad guys and similar, they're always fun to play for me.
The AI Deck
We'll start with our Signature and Routine actions. Here's our Slash, which makes up half of the attacks the Ironcast will perform on their turn.
Signature cards are always good to take a closer look at because not only to they represent “the default active behaviour) but they also tend to offer some insight into the theme of the given boss. Also, quite often (such as here with the Ironcast) the signature is one of the two active behaviours that the mob will do each turn. If you look back at the Monster Sheet you can see that the Ironcast Dead will trigger an AI card and then the Signature card each round, which means we have perfect information on that attack because we know what mob number is going to perform it each round and therefore who the target is. We're also fortunate that they don't go Signature then AI, because that would have the Signature Gangup always trying to set up the AI card for Swarm damage.
We have a moderate number of attack dice in combination with a "low" (for a signature) level of accuracy and Gangup 3 as a set up. It is at this point worth exploring Gangup and its partner Swarm in order to get a good picture of what is happening. I'm going to paste an image of the Gangup entry from p 82 because it is a lot easier to understand with ITU's images.
Gangup is effectively a “push” that attempts to relocate a knight adjacent to another mob, there is another keyword that is similar in Herd X, but that is more of a drag. If you're having trouble visualising what is happening for the thematics, effectively the Ironcast is propelling the knight backwards before hurrying after it, you could imagine this as either a full contact push, or a shove plus follow up with momentum. For clean mechanics the Knight is moved first and then the Ironcast moves up afterwards.
The goal for the Ironcast here is to end up with the knight adjacent to 2+ Ironcast so they can then deploy the Swarm via BP reactions next turn. If you can keep the Ironcast split up enough that they end up short of that goal (like the images above) then that's great, though it can sometimes be difficult to achieve this due to the Knights being outnumbered. Gangup is most of the time exactly 3 spaces, there is one AI 3 card that goes as far as Gangup 4 as an exception, so bare that in mind if the AI deck has a BP 3 card on top.
The routines in this game tend to be major punishments for players letting them happen and Ironcast March exemplifies this while also providing our example for Swarm. We're getting Swarm 3 being triggered here multiple times and the knight may have 4 Ironcast surrounding it, that's a lot of pain. As noted above, do not let this happen via the Lifeless Army (L4+) trait, it will absolutely crush your knights.
Swarm's thematics have a different Ironcast(s) to the one playing the AI card deal the damage, the main way to avoid being hit by this is to not have the target end up being shoved into that adjacent space. However, given how many of the Mob BPs can trigger AI card plays, that's not something you always have control over.
Before we get into the AI deck, it is worth pointing out that sometimes the best move is to not attack. If you are the last Knight in the group to act and the AI deck has an AI 1 card on top with higher levels underneath it then one should not attack. It is better to skip a Knight turn in exchange for a softer AI card in just about all cases. Likewise if there is an AI 3 on top with lower levels underneath then swinging out may be worth it, however as we have identified above in the BP section, the Ironcast love to play extra AI cards during the Knight's turn so that is not as clear cut a situation.
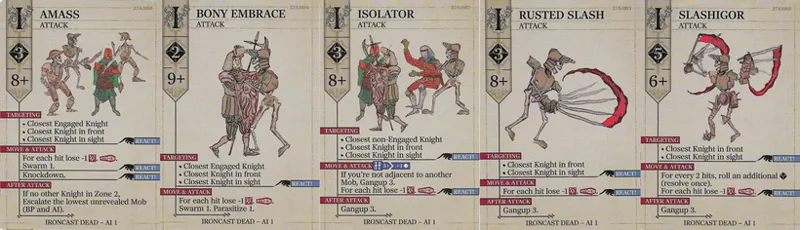
AI Level 1
1x Amass
1x Bony Embrace
1x Isolator
2x Rusted Slash
1x Slashigor
We've got six cards here, with two duplicate Rusted Slash and when we look at the targeting the only common element is that they pick the Closest Knight in Front. However there is a modifier and sometimes that is the Closest Engaged Knight instead and even one card cares about Closest non-Engaged Knight. That can make them feel chaotic, though if Isolator is already in the AI discard pile then at least you know that Closest non-Engaged Knight is safe from Tier 1 cards
Looking at Swarm vs. Gangup we have four cards that trigger gang up (with Isolator triggering Gangup 3 twice) and two with Swarm 1. The evasion target on these attacks is another thing we can be relatively confident on, with 4 of them being 8+ one of them being a 9+ and Slashigor being a 6+.
Slashigor is a card very much worth examining in smidge more detail than the rest, it's a “wild strikes” style of card that is very inaccurate but punishing if it connects. With each two hits causing another attack roll (just one round of extra attack rolls though thank goodness). This card is almost entirely pure damage though, with only a Gangup 3 as its crowd control aspect.
Amass is the second card worth paying attention to if it hasn't turned up yet. If there is no other Knight in Zone 2 of the attacking Ironcast we're going to suffer an escalation of both the AI deck and the lowest unrevealed Mob. Most situations you don't want that to happen, you can counteract this impact though by ensuring that your engaged knight nearest to the AI mob that is going to play the AI card for the round has company (what a mouthful of a sentence).
AI Level 2
1x Bones of The Kingdom
2x Flanking Strike
1x Ironcast Wall
1x Mindless Slasher
1x Swarmigor
Bones of the Kingdom is another Swarm card to think about during your turn, it is a little more tricky than some of the others because it can also result in Gangup 3 if the Closest Engaged Knight. This is something you have under control with preventative action. As always you know which Ironcast will be drawing the AI card for the turn, so if it is a Tier 2 AI card and you've not seen Bones of the Kingdom yet, you can place a Heat level 2 or lower Knight as the closest engaged (in sight) Knight for that particular mob.
Mindless Slasher is a harder hitting version of Slashigor, it has a lower starting attack dice amount, but it only needs 1 hit to trigger each additional attack dice and it's got both Parasitize and Choke as additional status conditions it inflicts.
Swarmigor, despite having the same naming convention as Slashigor isn't the evolution of the card, instead this is another Swarm plus set up card and it's very nasty if triggered by a BP reaction from your last attacking Knight because it has that Gangup 3 as an after attack trigger.
Overwhelm's main trick is that high amount of attack dice plus the automatic escalation punish, this makes it the scaled up version of Amass and the tools to mitigate this are the same as mentioned above. That is keep your knights somewhat close together and have the potential target for this card be supported by another knight close enough that they'll be in Zone 2 if this is the card that is drawn.
Finally we have two identical cards in Flanking Strike, these function like an upgraded Rusted Slash (AI L1) but now they are more accurate, have Swarm 1 and perform Knockback 3 instead of Gangup 3. Knockback is a bit more favourable for the Knights when compared to Gangup because it is less controlled, but these Flanking Strikes are nasty regardless when they are sat in the deck just below any AI card with Gangup due to having Swarm.
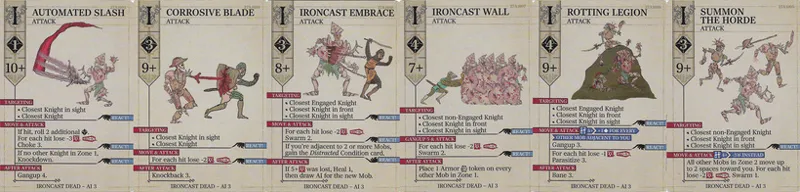
AI Level 3
1x Automated Slash
1x Corrosive Blade
1x Ironcast Embrace
1x Ironcast Wall
1x Rotting Legion
1x Summon the Horde
We always expect big, scary cards in the AI L3 cards and while the Ironcast dead are designed to be on the lower portion of the overall monster ladder these cards are no slouch for the portion of the game the Ironcast turn up in. These cards are all pulling the most dangerous tricks that the Ironcast have in their arsenal, there's lots of Swarm, Armor, Conditions and even a card that can trigger a Heal 1 and let the new Mob immediately act. So because each of these cards is so threatening we'll go through them all in detail.
Automated Slash is one of those cards that carries a lot of danger in a tight package. If the first dice hits (and it is base 10+ to evade, so it will hit without additional tools to help the Knight avoid it) then it'll pull two more dice out and attack with them. If you can get this to land on the right Knight, one with sufficient tools to avoid that first hit then the card's main threat is held back. However, if that isn't the case then we're looking at two more dice and each of these hits is -3 Vigor. That's 9 Vigor lost from one attack. It also has a the longest gangup at 4 and deploys Choke 3 (which makes it harder to avoid the high Heat punishment from other Ironcast AI Cards).
Corrosive Blade is frankly the card I want to see from this selection. It's the most basic of the bunch, dealing between 0 and 6 vigor damage and Knockback 3. That damage level is the lowest on any of these AI cards apart from Rotting Legion and that card has other things to worry about. There's not much more to cover here except that this is a nice example of the Ironcast's position as an introductory tier monster.
Ironcast Embrace is one of those cards that can absolutely set off the negative spiral in a Clash, that Heal 1 becomes harder and harder to avoid being triggered as the mob level climbs up and I've had it chain into the Necronode/Chaplain before which caused a real “emergency, all hands on deck” moment more than once.
I've mentioned Rotting Legion above, this card has a lower base damage of 1 vigor per hit, but the focus of this card is more on inflicting Parasitize and Bane, both of which can end a Knight very quickly if they are not prepared or built to handle it. The card is also another one of those which is brutal if you trigger it just before the Ironcast get to have their turn due to its set up nature with that Gangup. It doesn't hit vigor as hard as its fellow AI 3 colleagues, but it is very consistent at ensuring that Parasitize and Bane both connect on the Knight. How bad this is depends on your group, Young Stoneface has better tools than most to handle Bane for example.
Summon the Horde is our last card to look at. This one is both set up and pay off in the same card as it pulls those mobs in before attacking and triggering the Swarm 1. There's also a cheeky high heat punish where the hits go up to -3 Vigor each. I've found this card consistently awkward to deal with and the honest main goal is to not let the Clash drag on too much, which is kind of the bottom line for all Kingdoms Forlorn Clashes if we're honest.
The Strategy
The most common ways that this Clash can spiral out of control is via the AI Card draw triggers printed on the BP cards and the Healing mobs/AI cards. The second of these is somewhat easier to deal with, you know that those two mobs appear in the BP 2 and BP 3 cards so you can exercise caution about attacking them without other Knights as back up. The AI card draws though are a harder to control, not attacking is one way to ensure they do not happen, but this is a swarming horde style of enemy and not hitting them may feel counter intuitive (Plus at L4 we've got to make sure their numbers are kept low to avoid the Routine).
However, it is worth trying to hold in your head that despite being numerous, the Ironcast do not get more AI based attacks with more of them on the board (Routine excepted of course). They are at a consistent 1AI + 1S throughout these first four levels, the way that they instead leverage their numbers is via the Swarm mechanic rather than drawing more AI cards. So you can pace yourself and slow down your attacks, especially if the last Knight in the turn isn't going to be sure they can secure a kill, or is in position to be dragged away and ganked by an AI reaction followed by the normal AI card draw for the turn. This isn't an easy skill to learn, but one of the things that can very much assist is having weapons that need to be “reset” after an attack (so you hit very hard every other turn) or other supporting gear cards that offer alternatives for your turn instead of just attacking.
Another thing that stands out is positioning, the Ironcast seek to “divide and conquer” by using Gangup to pull the knights away from each other and then gank them with Swarm or punish their isolation with things like that Escalation. This makes the Clash something that can suddenly spiral out of control from “nowhere” but in truth you have a lot more control than you'd first realise.
I'm going to also share a tip here about how I learn/discover the way that bosses like to behave (via AI) in these games. That is by effectively letting the bosses do their thing against “training dummies”. Here I set up four knights with “infinite” vigor and have them do nothing while I watch the Ironcast do their thing. Without any form of resistance from player pieces this is how you can see the trends from the active behaviours (AI) and learn what positioning would be good. I then follow that up with a bit of letting the Knights move, but not attack, and see how positioning would help lessen the impact of the AI cards.
This is very similar to training against bosses in games like Monster Hunter or FromSoft games where if one goes in with no intention to attack and instead concentrate on lasting as long as possible you gradually internalise the signals that the boss makes for each of its attacks and learn the timing/positioning to avoid them. Board games do not have the reaction/real time element, but there are still things to learn, trends and hidden patterns in how these designs operate and this is very helpful, especially if you learn better by visualising or activity rather than just words.
Of course, when it comes to the BP part of the Clashes, that requires Knights hitting, so I tend to do that part “live” through natural play because it needs player input to trigger and simulating that doesn't help expose the “pattern of dance” that the bosses undertake as well. That's a large part of what makes these two deck monster designs so fascinating, single deck AI monsters just do their own thing and players have to adapt to that. Double deck (Active and Reactive behaviours) instead “dance” with the players and that increases the complexity of the entire thing in so many wonderful ways.
The Review
I'm going to end each of these encyclopaedia entries with a little review section where I can just go through how I feel about each of the monster designs in this game and perhaps rate them against each other. The Ironcast dead are solidly middle of the rankings for me, I find them to be rather overly complicated for the position they take in the game as what is an introductory monster. The gangup and swarm mechanics are the large part of why this is, I get what these mechics are seeking to do, but I would have liked them to be disabled when fighting the Level 1 Ironcast because it made learning the game quite a hump to get over.
When considering the potential Mob Tier options for the Principality of Stone including Wandering Monsters as well as the Principality specific ones I do like the Ironcast more than many others so I'm going to give them a rank of B- and they now provide the starting point I'll compare the others to. It's a good start, but I prefered learning the game against the Eggknight.
B Tier
Ironcast Dead
Comments (2)
+1 for the reference cards, these would be an amazing help 🙏
A real pleasure to read a thorough in depth article on a Kingdoms Forlorn monster. I think you've found a good format given the constraints inherent to this game. As for "If there is sufficient interest then I'll put together and release a full set of these reference cards for printing out" : count me in, this is an excellent idea. In ATO, I never felt the need for this sort of helpers, but in KF, definitely.