



Stellar Crossroads - Mining Tutorial
Overview:
The mining system within the game is intended to simulate the real-world process of prospecting for minerals. The success of a mining operation is largely dependent upon the mineral grade found within the ore mined. Not only is the quantity of the mineral in the desired ore dependent upon this grade, but also the value of the ore itself. Thus ore with twice the grade is four times as valuable. The grade is that percentage of the mined ore containing the desired element. In the cast of gold and diamond ores, parts per million (ppm) are used, due to the very low concentration of those elements.
As in the real world, there isn’t a magic mineral leading to financial fortune. For instance, gold mines with low grade often make a loss, whilst some of the most successful mining companies specialise in the relatively low value minerals of coal and iron. The key is usually the grade of the ore being mined. For successful gameplay, it is desirable to locate high grades of each ore type, such that you will have access to the required materials for your manufacturing facility.
Deposits of Iron and Coal are large and hence it is far easier to locate a good grade when surveying. Gold and Diamond deposits are not only small, but also at deep depths. For these you will ideally use an upgraded Phantom mining vessel with 700m maximum mining depth and 10 probes at your disposal.
I would suggest focussing initially on Coal and Iron before moving on to Sand, Copper and the Nickel. There is a more detailed ‘walk-though’ provided in the Processing Tutorial.
Gameplay Explanation:
The first thing to note about the mining mini game is that it is only intended that you go on a surveying trip about once per week. When you complete a surveying trip, Maive’s mining location will be set to that planet and mined mineral. She will return there each day to mine, until instructed to mine elsewhere. Whilst the grade at the mined location will drop off over time, it does so slowly. Without the time lost to probe a location, Maive will mine more metal from that location on days 2 and 3, than on the first day. If left there for an extended period, the grade will eventually drop off, such that the metal mined per day is significantly reduced.
To have her mine elsewhere you may survey an alternative location or change the destination to a location on another planet you have already surveyed (mine at existing location).
The first step after selecting your mining vessel is to determine which system you want engage in mining operations. The systems in the early game typically have lower grades than the new systems available after you advance the story. The exception to this is the Lavarian and Poldar worlds with contain iron and coal respectively. To gain access to these, you need to gain favour with those factions, through game decisions or via fulfilling contracts.
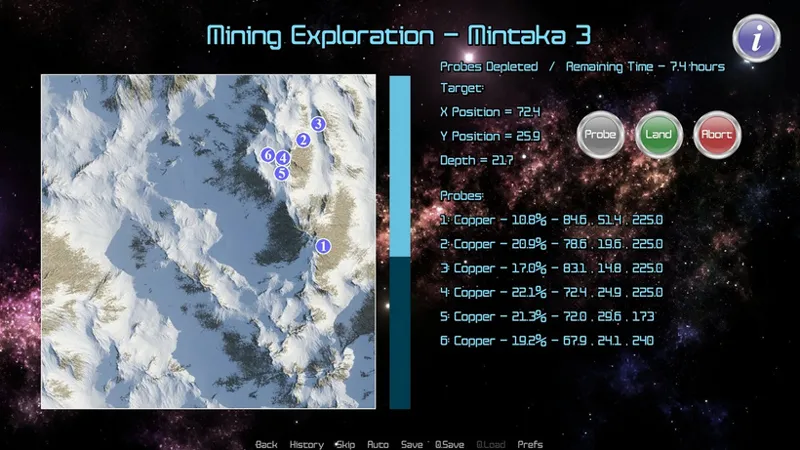
Following my selection of the Mintaka system, you will see that I have two worlds that I have already surveyed and a third containing copper. I may elect to send Maive to either of the two previous mining locations or I may elect to survey a new location on any of the planets. In this case I have elected to survey a location at Mintaka 3.
When selecting a planet, you should take note of the maximum possible grade available. Whilst you will never reach this grade, you are doing very well if you can get within say four-fifths of this grade. Thus any location where the grade is more than 20% would be considered very good.
The location of the resource hearts, maximum grade and size of the of the deposits are randomised every time you visit a planet. There is no ideal location at which to find materials, thus your results will be very different if you were to probe at the same locations I did below. The probe location is initially set to 50,50 and a depth halfway between the minimum and maximum mineral deposit heart depths. The mineral heart as I have termed it, is the centre of the deposit at which the grade is maximised. The further away from the heart in x, y and depth, the lower the grade will be. Each map randomises three of these hearts, each with their own location, grade and size. This creates some complexity in the overall three-dimensional grade map.
When you send a probe to a location data obtained will be reported in the lower right section of the screen. This uses the following format:
[Probe Number] [Mineral] – [grade] – [X position], [Y position], [Depth]
This provides a historical record, should you need to set probes in an alternative direction.
The initial probe location is a guess, as we don’t have any prior information to work from. It is however wise to stick with the initial mining depth initially. After my first probe returning a poor grade of 10.8%, I need to set my next probe at a location distant from the first. The second probe registering a high grade of 20.9% shows that the resource heart is likely close. Thus the third probe is set close by, however in this case in the wrong direction, as evident by a decrease in grade to 17.0%. Hence with the fourth probe I head in the opposite direction. The fifth and six probes I attempt to improve this grade by trying a couple of locations close by with alternative depths.
From the probe data I have obtained, I may then select the mining location at which mining operations will commence, by locating the target X, Y and depth and hitting the land button. I ended up choosing a location close to the probe 4 as the fifth and sixth probes were not particularly successful.
Above was the result of the mining trip that I made to Mintaka 3. The mining time of 7.4 hours is lower than the base 8 hours as I set 6 probes, consuming 6 minutes each. If I do not set an alternative location, Maive will return tomorrow and mine for the full 8 hours obtaining a 22.3% grade. If left alone, she will return on the third day mining for 8 hours obtaining a 21.2% grade (5% lower).
You will note that the Mule mining vessel above does not use the full hold capacity due to the mining depth of 217m. By upgrading the mining depth or mining rate of the vessel via talking with Krog in the workshop, the Ore yield may be increased from 240t. Alternatively you could employ the Phantom mining vessel to potentially increase the mined material.
Mining Ship Selection:
You may have two different ships that Maive can employ for mining operations. She will however only utilise one at a time. Each ship has their intended uses as below.
Mule – Jack-of-all-trades mining vessel allowing mining of a range of materials.
Sandgroper – High volume shallow miner specialised in Sand, Iron, Coal, Nickel.
Phantom – Deep mining vessel specialised in Gold, Diamond.
With release v0.4, you will be able to manufacture the ships above utilising minerals mined. Whilst you may purchase using credits in v0.3, you are better off waiting until the next release if you want to get maximum value.
You may upgrade the existing mining ships you own or assign an alternative ship to the mining hangar by visiting Krog in the workshop. Allocation of an additional mining ship to the hanger requires that you have one in your possession, either via procurement or by manufacturing. Note that should you sell a mining vessel (“X” button), the upgrades will be uninstalled and applied to a replacement ship, should it be of the same type. You will receive 50% of the ships sale value when selling via this method as it is essentially a used vessel.
Comments (1)
Thanks, but this is not the hardest part of the game nor the weakest. The battle system is.