We’ve now reached the final stage of the mission planning process: a refined fuel calculation, followed by a structured approach to "what if" thinking—anticipating what could go wrong and preparing tactical responses. These final steps transform your flight plan from a checklist into a resilient, adaptive combat strategy.
5. Refined fuel calculation
5.1 - Key Definitions
Even if you’re already familiar with these fuel planning terms, it’s essential to truly understand their implications. Each one connects directly to tactical decision points in flight.
5.1.1 - BINGO
Brevity: Prebriefed fuel state needed for recovery.
BINGO is your hard floor. It represents the minimum fuel needed to return safely to a pre-identified recovery location (usually your destination airfield), with all required margins included — such as statutory reserves.
However, BINGO is not a fixed number. It is tied to assumptions about:
Weather conditions (e.g., VFR vs. IFR at the alternate)
Recovery profile (e.g., low vs. high altitude)
If any of these conditions change, so does your BINGO. For example, if your alternate airfield becomes IFR mid-mission, and was originally calculated based on VFR conditions, you must adjust your BINGO upward.
Likewise, if your planned recovery was a low-level threat-avoidance route but you learn the threat is no longer present, you might revise BINGO downward to reflect a more efficient high-altitude return.
Though BINGO is typically calculated from the target area, it should be understood as a dynamic constraint that must be applied across your entire flight path. You don’t wait until the BINGO fuel level on target to make a decision — by then it may already be too late. You need to project and derive your BINGO-equivalent at earlier points (e.g., at push), to ensure the whole mission remains feasible.
Even Cougar froze up — and he was top of his class. When you’re low, below BINGO, and the pressure’s on, even the best can lose their edge...
This leads directly to another critical value: minimum push fuel — the minimum fuel required at the start of the combat phase to execute the mission and return with BINGO.
5.1.2 - JOKER
Brevity: Fuel state above BINGO at which separation, BUGOUT, or event termination should begin.
JOKER is a warning line rather than a hard limit. When you hit JOKER, it’s time to start making tactical decisions. It sits above BINGO and signals that you have enough fuel to complete the plan, but not to deviate much from it.
JOKER is especially useful for:
Ending a dogfight if you're not decisively offensive
Aborting a suppression or baiting tactic if a SAM hasn’t reacted
Deciding to skip a reattack in a CAS or strike mission
Recognizing that your last option to recommit is now behind you
If you're below JOKER, you may still continue with the mission as briefed — but your flexibility is over. If you're above it, you retain tactical options. It’s a crucial cognitive reference point.
Combat fuel is the fuel margin above BINGO, typically used for:
Loitering / waiting for other assets (SEAD, CAP, etc.)
Reacting to threats / engaging in air-to-air combat
Handling tactical deviations
In scripted strike profiles like Operation Bakwa Hammer, where timing and threat exposure are tightly constrained, you may plan for zero combat fuel — which simply means any deviation will result in an abort. That’s acceptable in certain cases, but must be clearly acknowledged.
Having combat fuel, even a modest amount, gives you the ability to adapt tactically. It’s the oxygen of decision-making.
5.2 - Fuel Calculation with Tools vs. Mental Estimate
There are essentially two ways to perform fuel calculations. One is good. The other is at least insufficient.
Let’s start with the one most pilots gravitate toward in the early stages of their planning journey.
5.2.1 - Using External Tools (The Wrong Way — If Used Alone)
Several tools are available for estimating mission fuel. One example is the AMVI DCS Mission Planner (DCSMP), which allows you to input aircraft configuration, speeds, altitudes, climb and descent profiles, weapon loads, etc... These tools are detailed and user-friendly, and they producepretty accurate results when used properly.
Let's take Operation Bakwa Hammer as a case study. After inputting the full mission profile into DCSMP — including all legs, altitudes, speeds, and timings — the tool tells us that the aircraft will need approximately 10,700 lbs of fuel to complete the mission, with a landing fuel of 2,200 lbs. Our configured total fuel load is 13,000 lbs, which gives us about 100 lbs of combat fuel.
DCSMP Fuel Planning for Operation Bakwa Hammer.
These numbers align perfectly with our expectations: the mission is tight but feasible, assuming no deviations. The same tool shows that we need 4,700 lbs from the target area back to base. This leads us to define a BINGO fuel at the target of 6,900 lbs — that is, 4,700 lbs to get home + 2,200 lbs at destination.
This all sounds excellent — and it is, to a point. But the major problem with these planning tools is simple: you do not carry them into the cockpit. They do not help you make real-time decisions...
Moreover, many aircraft — especially legacy platforms — do not have onboard systems that can perform any fuel forecasting. The FPAS (Fuel Prediction Advisory System) page in some modern jets, like the Hornet, helps — but it's limited. It only calculates based on your current flight conditions, not your planned future profile. It won’t tell you what it costs to loiter for 3 minutes at low level, or how much you'll burn in a climb and egress at combat speed.
So while tools like DCSMP are excellent for pre-mission fuel validation, they should never be your sole method of fuel planning. They are not a substitute for in-flight mental flexibility.
5.2.2 - Using Mental Calculations (The Right Way)
Mental fuel calculation is what separates serious pilots (and serious planners) from checklist-checkers. It is what allows you to adapt to evolving mission realities: threats, delays, ROLEX, changes in weather, system failures, combat damage, and more.
Real aircraft data for the F/A-18C can be found in the NATOPS. Note that the Fuel Flows (FF) are indicated in lbs/hour, while if find it more practical to use FF in lbs/min in real time.
It’s not complicated. In fact, it can be boiled down to a set of basic, easy-to-remember fuel flow values that you apply based on your flight profile and mission timing. One of the best quotes from the Cyclic Ops document says it clearly:
“There are only three speeds in a Navy fighter: Max Endurance, Max Range, Max Performance. Heed these profiles.”
Let’s apply this philosophy using the F/A-18C Hornet as our reference.
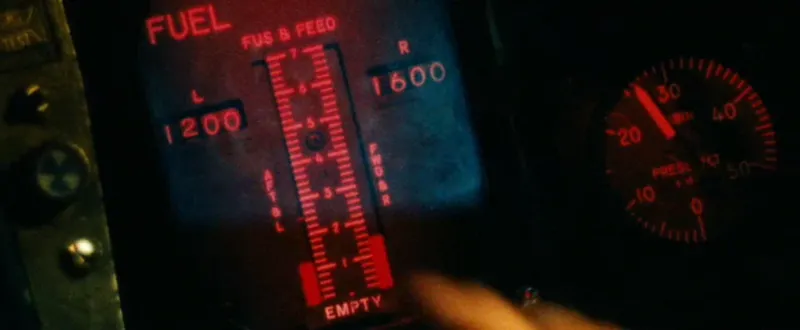
For Max Endurance flight — used when you’re trying to save every pound of fuel, typically in a holding pattern — your burn rate is around 1,200 lbs for 15 minutes (cf. the fuel ladder), or 80 lbs/min. If you’re heavier, especially early in the mission, round this up to 100 lbs/min for safety.
For Max Range, used in transits at cruise altitude, a conservative average is 100 lbs/min. This number can vary slightly with weight: increase it by 10% if you’re heavy (e.g., after takeoff with full tanks and weapons), or reduce it by 10% if you’re light (e.g., on egress with no ordnance).
Just remember: this Max Range number only applies when you’re established at cruise altitude. If you’re in a Low–High–Low profile, you can usually ignore climb fuel because your descent will roughly cancel it out. If you're in a Low–High–High, add about 500 lbs extra for the climb segment. That amount is typically enough to cover the difference in most situations, since heavier aircraft require lower climb altitudes to achieve best range anyway.
Now let’s talk about Combat fuel flow:
Low Level Combat Speed (540 KIAS): about 250 lbs/min
Medium Altitude Combat (0.89 Mach): about 200 lbs/min
High Altitude Combat (BUSTER, M0.90): around 150 lbs/min
Once again, apply a ±10% adjustment based on aircraft weight.
Now that we’ve got our five key numbers, it’s time to put them to work.
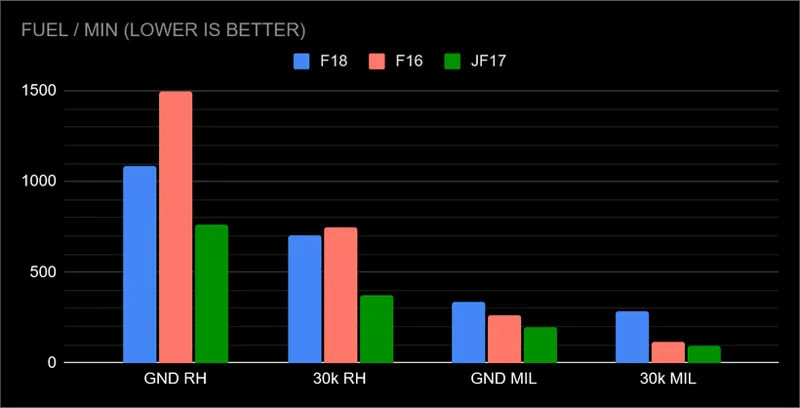
Examples of fuel flows for different aircraft in DCS world, for different situations. Source: Fly & Wire.
5.2.3 - Applying Mental Fuel Math to Bakwa Hammer
Let’s use our real mission timeline and build a complete picture.
Final track overview.
Timeline:
Takeoff: 07:52:00
Push: 08:07:30
Target: 08:20:00
Climb: 08:30:00
Landing: 08:55:00
Desired landing fuel: 2,200 lbs
Step 1: Calculate Return Leg (Target to Base)
Climb to base
Duration: 25 minutes at Max Range
Fuel: 25 × 100 = 2,500 lbs
Adjustment for light weight: –10% → 2,250 lbs
Add 2,200 lbs recovery fuel + 2,250 = 4,450 lbs required at climb point
Target to climb
Low level at combat speed: 10 minutes at 250 lbs/min = 2,500 lbs
Minus 10% for a light aircraft (no more weapons) = 2,250 lbs
Note: DCSMP gives us 6,900 lbs — we’re within 200 lbs of that figure.
Step 2: Push to Target Leg (12.5 minutes low-level)
Fuel: 12.5 × 250 = 3,125 lbs
Adjustment for heavier weight (pre-drop): +10% → 3,450 lbs
So minimum fuel at push = BINGO + attack leg = 6,700 + 3,450 = 10,150 lbs
Step 3: Pre-Push Transit (15 minutes at Max Range)
Fuel: 15 × 100 = 1,500 lbs
Adjustment for heavy weight: +10% → 1,650 lbs
Step 4: Taxi and Takeoff
Estimated at 1,000 lbs for a 10' taxi, Max. performance take-off, and initial climb
Final Total Fuel Requirement:
1,000 (T/O)
1,650 (transit to hold)
3,450 (ingress to target)
4,500 (egress post-target)
2,200 (landing) → 12,800 lbs
Aircraft load: 13,000 lbs → Combat Fuel: 200 lbs
Compare this with the 100 lbs estimated by DCSMP, and you see the power of this mental method: it’s fast, accurate, and responsive. You are no longer at the mercy of a spreadsheet...
Conclusion:
Pre-mission software helps validate your planning, but only mental math allows you to manage fuel in flight, under pressure, and in the face of uncertainty. Using just five fuel flow numbers and a little situational awareness, you can answer the most important question any pilot ever asks: Can I still make it home — if I do this next thing?
With our BINGO now validated, we’re in a position to define our JOKER and proceed to contingency planning.
As explained above, JOKER is not a guess or a buffer “just in case”; it’s a pre-planned fuel margin tied to a specific tactical option you may want to execute.
In the context of Operation Bakwa Hammer, a reattack is not part of the plan due to the high threat density around the runway. However, one realistic scenario is defending against an intercept from a MiG-29 patrol. If we get jumped at any point, we might want to go cold, extend, and wait to see if the bandit follows or disengages due to CAP pressure.
We estimate this defensive maneuver would last around 4 minutes at low level, which translates to about 1,000 lbs of fuel (250 lbs/min). That’s the fuel needed to stay alive, evade, and potentially recommit — or safely bug out.
So we build JOKER from BINGO plus this defensive margin: JOKER = BINGO + 1,000 lbs = 6,700 + 1,000 = 7,700 lbs
This means if we reach 7,700 lbs and haven’t started the attack, we should reassess. Proceeding below JOKER means there’s no more room for adaptation — just execution or abort.
It’s not a hard abort line, but it is a line that should trigger conscious decision-making. If nothing demands pressing forward, you might want to pull back. And if you’re still above it, you know you have at least one more tactical move available.
6. Contingency Planning: What Ifs
Now that we have a solid grasp of our fuel state — including BINGO, JOKER, and Combat Fuel — it’s time to address the second critical component of mission resilience: contingency planning. This is where we consider the events that could disrupt our plan and prepare for them in advance. It’s about building tactical flexibility before we need it, not in the middle of a crisis.
It may sound redundant, but it needs to be said: in our current configuration, we have almost no combat fuel. That single fact drives the entire tone of this section. We’ve built a mission that is tightly choreographed, with just enough fuel to complete it, assuming everything goes according to plan. This means that any deviation — even minor — could result in mission failure.
We have no fuel margin to detour around a long-range threat. We have no fuel margin to engage in a prolonged dogfight. We have no margin to delay in the hold while waiting for CAP support. We have no buffer to hold for weather or for a delayed reattack. This isn’t inherently bad — it's a valid and sometimes necessary constraint in combat aviation — but it must be understood and accounted for in our tactical thinking.
Let’s now explore the key "what if" scenarios and define how we can respond to each of them, even under these strict fuel limitations.
6.1 - What if the A/A CAP is late or missing entirely?
This is one of the most critical dependencies in our plan. If the enemy MiG-29s are in the area and our CAP (Enfield 41) is not yet on station, pushing into the target area is a major risk.
If we had taken a two-tank loadout instead of one — sacrificing two Mk-82SE bombs for extra fuel — we would have gained about 2,200 lbs of additional fuel, which translates into roughly 10 minutes at low-level combat speed or 20 minutes at Max Endurance. That margin would allow us to delay at the push point or hold under SAM coverage near Bastion, buying time for the CAP to arrive or for C2 to issue a ROLEX adjustment.
Without that fuel, however, our options shrink. One possibility is to accept the risk and push without A/A cover, assuming the CAP will catch up or the threat picture will resolve favorably. This is feasible only for aircraft with solid air-to-air radar and situational awareness — and for pilots who are comfortable defending autonomously. For less capable airframes or inexperienced crews, this is a significant gamble. Either way, the decision should be pre-briefed and made deliberately based on fuel state or SA.
6.2 - What if we get intercepted after the strike by MiG-29s?
This is another high-risk scenario, especially given that we’ll be at low altitude and potentially depleted on situational awareness after our attack run. We also that we will be low on fuel, since there's virtually no combat fuel.
If the MiGs commit aggressively, we must accept that a defensive fight could push us below BINGO, in which case we need to consider alternate recovery options like Camp Bastion.
This is where knowing our alternate options becomes critical. If we burn through fuel during a defensive maneuver, or if we have to divert around a threat and go long on timing, we may dip below our calculated BINGO to Kandahar.
Fortunately, Camp Bastion is much closer to the target area and provides a realistic divert option. If we plan for 2,200 lbs on final approach at Kandahar, but land at Bastion instead — which is only a 5-minute leg — we immediately gain about 2,000 lbs of usable fuel. That gives us extra freedom to engage, evade, or delay on the way out of the target area.
If we accept a reduced landing reserve (e.g., 500 lbs instead of 2,200 lbs) at Bastion, we gain another 1,700 lbs — a total of 3,700 lbs freed for combat operations or deviation. This becomes your absolute emergency option: in such a scenario, you can survive with a fuel state as low as BINGO – 3,700 lbs, and still recover the aircraft.
6.3 - What if I’m late for takeoff?
This is a simple but very real risk. Delays on the ground — due to traffic issues or system checks — may cause us to miss our planned push time or time on target (TOT).
First, we need to calculate our maximum acceptable delay based on the distance to the target and whether we can speed up to recover. If we have some time flexibility in the early transit leg, we may compensate by flying at a higher fuel burn rate or skipping a leg (like the dogleg or part of the hold).
If the delay becomes too great to recover the planned TOT, the correct procedure is to contact C2 and request a ROLEX. This time shift allows the rest of the strike package to adjust and maintain synchronization.
The success of a ROLEX depends on CAP availability, airspace sequencing, and overall strike window flexibility. It’s also worth asking: how long can Enfield 41 remain on station? If their window is tight, our ROLEX margin might be shorter than expected.
6.4 - What if one aircraft cannot release weapons?
This is a serious but manageable scenario, and one that should always be pre-briefed. If, for example, you have a weapon system failure and cannot pickle,you can imagine at least these two main courses of action.
First, the remaining shooter could still execute the attack, but switch to the primary DMPI. The non-shooter has two safe behavior options:
Avoid overflying the target entirely. Instead, break off at low level at least 5 NM east of the target, mask using terrain, and monitor for enemy SAM launches. After the attack, rejoin at a pre-briefed point (e.g., waypoint X, 15 NM away).
Alternatively, around 15 Nm the non-shooter can climb to 7,000 ft, just below clouds, remain east of the target area, and fly a beam profile against the SA-6. This exposes them to radar tracking and simulates a bait tactic. If the SAM launches, the aircraft defends by diving low and maneuvering, drawing fire off the striker.
In either case, the non-shooter supports the strike indirectly while minimizing risk.
6.5 - What if the SA-6 activates early, well before Farah?
If the SA-6 lights up on our RWR well before our expected engagement point — say, 40 NM out instead of 15 — we must assume the battery is repositioned. In that case, we should immediately deviate from the ingress by offsetting north of the expected route (away from the expected enemy CAP) and approaching the target from an alternate heading.
For instance, we might change the attack axis from 360° to 300°, knowing that it is one of the other acceptable attack headings. The attack can proceed if timing can be corrected, which is one of our first concerns after the defensive maneuvers have been performed.
6.6 - Other "What if"
Theoretically, the number of possible “what if” scenarios is endless. Anything that can go wrong — in systems, timelines, environment, or coordination — deserves at least brief consideration. In practice, however, your planning time is limited. You must focus your preparation on the most critical “what ifs”: those that are either highly likely, mission-killing, or extremely dangerous.
A good mental filter is to ask:
What’s most likely to go wrong?
What would be the most dangerous if it does?
6.6.1 - Mission Support Failures
One of the most standard and essential sets of “what ifs” revolves around the availability of supporting assets. You can plan your part of the mission perfectly, but if another unit does not show up — or shows up late — the plan could collapse.
No response from AWACS? He might be a bit preoccupied — like staying alive.
Examples include:
What if the CAP is not on station? Do you have enough fuel to wait at push? Can you push without A/A cover? What’s the fallback point if MiGs launch?
What if there is no SEAD? Should you proceed and accept the risk?
What if AWACS is not available or goes down mid-mission? How do you build situational awareness in a degraded environment? Can your own radar and RWR keep you safe?
What if AAR fails? This applies to extended-range missions. If the tanker doesn’t show, what’s your minimum offload? Can you execute a reduced profile? Where’s your divert?
These are not just theoretical — in a dynamic environment, any of these systems could be destroyed, or re-tasked at short notice.
6.6.2 - Environmental Degradation
While we often take good weather and systems for granted in simulators, they can and should be part of realistic planning.
What if the weather is worse than expected? What if I cannot find a place to dive to low level in VMC conditions? Where can I dive with instruments only? How low will I accept to descend to find the ground? What if I discover that there's a thunderstorm on target when I reach the IP?
What if the INS is degraded and your navigation is drifting? Can you revert to NAVAIDs or visual-only navigation? Do you have pre-planned waypoints based on terrain features?
What if the radar fails? Do you have back-up sensors? Which ones should be used in priority?
What if your weapon release system fails after IP? Will you continue as bait? Will your wingman switch DMPIs or is it too late? What’s your plan for aborting cleanly?
What if your radios are jammed ? Do you have pre-briefed lost comm plans (CHATTERMARK)? What’s your action if you cannot send DELOUSE?
What if GNSS signals are denied ? Can you still use your weapons?
Etc...
Conclusion: Plan, Then Prepare to Adapt
We’ve now reached the end of the planning phase. What began as a flight route and a target has evolved into a complete combat strategy — shaped by real-world constraints, refined by fuel logic, and stress-tested through structured “what if” thinking.
Your flight plan is now more than just a line on a map. It’s a living framework backed by data, contingency, and decision points. You know your fuel thresholds. You understand your timeline. You’ve mentally rehearsed what to do if the CAP is late, if the SAMs wake up early, if radios go silent, or if you end up flying solo. This level of preparation is what turns a sortie into a mission.
You won’t have time in the cockpit to invent new plans. You’ll fly the one you built — or you’ll rely on the options you’ve already imagined. In that sense, mission success doesn’t begin at takeoff. It begins in planning — and now, that planning is complete.
The next step is to translate all this work into something flyable.
In a final post, I’ll publish the Mission Data Card (MDC) and all supporting materials: a clear route overview, timing sheet, threat references, etc... With those tools, you'll be ready to step to the aircraft and fly Operation Bakwa Hammer with complete tactical awareness — and confidence in your choices.
Thank you so much for the analysis and planning work, it's fantastic! I've done the mission once and I ran out of fuel, it's really tight, isn't it? Especially when it comes to meeting the deadlines. Any advice?
G
Graveyard of Empires · December 11, 2025
Fly longer at higher altitude? More tanks, less bombs? Land at Camp Bastion? But agreed, it's very tight